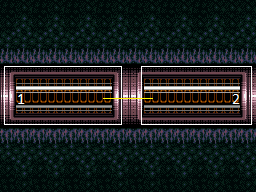
Crateria Tube
Room ID: 9
|
Exit condition: {
"leaveWithRunway": {
"length": 14,
"openEnd": 0
}
}
|
|
Requires: "h_canCrystalFlash" |
|
|
|
Entrance condition: {
"comeInShinecharging": {
"length": 13,
"openEnd": 0
}
}
Exit condition: {
"leaveShinecharged": {
"framesRemaining": 179
}
}
|
|
Entrance condition: {
"comeInShinecharged": {
"framesRequired": 50
}
}
Requires: "canShinechargeMovement" Exit condition: {
"leaveShinecharged": {
"framesRemaining": "auto"
}
}
|
|
Entrance condition: {
"comeInWithSpark": {}
}
Requires: {
"shinespark": {
"frames": 21
}
}
Exit condition: {
"leaveWithSpark": {}
}
|
|
Entrance condition: {
"comeInWithStoredFallSpeed": {
"fallSpeedInTiles": 1
}
}
Exit condition: {
"leaveWithStoredFallSpeed": {
"fallSpeedInTiles": 1
}
}
|
|
From: 1
Left Doorway
To: 2
Right Doorway
Entrance condition: {
"comeInWithStoredFallSpeed": {
"fallSpeedInTiles": 2
}
}
Exit condition: {
"leaveWithStoredFallSpeed": {
"fallSpeedInTiles": 2
}
}
|
|
From: 1
Left Doorway
To: 2
Right Doorway
Entrance condition: {
"comeInWithGMode": {
"mode": "any",
"morphed": false
}
}
Exit condition: {
"leaveWithGMode": {
"morphed": false
}
}
|
|
From: 1
Left Doorway
To: 2
Right Doorway
Entrance condition: {
"comeInWithGMode": {
"mode": "any",
"morphed": true
}
}
Exit condition: {
"leaveWithGMode": {
"morphed": true
}
}
|
|
Entrance condition: {
"comeInWithGrappleTeleport": {
"blockPositions": [
[
12,
12
],
[
12,
13
]
]
}
}
Bypasses door shell: true |
|
From: 1
Left Doorway
To: 2
Right Doorway
Entrance condition: {
"comeInWithGrappleTeleport": {
"blockPositions": [
[
12,
12
]
]
}
}
Exit condition: {
"leaveWithGrappleTeleport": {
"blockPositions": [
[
12,
12
]
]
}
}
Bypasses door shell: true |
|
From: 1
Left Doorway
To: 2
Right Doorway
Entrance condition: {
"comeInWithGrappleTeleport": {
"blockPositions": [
[
12,
13
]
]
}
}
Exit condition: {
"leaveWithGrappleTeleport": {
"blockPositions": [
[
12,
13
]
]
}
}
Bypasses door shell: true |
|
|
|
Entrance condition: {
"comeInShinecharging": {
"length": 13,
"openEnd": 0
}
}
Exit condition: {
"leaveShinecharged": {
"framesRemaining": 179
}
}
|
|
Entrance condition: {
"comeInShinecharged": {
"framesRequired": 50
}
}
Requires: "canShinechargeMovement" Exit condition: {
"leaveShinecharged": {
"framesRemaining": "auto"
}
}
|
|
Entrance condition: {
"comeInWithSpark": {}
}
Requires: {
"shinespark": {
"frames": 21
}
}
Exit condition: {
"leaveWithSpark": {}
}
|
|
Entrance condition: {
"comeInWithStoredFallSpeed": {
"fallSpeedInTiles": 1
}
}
Exit condition: {
"leaveWithStoredFallSpeed": {
"fallSpeedInTiles": 1
}
}
|
|
From: 2
Right Doorway
To: 1
Left Doorway
Entrance condition: {
"comeInWithStoredFallSpeed": {
"fallSpeedInTiles": 2
}
}
Exit condition: {
"leaveWithStoredFallSpeed": {
"fallSpeedInTiles": 2
}
}
|
|
From: 2
Right Doorway
To: 1
Left Doorway
Entrance condition: {
"comeInWithGMode": {
"mode": "any",
"morphed": false
}
}
Exit condition: {
"leaveWithGMode": {
"morphed": false
}
}
|
|
From: 2
Right Doorway
To: 1
Left Doorway
Entrance condition: {
"comeInWithGMode": {
"mode": "any",
"morphed": true
}
}
Exit condition: {
"leaveWithGMode": {
"morphed": true
}
}
|
|
Entrance condition: {
"comeInWithGrappleTeleport": {
"blockPositions": [
[
3,
12
],
[
3,
13
]
]
}
}
Bypasses door shell: true |
|
From: 2
Right Doorway
To: 1
Left Doorway
Entrance condition: {
"comeInWithGrappleTeleport": {
"blockPositions": [
[
3,
12
]
]
}
}
Exit condition: {
"leaveWithGrappleTeleport": {
"blockPositions": [
[
3,
12
]
]
}
}
Bypasses door shell: true |
|
From: 2
Right Doorway
To: 1
Left Doorway
Entrance condition: {
"comeInWithGrappleTeleport": {
"blockPositions": [
[
3,
13
]
]
}
}
Exit condition: {
"leaveWithGrappleTeleport": {
"blockPositions": [
[
3,
13
]
]
}
}
Bypasses door shell: true |
|
Exit condition: {
"leaveWithRunway": {
"length": 14,
"openEnd": 0
}
}
|
{
"$schema": "../../../schema/m3-room.schema.json",
"id": 9,
"name": "Crateria Tube",
"area": "Crateria",
"subarea": "Central",
"playable": true,
"roomAddress": "0x795D4",
"roomEnvironments": [
{
"heated": false
}
],
"nodes": [
{
"id": 1,
"name": "Left Doorway",
"nodeType": "door",
"nodeSubType": "doorway",
"nodeAddress": "0x0018ac6",
"doorEnvironments": [
{
"physics": "air"
}
]
},
{
"id": 2,
"name": "Right Doorway",
"nodeType": "door",
"nodeSubType": "doorway",
"nodeAddress": "0x0018ad2",
"doorEnvironments": [
{
"physics": "air"
}
]
}
],
"enemies": [],
"links": [
{
"from": 1,
"to": [
{
"id": 1
},
{
"id": 2
}
]
},
{
"from": 2,
"to": [
{
"id": 1
},
{
"id": 2
}
]
}
],
"strats": [
{
"link": [
1,
1
],
"name": "Leave with Runway",
"requires": [],
"exitCondition": {
"leaveWithRunway": {
"length": 14,
"openEnd": 0
}
}
},
{
"link": [
1,
1
],
"name": "Crystal Flash",
"requires": [
"h_canCrystalFlash"
]
},
{
"link": [
1,
2
],
"name": "Base",
"requires": []
},
{
"link": [
1,
2
],
"name": "Leave Shinecharged",
"entranceCondition": {
"comeInShinecharging": {
"length": 13,
"openEnd": 0
}
},
"requires": [],
"exitCondition": {
"leaveShinecharged": {
"framesRemaining": 179
}
},
"devNote": "FIXME: Add 3 room shinecharges."
},
{
"link": [
1,
2
],
"name": "Carry Shinecharge",
"entranceCondition": {
"comeInShinecharged": {
"framesRequired": 50
}
},
"requires": [
"canShinechargeMovement"
],
"exitCondition": {
"leaveShinecharged": {
"framesRemaining": "auto"
}
}
},
{
"link": [
1,
2
],
"name": "Spark Through Tunnel",
"entranceCondition": {
"comeInWithSpark": {}
},
"requires": [
{
  "shinespark": {
    "frames": 21
  }
}
],
"exitCondition": {
"leaveWithSpark": {}
}
},
{
"link": [
1,
2
],
"name": "Transition with Stored Fall Speed",
"entranceCondition": {
"comeInWithStoredFallSpeed": {
"fallSpeedInTiles": 1
}
},
"requires": [],
"exitCondition": {
"leaveWithStoredFallSpeed": {
"fallSpeedInTiles": 1
}
}
},
{
"link": [
1,
2
],
"name": "Transition with Stored Fall Speed (more speed)",
"entranceCondition": {
"comeInWithStoredFallSpeed": {
"fallSpeedInTiles": 2
}
},
"requires": [],
"exitCondition": {
"leaveWithStoredFallSpeed": {
"fallSpeedInTiles": 2
}
}
},
{
"link": [
1,
2
],
"name": "Carry G-Mode Through Tube (Left to Right)",
"notable": false,
"entranceCondition": {
"comeInWithGMode": {
"mode": "any",
"morphed": false
}
},
"requires": [],
"exitCondition": {
"leaveWithGMode": {
"morphed": false
}
}
},
{
"link": [
1,
2
],
"name": "Carry G-Mode Morph Through Tube (Left to Right)",
"notable": false,
"entranceCondition": {
"comeInWithGMode": {
"mode": "any",
"morphed": true
}
},
"requires": [],
"exitCondition": {
"leaveWithGMode": {
"morphed": true
}
}
},
{
"link": [
1,
2
],
"name": "Grapple Teleport",
"entranceCondition": {
"comeInWithGrappleTeleport": {
"blockPositions": [
[
12,
12
],
[
12,
13
]
]
}
},
"requires": [],
"bypassesDoorShell": true
},
{
"link": [
1,
2
],
"name": "Carry Grapple Teleport (Top Position)",
"entranceCondition": {
"comeInWithGrappleTeleport": {
"blockPositions": [
[
12,
12
]
]
}
},
"requires": [],
"bypassesDoorShell": true,
"exitCondition": {
"leaveWithGrappleTeleport": {
"blockPositions": [
[
12,
12
]
]
}
}
},
{
"link": [
1,
2
],
"name": "Carry Grapple Teleport (Bottom Position)",
"entranceCondition": {
"comeInWithGrappleTeleport": {
"blockPositions": [
[
12,
13
]
]
}
},
"requires": [],
"bypassesDoorShell": true,
"exitCondition": {
"leaveWithGrappleTeleport": {
"blockPositions": [
[
12,
13
]
]
}
}
},
{
"link": [
2,
1
],
"name": "Base",
"requires": []
},
{
"link": [
2,
1
],
"name": "Leave Shinecharged",
"entranceCondition": {
"comeInShinecharging": {
"length": 13,
"openEnd": 0
}
},
"requires": [],
"exitCondition": {
"leaveShinecharged": {
"framesRemaining": 179
}
},
"devNote": "FIXME: Add 3 room shinecharges."
},
{
"link": [
2,
1
],
"name": "Carry Shinecharge",
"entranceCondition": {
"comeInShinecharged": {
"framesRequired": 50
}
},
"requires": [
"canShinechargeMovement"
],
"exitCondition": {
"leaveShinecharged": {
"framesRemaining": "auto"
}
}
},
{
"link": [
2,
1
],
"name": "Spark Through Tunnel",
"entranceCondition": {
"comeInWithSpark": {}
},
"requires": [
{
  "shinespark": {
    "frames": 21
  }
}
],
"exitCondition": {
"leaveWithSpark": {}
}
},
{
"link": [
2,
1
],
"name": "Transition with Stored Fall Speed",
"entranceCondition": {
"comeInWithStoredFallSpeed": {
"fallSpeedInTiles": 1
}
},
"requires": [],
"exitCondition": {
"leaveWithStoredFallSpeed": {
"fallSpeedInTiles": 1
}
}
},
{
"link": [
2,
1
],
"name": "Transition with Stored Fall Speed (more speed)",
"entranceCondition": {
"comeInWithStoredFallSpeed": {
"fallSpeedInTiles": 2
}
},
"requires": [],
"exitCondition": {
"leaveWithStoredFallSpeed": {
"fallSpeedInTiles": 2
}
}
},
{
"link": [
2,
1
],
"name": "Carry G-Mode Through Tube (Right to Left)",
"notable": false,
"entranceCondition": {
"comeInWithGMode": {
"mode": "any",
"morphed": false
}
},
"requires": [],
"exitCondition": {
"leaveWithGMode": {
"morphed": false
}
}
},
{
"link": [
2,
1
],
"name": "Carry G-Mode Morph Through Tube (Right to Left)",
"notable": false,
"entranceCondition": {
"comeInWithGMode": {
"mode": "any",
"morphed": true
}
},
"requires": [],
"exitCondition": {
"leaveWithGMode": {
"morphed": true
}
}
},
{
"link": [
2,
1
],
"name": "Grapple Teleport",
"entranceCondition": {
"comeInWithGrappleTeleport": {
"blockPositions": [
[
3,
12
],
[
3,
13
]
]
}
},
"requires": [],
"bypassesDoorShell": true
},
{
"link": [
2,
1
],
"name": "Carry Grapple Teleport (Top Position)",
"entranceCondition": {
"comeInWithGrappleTeleport": {
"blockPositions": [
[
3,
12
]
]
}
},
"requires": [],
"bypassesDoorShell": true,
"exitCondition": {
"leaveWithGrappleTeleport": {
"blockPositions": [
[
3,
12
]
]
}
}
},
{
"link": [
2,
1
],
"name": "Carry Grapple Teleport (Bottom Position)",
"entranceCondition": {
"comeInWithGrappleTeleport": {
"blockPositions": [
[
3,
13
]
]
}
},
"requires": [],
"bypassesDoorShell": true,
"exitCondition": {
"leaveWithGrappleTeleport": {
"blockPositions": [
[
3,
13
]
]
}
}
},
{
"link": [
2,
2
],
"name": "Leave with Runway",
"requires": [],
"exitCondition": {
"leaveWithRunway": {
"length": 14,
"openEnd": 0
}
}
}
]
}