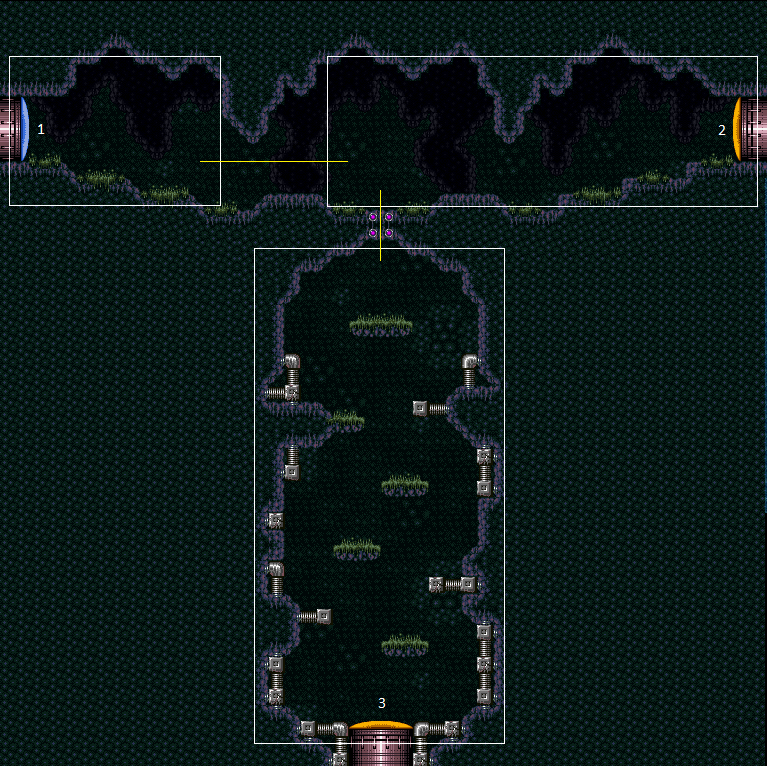
Crateria Kihunter Room
Room ID: 24
|
Exit condition: {
"leaveWithRunway": {
"length": 34,
"openEnd": 0,
"steepUpTiles": 5,
"steepDownTiles": 2
}
}
|
|
From: 1
Left Door
To: 1
Left Door
Exit condition: {
"leaveWithGModeSetup": {}
}
|
|
Requires: {
"enemyDamage": {
"enemy": "Kihunter (green)",
"type": "contact",
"hits": 1
}
}
|
|
|
|
|
|
Entrance condition: {
"comeInWithGrappleTeleport": {
"blockPositions": [
[
3,
12
],
[
3,
13
]
]
}
}
Bypasses door shell: true |
|
From: 2
Right Door
To: 1
Left Door
Entrance condition: {
"comeInWithGrappleTeleport": {
"blockPositions": [
[
3,
12
]
]
}
}
Exit condition: {
"leaveWithGrappleTeleport": {
"blockPositions": [
[
3,
12
]
]
}
}
Bypasses door shell: true |
|
From: 2
Right Door
To: 1
Left Door
Entrance condition: {
"comeInWithGrappleTeleport": {
"blockPositions": [
[
3,
13
]
]
}
}
Exit condition: {
"leaveWithGrappleTeleport": {
"blockPositions": [
[
3,
13
]
]
}
}
Bypasses door shell: true |
|
Exit the previous room with Samus in a standing pose (while grappled). After teleporting, press right to release Grapple while staying standing (not being forced into a crouch). Then X-ray climb to get up to the door transition, without needing to open the door. Entrance condition: {
"comeInWithGrappleTeleport": {
"blockPositions": [
[
2,
18
],
[
2,
19
],
[
2,
28
],
[
2,
29
],
[
2,
34
]
]
}
}
Requires: "canXRayClimb" Bypasses door shell: true |
|
Exit condition: {
"leaveWithRunway": {
"length": 4,
"openEnd": 1
}
}
|
|
Requires: "canShinechargeMovement"
{
"canShineCharge": {
"usedTiles": 33,
"openEnd": 0,
"steepUpTiles": 2,
"steepDownTiles": 5
}
}
Exit condition: {
"leaveShinecharged": {
"framesRemaining": 65
}
}
|
|
Requires: {
"resetRoom": {
"nodes": [
1,
2,
3
],
"mustStayPut": false
}
}
{
"refill": [
"Energy",
"PowerBomb"
]
}
|
|
From: 2
Right Door
To: 2
Right Door
Exit condition: {
"leaveWithGModeSetup": {}
}
|
|
Requires: {
"enemyDamage": {
"enemy": "Kihunter (green)",
"type": "contact",
"hits": 1
}
}
|
|
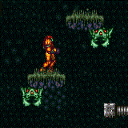
Jump and aim down to lower the camera to see where the crabs are. Alternatively use a Power Bomb to kill them or risk tanking a hit. Requires: {
"or": [
"canCameraManip",
"h_canUsePowerBombs",
{
"enemyDamage": {
"enemy": "Sciser",
"type": "contact",
"hits": 1
}
}
]
}
|
|
|
|
Exit condition: {
"leaveNormally": {}
}
|
|
From: 3
Bottom Door
To: 3
Bottom Door
Notable: true 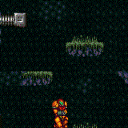
Freeze the two Scisers to set up a moonfall between them, and aim down. Hold left to move to the right at the correct time, which will set up an automatic turn-around, allowing Samus to clip past the floating platform below, past the door shell, and through the transition. The amount of speed required is highly precise. Requires: "canEnemyStuckMoonfall" "canTrickyUseFrozenEnemies" Bypasses door shell: true |
|
Enter on the right side of the doorway to reduce the amount of energy used. Entrance condition: {
"comeInWithSpark": {},
"comesThroughToilet": "any"
}
Requires: {
"shinespark": {
"frames": 2,
"excessFrames": 2
}
}
|
|
Requires: "h_canCrystalFlash" |
|
From: 3
Bottom Door
To: 3
Bottom Door
Run from the ledge into the open doorway while hitting the frozen Crab as it thaws and the door transition simultaneously. Note that this requires a pixel perfect freeze, a small pixel starting window, and has tight timing. It then has a 50% success rate due to collision oscillation. Requires: "canWallIceClip"
"canDownwardGModeSetup"
{
"ammo": {
"type": "Super",
"count": 1
}
}
Exit condition: {
"leaveWithGModeSetup": {}
}
|
{
"$schema": "../../../schema/m3-room.schema.json",
"id": 24,
"name": "Crateria Kihunter Room",
"area": "Crateria",
"subarea": "East",
"playable": true,
"roomAddress": "0x7948C",
"roomEnvironments": [
{
"heated": false
}
],
"nodes": [
{
"id": 1,
"name": "Left Door",
"nodeType": "door",
"nodeSubType": "blue",
"nodeAddress": "0x0018a2a",
"doorEnvironments": [
{
"physics": "air"
}
]
},
{
"id": 2,
"name": "Right Door",
"nodeType": "door",
"nodeSubType": "yellow",
"nodeAddress": "0x0018a36",
"doorEnvironments": [
{
"physics": "air"
}
],
"locks": [
{
"name": "Crateria Kihunter Room Right Yellow Lock (to Moat)",
"lockType": "coloredDoor",
"unlockStrats": [
{
"name": "Base",
"notable": false,
"requires": [
"h_canOpenYellowDoors"
]
}
]
}
]
},
{
"id": 3,
"name": "Bottom Door",
"nodeType": "door",
"nodeSubType": "yellow",
"nodeAddress": "0x0018a42",
"doorEnvironments": [
{
"physics": "air"
}
],
"locks": [
{
"name": "Crateria Kihunter Room Bottom Yellow Lock (to Elevator)",
"lockType": "coloredDoor",
"unlockStrats": [
{
"name": "Base",
"notable": false,
"requires": [
"h_canOpenYellowDoors"
]
}
]
}
]
}
],
"enemies": [
{
"id": "e1",
"groupName": "Crateria Kihunters",
"enemyName": "Kihunter (green)",
"quantity": 2,
"homeNodes": [
1,
2
]
},
{
"id": "e2",
"groupName": "Crateria Kihunter Room Scisers",
"enemyName": "Sciser",
"quantity": 2,
"homeNodes": [
3
]
}
],
"links": [
{
"from": 1,
"to": [
{
"id": 1
},
{
"id": 2
}
]
},
{
"from": 2,
"to": [
{
"id": 1
},
{
"id": 2
},
{
"id": 3
}
]
},
{
"from": 3,
"to": [
{
"id": 2
},
{
"id": 3
}
]
}
],
"strats": [
{
"link": [
1,
1
],
"name": "Leave with Runway",
"requires": [],
"exitCondition": {
"leaveWithRunway": {
"length": 34,
"openEnd": 0,
"steepUpTiles": 5,
"steepDownTiles": 2
}
}
},
{
"link": [
1,
1
],
"name": "G-Mode Setup - Get Hit by Kihunter",
"notable": false,
"requires": [],
"exitCondition": {
"leaveWithGModeSetup": {}
}
},
{
"link": [
1,
1
],
"name": "G-Mode Regain Mobility",
"requires": [
{
  "enemyDamage": {
    "enemy": "Kihunter (green)",
    "type": "contact",
    "hits": 1
  }
}
],
"gModeRegainMobility": {}
},
{
"link": [
1,
2
],
"name": "Base",
"requires": []
},
{
"link": [
2,
1
],
"name": "Base",
"requires": []
},
{
"link": [
2,
1
],
"name": "Grapple Teleport",
"entranceCondition": {
"comeInWithGrappleTeleport": {
"blockPositions": [
[
3,
12
],
[
3,
13
]
]
}
},
"requires": [],
"bypassesDoorShell": true
},
{
"link": [
2,
1
],
"name": "Carry Grapple Teleport (Top Position)",
"entranceCondition": {
"comeInWithGrappleTeleport": {
"blockPositions": [
[
3,
12
]
]
}
},
"requires": [],
"bypassesDoorShell": true,
"exitCondition": {
"leaveWithGrappleTeleport": {
"blockPositions": [
[
3,
12
]
]
}
}
},
{
"link": [
2,
1
],
"name": "Carry Grapple Teleport (Bottom Position)",
"entranceCondition": {
"comeInWithGrappleTeleport": {
"blockPositions": [
[
3,
13
]
]
}
},
"requires": [],
"bypassesDoorShell": true,
"exitCondition": {
"leaveWithGrappleTeleport": {
"blockPositions": [
[
3,
13
]
]
}
}
},
{
"link": [
2,
1
],
"name": "Grapple Teleport X-Ray Climb",
"entranceCondition": {
"comeInWithGrappleTeleport": {
"blockPositions": [
[
2,
18
],
[
2,
19
],
[
2,
28
],
[
2,
29
],
[
2,
34
]
]
}
},
"requires": [
"canXRayClimb"
],
"bypassesDoorShell": true,
"note": [
"Exit the previous room with Samus in a standing pose (while grappled).",
"After teleporting, press right to release Grapple while staying standing (not being forced into a crouch).",
"Then X-ray climb to get up to the door transition, without needing to open the door."
]
},
{
"link": [
2,
2
],
"name": "Leave with Runway",
"requires": [],
"exitCondition": {
"leaveWithRunway": {
"length": 4,
"openEnd": 1
}
}
},
{
"link": [
2,
2
],
"name": "Leave Shinecharged",
"requires": [
"canShinechargeMovement",
{
"canShineCharge": {
"usedTiles": 33,
"openEnd": 0,
"steepUpTiles": 2,
"steepDownTiles": 5
}
}
],
"exitCondition": {
"leaveShinecharged": {
"framesRemaining": 65
}
}
},
{
"link": [
2,
2
],
"name": "Sciser Farm",
"requires": [
{
"resetRoom": {
"nodes": [
1,
2,
3
],
"mustStayPut": false
}
},
{
"refill": [
"Energy",
"PowerBomb"
]
}
]
},
{
"link": [
2,
2
],
"name": "G-Mode Setup - Get Hit by Kihunter",
"notable": false,
"requires": [],
"exitCondition": {
"leaveWithGModeSetup": {}
}
},
{
"link": [
2,
2
],
"name": "G-Mode Regain Mobility",
"requires": [
{
  "enemyDamage": {
    "enemy": "Kihunter (green)",
    "type": "contact",
    "hits": 1
  }
}
],
"gModeRegainMobility": {}
},
{
"link": [
2,
3
],
"name": "Base",
"requires": [
{
  "or": [
    "canCameraManip",
    "h_canUsePowerBombs",
    {
      "enemyDamage": {
        "enemy": "Sciser",
        "type": "contact",
        "hits": 1
      }
    }
  ]
}
],
"note": [
"Jump and aim down to lower the camera to see where the crabs are.",
"Alternatively use a Power Bomb to kill them or risk tanking a hit."
]
},
{
"link": [
3,
2
],
"name": "Base",
"requires": []
},
{
"link": [
3,
3
],
"name": "Leave Normally",
"exitCondition": {
"leaveNormally": {}
},
"requires": []
},
{
"link": [
3,
3
],
"name": "Crateria Kihunter Room Ice Moonfall Door Lock Skip",
"notable": true,
"requires": [
"canEnemyStuckMoonfall",
"canTrickyUseFrozenEnemies"
],
"bypassesDoorShell": true,
"note": [
"Freeze the two Scisers to set up a moonfall between them, and aim down.",
"Hold left to move to the right at the correct time, which will set up an automatic turn-around, allowing Samus to clip past the floating platform below, past the door shell, and through the transition.",
"The amount of speed required is highly precise."
]
},
{
"link": [
3,
3
],
"name": "Shinespark",
"entranceCondition": {
"comeInWithSpark": {},
"comesThroughToilet": "any"
},
"requires": [
{
  "shinespark": {
    "frames": 2,
    "excessFrames": 2
  }
}
],
"note": "Enter on the right side of the doorway to reduce the amount of energy used.",
"devNote": "This strat is not useful in-room, but can satisfy a strat in the room before with an exit shinespark."
},
{
"link": [
3,
3
],
"name": "Crystal Flash",
"requires": [
"h_canCrystalFlash"
]
},
{
"link": [
3,
3
],
"name": "G-Mode Setup - Get Hit by Thawing Sciser",
"notable": false,
"requires": [
"canWallIceClip",
"canDownwardGModeSetup",
{
"ammo": {
"type": "Super",
"count": 1
}
}
],
"exitCondition": {
"leaveWithGModeSetup": {}
},
"note": [
"Run from the ledge into the open doorway while hitting the frozen Crab as it thaws and the door transition simultaneously.",
"Note that this requires a pixel perfect freeze, a small pixel starting window, and has tight timing. It then has a 50% success rate due to collision oscillation."
]
}
]
}