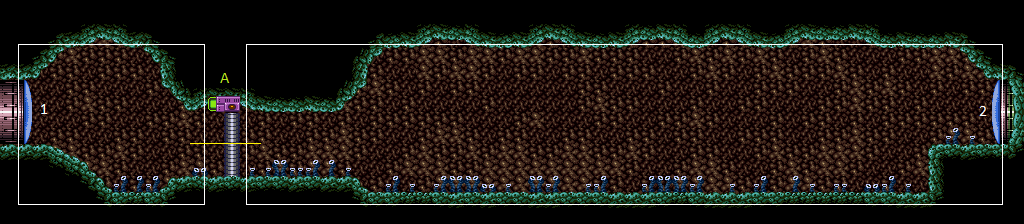
Crab Tunnel
Room ID: 176
|
Exit condition: {
"leaveWithRunway": {
"length": 13,
"gentleUpTiles": 2,
"steepUpTiles": 2,
"steepDownTiles": 1,
"openEnd": 0
}
}
|
|
Requires: {
"or": [
{
"obstaclesCleared": [
"A"
]
},
{
"ammo": {
"type": "Super",
"count": 1
}
}
]
}
Exit condition: {
"leaveWithRunway": {
"length": 45,
"openEnd": 1
}
}
|
|
From: 1
Left Door
To: 1
Left Door
Entrance condition: {
"comeInRunning": {
"speedBooster": true,
"minTiles": 2
}
}
Requires: "canSuitlessMaridia"
"canShinechargeMovementComplex"
"canStutterWaterShineCharge"
{
"shinespark": {
"frames": 3
}
}
Exit condition: {
"leaveWithSpark": {}
}
|
|
From: 1
Left Door
To: 1
Left Door
Entrance condition: {
"comeInRunning": {
"speedBooster": true,
"minTiles": 2
}
}
Requires: "canSuitlessMaridia" "canShinechargeMovementTricky" "canStutterWaterShineCharge" Exit condition: {
"leaveShinecharged": {
"framesRemaining": 10
}
}
|
|
Requires: "h_canNavigateUnderwater"
{
"resetRoom": {
"nodes": [
1
],
"mustStayPut": false
}
}
{
"refill": [
"PowerBomb"
]
}
|
|
Requires: "h_canCrystalFlash" |
|
Exit condition: {
"leaveWithGModeSetup": {}
}
|
|
Requires: {
"enemyDamage": {
"enemy": "Sciser",
"type": "contact",
"hits": 1
}
}
|
|
Requires: {
"or": [
{
"ammo": {
"type": "Super",
"count": 1
}
},
{
"obstaclesCleared": [
"A"
]
}
]
}
Clears obstacles: A |
|
The gate will not spawn in indirect g-mode, and can be freely passed. Entrance condition: {
"comeInWithGMode": {
"mode": "indirect",
"morphed": false
}
}
|
|
From: 1
Left Door
To: 2
Right Door
Notable: true 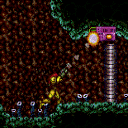
Requires a very precise stutter where Samus is moving slow enough while near the gate, so she can shoot it and it is fully open before she collides with it. A runway in the adjacent room of 2 tiles works best - with a longer runway, Samus will be moving too fast. Entrance condition: {
"comeInRunning": {
"speedBooster": true,
"minTiles": 1.4375
}
}
Requires: "canSuitlessMaridia"
"canShinechargeMovementComplex"
"canStutterWaterShineCharge"
"canDodgeWhileShooting"
{
"ammo": {
"type": "Super",
"count": 1
}
}
Exit condition: {
"leaveShinecharged": {
"framesRemaining": 70
}
}
|
|
Samus will teleport inside of the gate, causing it to open. Entrance condition: {
"comeInWithGrappleTeleport": {
"blockPositions": [
[
12,
12
],
[
12,
13
]
]
}
}
Clears obstacles: A |
|
Requires: {
"or": [
"h_canGreenGateGlitch",
{
"obstaclesCleared": [
"A"
]
}
]
}
Clears obstacles: A |
|
The gate will not spawn in indirect g-mode, and can be freely passed. Entrance condition: {
"comeInWithGMode": {
"mode": "indirect",
"morphed": false
}
}
|
|
Entrance condition: {
"comeInWithGrappleTeleport": {
"blockPositions": [
[
5,
3
],
[
7,
2
]
]
}
}
|
|
Entrance condition: {
"comeInWithGrappleTeleport": {
"blockPositions": [
[
3,
12
],
[
3,
13
]
]
}
}
Bypasses door shell: true |
|
Entrance condition: {
"comeInWithGrappleTeleport": {
"blockPositions": [
[
3,
12
]
]
}
}
Exit condition: {
"leaveWithGrappleTeleport": {
"blockPositions": [
[
3,
12
]
]
}
}
Bypasses door shell: true |
|
Entrance condition: {
"comeInWithGrappleTeleport": {
"blockPositions": [
[
3,
13
]
]
}
}
Exit condition: {
"leaveWithGrappleTeleport": {
"blockPositions": [
[
3,
13
]
]
}
}
Bypasses door shell: true |
|
Exit condition: {
"leaveWithRunway": {
"length": 5,
"openEnd": 1
}
}
|
|
Requires: "h_canFrozenEnemyRunway" Exit condition: {
"leaveWithRunway": {
"length": 6,
"openEnd": 1
}
}
|
|
Requires: "h_canNavigateUnderwater"
{
"resetRoom": {
"nodes": [
2
],
"mustStayPut": false
}
}
{
"refill": [
"Energy",
"PowerBomb"
]
}
|
|
Requires: "h_canCrystalFlash" |
|
Requires: "Gravity"
"canShinechargeMovement"
{
"canShineCharge": {
"usedTiles": 33,
"openEnd": 2
}
}
Exit condition: {
"leaveShinecharged": {
"framesRemaining": 120
}
}
|
|
Exit condition: {
"leaveWithGModeSetup": {}
}
|
|
Requires: {
"enemyDamage": {
"enemy": "Sciser",
"type": "contact",
"hits": 1
}
}
|
{
"$schema": "../../../schema/m3-room.schema.json",
"id": 176,
"name": "Crab Tunnel",
"area": "Maridia",
"subarea": "Outer",
"playable": true,
"roomAddress": "0x7D08A",
"roomEnvironments": [
{
"heated": false
}
],
"nodes": [
{
"id": 1,
"name": "Left Door",
"nodeType": "door",
"nodeSubType": "blue",
"nodeAddress": "0x001a414",
"doorEnvironments": [
{
"physics": "water"
}
]
},
{
"id": 2,
"name": "Right Door",
"nodeType": "door",
"nodeSubType": "blue",
"nodeAddress": "0x001a420",
"doorEnvironments": [
{
"physics": "water"
}
]
}
],
"obstacles": [
{
"id": "A",
"obstacleType": "inanimate",
"name": "Green Gate"
}
],
"enemies": [
{
"id": "e1",
"groupName": "Crab Tunnel Left Sciser",
"enemyName": "Sciser",
"quantity": 1,
"homeNodes": [
1
]
},
{
"id": "e2",
"groupName": "Crab Tunnel Right Scisers",
"enemyName": "Sciser",
"quantity": 5,
"homeNodes": [
2
]
}
],
"links": [
{
"from": 1,
"to": [
{
"id": 1
},
{
"id": 2
}
]
},
{
"from": 2,
"to": [
{
"id": 1
},
{
"id": 2
}
]
}
],
"strats": [
{
"link": [
1,
1
],
"name": "Leave with Runway",
"requires": [],
"exitCondition": {
"leaveWithRunway": {
"length": 13,
"gentleUpTiles": 2,
"steepUpTiles": 2,
"steepDownTiles": 1,
"openEnd": 0
}
}
},
{
"link": [
1,
1
],
"name": "Leave with Runway (Open Gate)",
"requires": [
{
  "or": [
    {
      "obstaclesCleared": [
        "A"
      ]
    },
    {
      "ammo": {
        "type": "Super",
        "count": 1
      }
    }
  ]
}
],
"exitCondition": {
"leaveWithRunway": {
"length": 45,
"openEnd": 1
}
}
},
{
"link": [
1,
1
],
"name": "Suitless Stutter Shinecharge, Shinespark Return",
"entranceCondition": {
"comeInRunning": {
"speedBooster": true,
"minTiles": 2
}
},
"requires": [
"canSuitlessMaridia",
"canShinechargeMovementComplex",
"canStutterWaterShineCharge",
{
"shinespark": {
"frames": 3
}
}
],
"exitCondition": {
"leaveWithSpark": {}
},
"unlocksDoors": [
{
"types": [
"super"
],
"requires": []
},
{
"types": [
"missiles",
"powerbomb"
],
"requires": [
"never"
]
}
]
},
{
"link": [
1,
1
],
"name": "Suitless Stutter Shinecharge, Return Shinecharged",
"entranceCondition": {
"comeInRunning": {
"speedBooster": true,
"minTiles": 2
}
},
"requires": [
"canSuitlessMaridia",
"canShinechargeMovementTricky",
"canStutterWaterShineCharge"
],
"exitCondition": {
"leaveShinecharged": {
"framesRemaining": 10
}
},
"unlocksDoors": [
{
"types": [
"super"
],
"requires": []
},
{
"types": [
"missiles",
"powerbomb"
],
"requires": [
"never"
]
}
]
},
{
"link": [
1,
1
],
"name": "Sciser Farm",
"requires": [
"h_canNavigateUnderwater",
{
"resetRoom": {
"nodes": [
1
],
"mustStayPut": false
}
},
{
"refill": [
"PowerBomb"
]
}
]
},
{
"link": [
1,
1
],
"name": "Crystal Flash",
"requires": [
"h_canCrystalFlash"
]
},
{
"link": [
1,
1
],
"name": "G-Mode Setup - Get Hit By Sciser",
"notable": false,
"requires": [],
"exitCondition": {
"leaveWithGModeSetup": {}
}
},
{
"link": [
1,
1
],
"name": "G-Mode Regain Mobility",
"requires": [
{
  "enemyDamage": {
    "enemy": "Sciser",
    "type": "contact",
    "hits": 1
  }
}
],
"gModeRegainMobility": {}
},
{
"link": [
1,
2
],
"name": "Base",
"requires": [
{
  "or": [
    {
      "ammo": {
        "type": "Super",
        "count": 1
      }
    },
    {
      "obstaclesCleared": [
        "A"
      ]
    }
  ]
}
],
"clearsObstacles": [
"A"
]
},
{
"link": [
1,
2
],
"name": "Indirect G-Mode Gate Despawn",
"entranceCondition": {
"comeInWithGMode": {
"mode": "indirect",
"morphed": false
}
},
"requires": [],
"note": "The gate will not spawn in indirect g-mode, and can be freely passed."
},
{
"link": [
1,
2
],
"name": "Crab Tunnel Stutter Shinecharge Through The Gate",
"notable": true,
"entranceCondition": {
"comeInRunning": {
"speedBooster": true,
"minTiles": 1.4375
}
},
"requires": [
"canSuitlessMaridia",
"canShinechargeMovementComplex",
"canStutterWaterShineCharge",
"canDodgeWhileShooting",
{
"ammo": {
"type": "Super",
"count": 1
}
}
],
"exitCondition": {
"leaveShinecharged": {
"framesRemaining": 70
}
},
"unlocksDoors": [
{
"types": [
"super"
],
"requires": []
},
{
"types": [
"missiles",
"powerbomb"
],
"requires": [
"never"
]
}
],
"note": [
"Requires a very precise stutter where Samus is moving slow enough while near the gate, so she can shoot it and it is fully open before she collides with it.",
"A runway in the adjacent room of 2 tiles works best - with a longer runway, Samus will be moving too fast."
]
},
{
"link": [
1,
2
],
"name": "Grapple Teleport",
"entranceCondition": {
"comeInWithGrappleTeleport": {
"blockPositions": [
[
12,
12
],
[
12,
13
]
]
}
},
"requires": [],
"clearsObstacles": [
"A"
],
"note": [
"Samus will teleport inside of the gate, causing it to open."
]
},
{
"link": [
2,
1
],
"name": "Green Gate Glitch",
"requires": [
{
  "or": [
    "h_canGreenGateGlitch",
    {
      "obstaclesCleared": [
        "A"
      ]
    }
  ]
}
],
"clearsObstacles": [
"A"
]
},
{
"link": [
2,
1
],
"name": "Indirect G-Mode Gate Despawn",
"entranceCondition": {
"comeInWithGMode": {
"mode": "indirect",
"morphed": false
}
},
"requires": [],
"note": "The gate will not spawn in indirect g-mode, and can be freely passed."
},
{
"link": [
2,
1
],
"name": "Grapple Teleport",
"entranceCondition": {
"comeInWithGrappleTeleport": {
"blockPositions": [
[
5,
3
],
[
7,
2
]
]
}
},
"requires": []
},
{
"link": [
2,
1
],
"name": "Grapple Teleport Door Lock Skip",
"entranceCondition": {
"comeInWithGrappleTeleport": {
"blockPositions": [
[
3,
12
],
[
3,
13
]
]
}
},
"requires": [],
"bypassesDoorShell": true
},
{
"link": [
2,
1
],
"name": "Carry Grapple Teleport (Top Position)",
"entranceCondition": {
"comeInWithGrappleTeleport": {
"blockPositions": [
[
3,
12
]
]
}
},
"requires": [],
"bypassesDoorShell": true,
"exitCondition": {
"leaveWithGrappleTeleport": {
"blockPositions": [
[
3,
12
]
]
}
}
},
{
"link": [
2,
1
],
"name": "Carry Grapple Teleport (Bottom Position)",
"entranceCondition": {
"comeInWithGrappleTeleport": {
"blockPositions": [
[
3,
13
]
]
}
},
"requires": [],
"bypassesDoorShell": true,
"exitCondition": {
"leaveWithGrappleTeleport": {
"blockPositions": [
[
3,
13
]
]
}
}
},
{
"link": [
2,
2
],
"name": "Leave with Runway",
"requires": [],
"exitCondition": {
"leaveWithRunway": {
"length": 5,
"openEnd": 1
}
}
},
{
"link": [
2,
2
],
"name": "Leave With Runway - Frozen Sciser",
"requires": [
"h_canFrozenEnemyRunway"
],
"exitCondition": {
"leaveWithRunway": {
"length": 6,
"openEnd": 1
}
}
},
{
"link": [
2,
2
],
"name": "Sciser Farm",
"requires": [
"h_canNavigateUnderwater",
{
"resetRoom": {
"nodes": [
2
],
"mustStayPut": false
}
},
{
"refill": [
"Energy",
"PowerBomb"
]
}
]
},
{
"link": [
2,
2
],
"name": "Crystal Flash",
"requires": [
"h_canCrystalFlash"
]
},
{
"link": [
2,
2
],
"name": "Leave Shinecharged",
"requires": [
"Gravity",
"canShinechargeMovement",
{
"canShineCharge": {
"usedTiles": 33,
"openEnd": 2
}
}
],
"exitCondition": {
"leaveShinecharged": {
"framesRemaining": 120
}
}
},
{
"link": [
2,
2
],
"name": "G-Mode Setup - Get Hit By Sciser",
"notable": false,
"requires": [],
"exitCondition": {
"leaveWithGModeSetup": {}
}
},
{
"link": [
2,
2
],
"name": "G-Mode Regain Mobility",
"requires": [
{
  "enemyDamage": {
    "enemy": "Sciser",
    "type": "contact",
    "hits": 1
  }
}
],
"gModeRegainMobility": {}
}
]
}