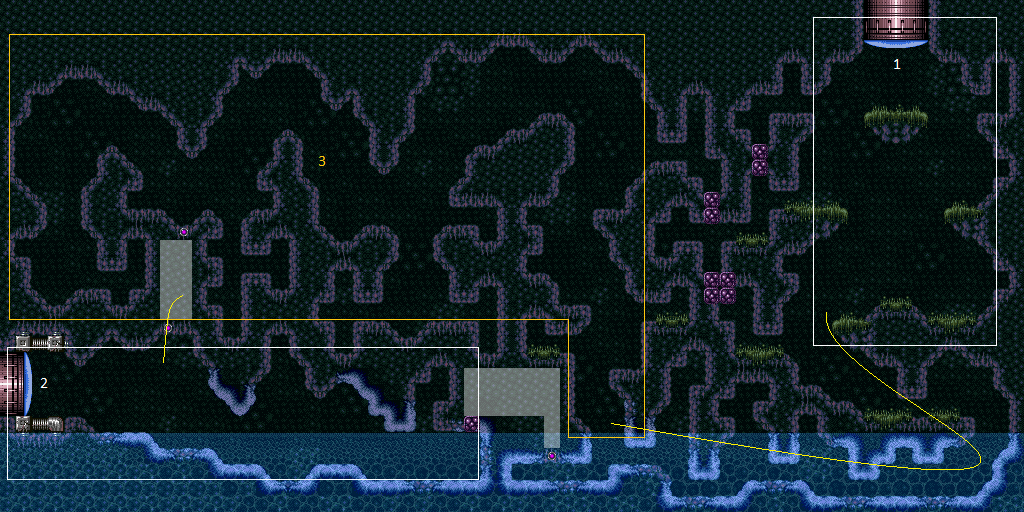
Crab Maze
Room ID: 36
|
Shoot a Super as a Sciser crawls near the top door, then freeze it mid-air and use it to clip up past the door shell. If you don't have Morph and X-Ray, you must shoot the Super while the Sciser is on the slope near the door, not on the door itself. Requires: {
"ammo": {
"type": "Super",
"count": 1
}
}
"canTrickyUseFrozenEnemies"
"h_canNonTrivialCeilingClip"
Bypasses door shell: true |
|
Requires: {
"resetRoom": {
"nodes": [
1
],
"mustStayPut": false
}
}
{
"refill": [
"Energy",
"PowerBomb"
]
}
|
|
Requires: "h_canCrystalFlash" |
|
Exit condition: {
"leaveWithDoorFrameBelow": {
"height": 2
}
}
|
|
Exit condition: {
"leaveWithPlatformBelow": {
"height": 6,
"leftPosition": -2.5,
"rightPosition": 2.5
}
}
|
|
The nearby Global crab can be used to exit on the left side of the door. Exiting on the right will require travelling the Morph maze to find a local crab or two. Requires: "canUpwardGModeSetup" "canTrickyUseFrozenEnemies" "h_canUseSpringBall" "canBePatient" Exit condition: {
"leaveWithGModeSetup": {}
}
|
|
Requires: {
"enemyDamage": {
"enemy": "Sciser",
"type": "contact",
"hits": 1
}
}
|
|
Requires: "Morph" |
|
Without Springball or Gravity, it is possible to overload PLMs with the crumble blocks with bombs. Take the first left above the waterline. Place bombs in the single tile nook on the left. Entrance condition: {
"comeInWithGMode": {
"mode": "any",
"morphed": true
},
"comesThroughToilet": "any"
}
Requires: {
"or": [
"h_canArtificialMorphSpringBall",
{
"and": [
"h_canArtificialMorphBombThings",
"Gravity"
]
},
"h_canArtificialMorphIBJ"
]
}
|
|
Place bombs at the far right, next to the low underwater ceiling. To safely bomb the fast crab, wait just left of the crack on the floor where it falls. Entrance condition: {
"comeInWithGMode": {
"mode": "any",
"morphed": true
}
}
Requires: {
"or": [
{
"and": [
"Gravity",
"h_canArtificialMorphIBJ"
]
},
{
"and": [
"h_canArtificialMorphSpringBall",
"HiJump",
"h_canArtificialMorphBombs"
]
}
]
}
|
|
Exit condition: {
"leaveWithRunway": {
"length": 8,
"openEnd": 0,
"steepUpTiles": 1
}
}
|
|
Exit condition: {
"leaveWithRunway": {
"length": 29,
"openEnd": 0,
"steepUpTiles": 5,
"steepDownTiles": 1
}
}
|
|
Requires: {
"resetRoom": {
"nodes": [
2
],
"mustStayPut": false
}
}
{
"refill": [
"Energy",
"PowerBomb"
]
}
|
|
Exit condition: {
"leaveWithGModeSetup": {}
}
|
|
Requires: {
"or": [
"canCarefulJump",
"canUseFrozenEnemies",
"SpaceJump",
{
"and": [
"Gravity",
{
"or": [
"HiJump",
"canWalljump",
"h_canCrouchJumpDownGrab",
"h_canIBJ",
"canSpringBallJumpMidAir"
]
}
]
}
]
}
|
|
Requires: "Morph" |
|
|
{
"$schema": "../../../schema/m3-room.schema.json",
"id": 36,
"name": "Crab Maze",
"area": "Crateria",
"subarea": "East",
"playable": true,
"roomAddress": "0x7957D",
"roomEnvironments": [
{
"heated": false
}
],
"nodes": [
{
"id": 1,
"name": "Top Door",
"nodeType": "door",
"nodeSubType": "blue",
"nodeAddress": "0x0018a96",
"doorEnvironments": [
{
"physics": "air"
}
]
},
{
"id": 2,
"name": "Left Door",
"nodeType": "door",
"nodeSubType": "blue",
"nodeAddress": "0x0018aae",
"doorEnvironments": [
{
"physics": "air"
}
]
},
{
"id": 3,
"name": "Crab Maze Middle Junction",
"nodeType": "junction",
"nodeSubType": "junction"
}
],
"enemies": [
{
"id": "e1",
"groupName": "Crab Maze Top Right Sciser",
"enemyName": "Sciser",
"quantity": 1,
"homeNodes": [
1
]
},
{
"id": "e2",
"groupName": "Crab Maze Bottom Left Scisers",
"enemyName": "Sciser",
"quantity": 3,
"homeNodes": [
2
]
},
{
"id": "e3",
"groupName": "Crab Maze Top Left Scisers",
"enemyName": "Sciser",
"quantity": 4,
"homeNodes": [
3
]
}
],
"links": [
{
"from": 1,
"to": [
{
"id": 1
},
{
"id": 3
}
]
},
{
"from": 2,
"to": [
{
"id": 1
},
{
"id": 2
},
{
"id": 3
}
]
},
{
"from": 3,
"to": [
{
"id": 1
},
{
"id": 2
}
]
}
],
"strats": [
{
"link": [
1,
1
],
"name": "Sciser Ice Clip Door Lock Skip",
"requires": [
{
"ammo": {
"type": "Super",
"count": 1
}
},
"canTrickyUseFrozenEnemies",
"h_canNonTrivialCeilingClip"
],
"bypassesDoorShell": true,
"note": [
"Shoot a Super as a Sciser crawls near the top door, then freeze it mid-air and use it to clip up past the door shell.",
"If you don't have Morph and X-Ray, you must shoot the Super while the Sciser is on the slope near the door, not on the door itself."
]
},
{
"link": [
1,
1
],
"name": "Sciser Farm",
"requires": [
{
"resetRoom": {
"nodes": [
1
],
"mustStayPut": false
}
},
{
"refill": [
"Energy",
"PowerBomb"
]
}
]
},
{
"link": [
1,
1
],
"name": "Crystal Flash",
"requires": [
"h_canCrystalFlash"
]
},
{
"link": [
1,
1
],
"name": "Leave With Door Frame Below",
"requires": [],
"exitCondition": {
"leaveWithDoorFrameBelow": {
"height": 2
}
}
},
{
"link": [
1,
1
],
"name": "Leave With Platform Below",
"requires": [],
"exitCondition": {
"leaveWithPlatformBelow": {
"height": 6,
"leftPosition": -2.5,
"rightPosition": 2.5
}
}
},
{
"link": [
1,
1
],
"name": "G-Mode Setup - Frozen Sciser",
"notable": false,
"requires": [
"canUpwardGModeSetup",
"canTrickyUseFrozenEnemies",
"h_canUseSpringBall",
"canBePatient"
],
"exitCondition": {
"leaveWithGModeSetup": {}
},
"note": [
"The nearby Global crab can be used to exit on the left side of the door.",
"Exiting on the right will require travelling the Morph maze to find a local crab or two."
],
"devNote": [
"There is a Morphless way to jump on the crab with aim down but it feels too precise to include.",
"Global Crab (left side) takes 40 seconds, local crab (Right side) is 180. Finding two left side crabs to use together is faster."
]
},
{
"link": [
1,
1
],
"name": "G-Mode Regain Mobility",
"requires": [
{
  "enemyDamage": {
    "enemy": "Sciser",
    "type": "contact",
    "hits": 1
  }
}
],
"gModeRegainMobility": {}
},
{
"link": [
1,
3
],
"name": "Base",
"requires": [
"Morph"
]
},
{
"link": [
1,
3
],
"name": "G-Mode Morph",
"entranceCondition": {
"comeInWithGMode": {
"mode": "any",
"morphed": true
},
"comesThroughToilet": "any"
},
"requires": [
{
  "or": [
    "h_canArtificialMorphSpringBall",
    {
      "and": [
        "h_canArtificialMorphBombThings",
        "Gravity"
      ]
    },
    "h_canArtificialMorphIBJ"
  ]
}
],
"note": [
"Without Springball or Gravity, it is possible to overload PLMs with the crumble blocks with bombs.",
"Take the first left above the waterline. Place bombs in the single tile nook on the left."
]
},
{
"link": [
2,
1
],
"name": "G-Mode Morph to overload Crumble Block Plms",
"entranceCondition": {
"comeInWithGMode": {
"mode": "any",
"morphed": true
}
},
"requires": [
{
  "or": [
    {
      "and": [
        "Gravity",
        "h_canArtificialMorphIBJ"
      ]
    },
    {
      "and": [
        "h_canArtificialMorphSpringBall",
        "HiJump",
        "h_canArtificialMorphBombs"
      ]
    }
  ]
}
],
"note": [
"Place bombs at the far right, next to the low underwater ceiling.",
"To safely bomb the fast crab, wait just left of the crack on the floor where it falls."
]
},
{
"link": [
2,
2
],
"name": "Leave with Runway",
"requires": [],
"exitCondition": {
"leaveWithRunway": {
"length": 8,
"openEnd": 0,
"steepUpTiles": 1
}
},
"devNote": "Because the next tile is a slope into the water, it behaves like no open end."
},
{
"link": [
2,
2
],
"name": "Leave with Runway, With Gravity",
"requires": [],
"exitCondition": {
"leaveWithRunway": {
"length": 29,
"openEnd": 0,
"steepUpTiles": 5,
"steepDownTiles": 1
}
}
},
{
"link": [
2,
2
],
"name": "Sciser Farm",
"requires": [
{
"resetRoom": {
"nodes": [
2
],
"mustStayPut": false
}
},
{
"refill": [
"Energy",
"PowerBomb"
]
}
]
},
{
"link": [
2,
2
],
"name": "G-Mode Setup - Getting hit by Sciser",
"notable": false,
"requires": [],
"exitCondition": {
"leaveWithGModeSetup": {}
}
},
{
"link": [
2,
3
],
"name": "Base",
"requires": [
{
  "or": [
    "canCarefulJump",
    "canUseFrozenEnemies",
    "SpaceJump",
    {
      "and": [
        "Gravity",
        {
          "or": [
            "HiJump",
            "canWalljump",
            "h_canCrouchJumpDownGrab",
            "h_canIBJ",
            "canSpringBallJumpMidAir"
          ]
        }
      ]
    }
  ]
}
]
},
{
"link": [
3,
1
],
"name": "Base",
"requires": [
"Morph"
]
},
{
"link": [
3,
2
],
"name": "Base",
"requires": []
}
]
}