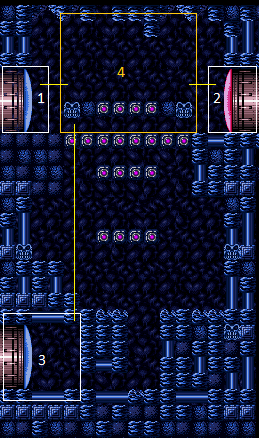
Construction Zone
Room ID: 39
|
Exit condition: {
"leaveWithRunway": {
"length": 3,
"openEnd": 0
}
}
|
|
From: 1
Top Left Door
To: 1
Top Left Door
Carefully shoot the shoot blocks at the right time to knock off a Geemer without killing it. Requires: "h_ZebesIsAwake" Exit condition: {
"leaveWithGModeSetup": {}
}
|
|
Shoot a Super at the wall, while the Geemer is moving vertically. If it is on the bottom of the shot blocks, it will not fall. Requires: {
"enemyDamage": {
"enemy": "Geemer (blue)",
"type": "contact",
"hits": 1
}
}
"h_ZebesIsAwake"
{
"ammo": {
"type": "Super",
"count": 1
}
}
|
|
Entrance condition: {
"comeInShinecharged": {
"framesRequired": 90
}
}
Requires: "canShinechargeMovementComplex" Exit condition: {
"leaveShinecharged": {
"framesRemaining": "auto"
}
}
|
|
Entrance condition: {
"comeInWithGrappleTeleport": {
"blockPositions": [
[
12,
12
],
[
12,
13
]
]
}
}
Bypasses door shell: true |
|
From: 1
Top Left Door
To: 2
Right Door
Entrance condition: {
"comeInWithGrappleTeleport": {
"blockPositions": [
[
12,
12
]
]
}
}
Exit condition: {
"leaveWithGrappleTeleport": {
"blockPositions": [
[
12,
12
]
]
}
}
Bypasses door shell: true |
|
From: 1
Top Left Door
To: 2
Right Door
Entrance condition: {
"comeInWithGrappleTeleport": {
"blockPositions": [
[
12,
13
]
]
}
}
Exit condition: {
"leaveWithGrappleTeleport": {
"blockPositions": [
[
12,
13
]
]
}
}
Bypasses door shell: true |
|
From: 1
Top Left Door
To: 3
Bottom Left Door
Entrance condition: {
"comeInShinecharged": {
"framesRequired": 160
}
}
Requires: "Morph"
{
"shinespark": {
"frames": 6
}
}
Exit condition: {
"leaveWithSpark": {
"position": "bottom"
}
}
|
|
|
|
Entrance condition: {
"comeInShinecharged": {
"framesRequired": 90
}
}
Requires: "canShinechargeMovementComplex" Exit condition: {
"leaveShinecharged": {
"framesRemaining": "auto"
}
}
|
|
Entrance condition: {
"comeInWithGrappleTeleport": {
"blockPositions": [
[
3,
12
],
[
3,
13
]
]
}
}
Bypasses door shell: true |
|
From: 2
Right Door
To: 1
Top Left Door
Entrance condition: {
"comeInWithGrappleTeleport": {
"blockPositions": [
[
3,
12
]
]
}
}
Exit condition: {
"leaveWithGrappleTeleport": {
"blockPositions": [
[
3,
12
]
]
}
}
Bypasses door shell: true |
|
From: 2
Right Door
To: 1
Top Left Door
Entrance condition: {
"comeInWithGrappleTeleport": {
"blockPositions": [
[
3,
13
]
]
}
}
Exit condition: {
"leaveWithGrappleTeleport": {
"blockPositions": [
[
3,
13
]
]
}
}
Bypasses door shell: true |
|
Exit the previous room with Samus in a standing pose (while grappled) with a horizontal position of 21 (as far right as possible). After teleporting, press right to release Grapple while staying standing (not being forced into a crouch). Then X-ray climb to get to the door transition above, without needing to open the door. At the beginning of the climb, avoid pressing left without X-Ray being held, to prevent triggering the transition of the bottom door. Entrance condition: {
"comeInWithGrappleTeleport": {
"blockPositions": [
[
2,
18
],
[
2,
19
],
[
2,
28
],
[
2,
29
]
]
}
}
Requires: "canXRayClimb" Bypasses door shell: true |
|
Exit condition: {
"leaveWithRunway": {
"length": 3,
"openEnd": 0
}
}
|
|
Carefully shoot the shoot blocks at the right time to knock off a Geemer without killing it. Requires: "h_ZebesIsAwake" Exit condition: {
"leaveWithGModeSetup": {}
}
|
|
Shoot a Super at the wall, while the Geemer is moving vertically. If it is on the bottom of the shot blocks, it will not fall. Requires: {
"enemyDamage": {
"enemy": "Geemer (blue)",
"type": "contact",
"hits": 1
}
}
"h_ZebesIsAwake"
{
"ammo": {
"type": "Super",
"count": 1
}
}
|
|
Entrance condition: {
"comeInShinecharged": {
"framesRequired": 160
}
}
Requires: "Morph" "canShinechargeMovementComplex" Exit condition: {
"leaveShinecharged": {
"framesRemaining": "auto"
}
}
|
|
Entrance condition: {
"comeInWithGrappleTeleport": {
"blockPositions": [
[
2,
18
],
[
2,
19
],
[
2,
28
],
[
2,
29
]
]
}
}
Bypasses door shell: true |
|
From: 2
Right Door
To: 3
Bottom Left Door
Entrance condition: {
"comeInWithGrappleTeleport": {
"blockPositions": [
[
2,
18
]
]
}
}
Exit condition: {
"leaveWithGrappleTeleport": {
"blockPositions": [
[
2,
18
]
]
}
}
Bypasses door shell: true |
|
From: 2
Right Door
To: 3
Bottom Left Door
Entrance condition: {
"comeInWithGrappleTeleport": {
"blockPositions": [
[
2,
19
]
]
}
}
Exit condition: {
"leaveWithGrappleTeleport": {
"blockPositions": [
[
2,
19
]
]
}
}
Bypasses door shell: true |
|
From: 2
Right Door
To: 3
Bottom Left Door
Entrance condition: {
"comeInWithGrappleTeleport": {
"blockPositions": [
[
2,
28
]
]
}
}
Exit condition: {
"leaveWithGrappleTeleport": {
"blockPositions": [
[
2,
28
]
]
}
}
Bypasses door shell: true |
|
From: 2
Right Door
To: 3
Bottom Left Door
Entrance condition: {
"comeInWithGrappleTeleport": {
"blockPositions": [
[
2,
29
]
]
}
}
Exit condition: {
"leaveWithGrappleTeleport": {
"blockPositions": [
[
2,
29
]
]
}
}
Bypasses door shell: true |
|
|
|
From: 3
Bottom Left Door
To: 1
Top Left Door
Enter with G-mode direct, back up to between 1 and 6 pixels from the door transition, and activate X-ray to get very deep stuck in the door. Climb up 1 screen, and perform a turnaround buffered spin-jump away from the door to trigger the transition, bypassing any lock on the door. Entrance condition: {
"comeInWithGMode": {
"mode": "direct",
"morphed": false
}
}
Requires: "canXRayClimb" Bypasses door shell: true |
|
Entrance condition: {
"comeInWithGrappleTeleport": {
"blockPositions": [
[
12,
12
],
[
12,
13
]
]
}
}
Bypasses door shell: true |
|
From: 3
Bottom Left Door
To: 2
Right Door
Entrance condition: {
"comeInWithGrappleTeleport": {
"blockPositions": [
[
12,
12
]
]
}
}
Exit condition: {
"leaveWithGrappleTeleport": {
"blockPositions": [
[
12,
12
]
]
}
}
Bypasses door shell: true |
|
From: 3
Bottom Left Door
To: 2
Right Door
Entrance condition: {
"comeInWithGrappleTeleport": {
"blockPositions": [
[
12,
13
]
]
}
}
Exit condition: {
"leaveWithGrappleTeleport": {
"blockPositions": [
[
12,
13
]
]
}
}
Bypasses door shell: true |
|
Exit condition: {
"leaveWithRunway": {
"length": 4,
"openEnd": 0
}
}
|
|
From: 3
Bottom Left Door
To: 3
Bottom Left Door
Carefully shoot the shoot blocks at the right time to knock off a Geemer without killing it. Requires: "Morph" "h_ZebesIsAwake" Exit condition: {
"leaveWithGModeSetup": {}
}
|
|
Requires: "Morph" |
|
This is a short climb of only a few tiles. Entrance condition: {
"comeInWithDoorStuckSetup": {}
}
Requires: "canXRayClimb" |
|
Entrance condition: {
"comeInWithGMode": {
"mode": "any",
"morphed": true
}
}
|
|
|
|
|
|
Requires: "Morph" |
|
Requires: "h_ZebesIsAwake"
{
"resetRoom": {
"nodes": [
1,
2
],
"mustStayPut": false
}
}
{
"refill": [
"Energy",
"Missile"
]
}
|
|
Requires: "h_canCrystalFlash" |
{
"$schema": "../../../schema/m3-room.schema.json",
"id": 39,
"name": "Construction Zone",
"area": "Brinstar",
"subarea": "Blue",
"playable": true,
"roomAddress": "0x79F11",
"roomEnvironments": [
{
"heated": false
}
],
"nodes": [
{
"id": 1,
"name": "Top Left Door",
"nodeType": "door",
"nodeSubType": "blue",
"nodeAddress": "0x0018ec2",
"doorEnvironments": [
{
"physics": "air"
}
]
},
{
"id": 2,
"name": "Right Door",
"nodeType": "door",
"nodeSubType": "red",
"nodeAddress": "0x0018ece",
"doorEnvironments": [
{
"physics": "air"
}
],
"locks": [
{
"name": "Construction Zone Red Lock (to Ceiling E-Tank)",
"lockType": "coloredDoor",
"unlockStrats": [
{
"name": "Base",
"notable": false,
"requires": [
"h_canOpenRedDoors"
]
}
]
}
]
},
{
"id": 3,
"name": "Bottom Left Door",
"nodeType": "door",
"nodeSubType": "blue",
"nodeAddress": "0x0018eda",
"doorEnvironments": [
{
"physics": "air"
}
]
},
{
"id": 4,
"name": "Top Junction",
"nodeType": "junction",
"nodeSubType": "junction"
}
],
"enemies": [
{
"id": "e1",
"groupName": "Construction Zone Geemers",
"enemyName": "Geemer (blue)",
"quantity": 2,
"homeNodes": [
4
],
"spawn": [
"f_ZebesAwake"
]
}
],
"links": [
{
"from": 1,
"to": [
{
"id": 1
},
{
"id": 2
},
{
"id": 3
},
{
"id": 4
}
]
},
{
"from": 2,
"to": [
{
"id": 1
},
{
"id": 2
},
{
"id": 3
},
{
"id": 4
}
]
},
{
"from": 3,
"to": [
{
"id": 1
},
{
"id": 2
},
{
"id": 3
},
{
"id": 4
}
]
},
{
"from": 4,
"to": [
{
"id": 1
},
{
"id": 2
},
{
"id": 3
},
{
"id": 4
}
]
}
],
"strats": [
{
"link": [
1,
1
],
"name": "Leave with Runway",
"requires": [],
"exitCondition": {
"leaveWithRunway": {
"length": 3,
"openEnd": 0
}
}
},
{
"link": [
1,
1
],
"name": "G-Mode Setup - Get Hit By Geemer",
"requires": [
"h_ZebesIsAwake"
],
"exitCondition": {
"leaveWithGModeSetup": {}
},
"note": "Carefully shoot the shoot blocks at the right time to knock off a Geemer without killing it."
},
{
"link": [
1,
1
],
"name": "G-Mode Regain Mobility",
"requires": [
{
"enemyDamage": {
"enemy": "Geemer (blue)",
"type": "contact",
"hits": 1
}
},
"h_ZebesIsAwake",
{
"ammo": {
"type": "Super",
"count": 1
}
}
],
"gModeRegainMobility": {},
"note": "Shoot a Super at the wall, while the Geemer is moving vertically. If it is on the bottom of the shot blocks, it will not fall."
},
{
"link": [
1,
2
],
"name": "Carry Shinecharge",
"entranceCondition": {
"comeInShinecharged": {
"framesRequired": 90
}
},
"requires": [
"canShinechargeMovementComplex"
],
"exitCondition": {
"leaveShinecharged": {
"framesRemaining": "auto"
}
},
"unlocksDoors": [
{
"types": [
"super"
],
"requires": []
},
{
"types": [
"missiles",
"powerbomb"
],
"requires": [
"never"
]
}
]
},
{
"link": [
1,
2
],
"name": "Grapple Teleport",
"entranceCondition": {
"comeInWithGrappleTeleport": {
"blockPositions": [
[
12,
12
],
[
12,
13
]
]
}
},
"requires": [],
"bypassesDoorShell": true
},
{
"link": [
1,
2
],
"name": "Carry Grapple Teleport (Top Position)",
"entranceCondition": {
"comeInWithGrappleTeleport": {
"blockPositions": [
[
12,
12
]
]
}
},
"requires": [],
"bypassesDoorShell": true,
"exitCondition": {
"leaveWithGrappleTeleport": {
"blockPositions": [
[
12,
12
]
]
}
}
},
{
"link": [
1,
2
],
"name": "Carry Grapple Teleport (Bottom Position)",
"entranceCondition": {
"comeInWithGrappleTeleport": {
"blockPositions": [
[
12,
13
]
]
}
},
"requires": [],
"bypassesDoorShell": true,
"exitCondition": {
"leaveWithGrappleTeleport": {
"blockPositions": [
[
12,
13
]
]
}
}
},
{
"link": [
1,
3
],
"name": "Come in Shinecharged, Leave With Spark",
"entranceCondition": {
"comeInShinecharged": {
"framesRequired": 160
}
},
"requires": [
"Morph",
{
"shinespark": {
"frames": 6
}
}
],
"exitCondition": {
"leaveWithSpark": {
"position": "bottom"
}
},
"unlocksDoors": [
{
"types": [
"super"
],
"requires": []
},
{
"types": [
"missiles",
"powerbomb"
],
"requires": [
"never"
]
}
]
},
{
"link": [
1,
4
],
"name": "Base",
"requires": []
},
{
"link": [
2,
1
],
"name": "Carry Shinecharge",
"entranceCondition": {
"comeInShinecharged": {
"framesRequired": 90
}
},
"requires": [
"canShinechargeMovementComplex"
],
"exitCondition": {
"leaveShinecharged": {
"framesRemaining": "auto"
}
},
"unlocksDoors": [
{
"types": [
"super"
],
"requires": []
},
{
"types": [
"missiles",
"powerbomb"
],
"requires": [
"never"
]
}
]
},
{
"link": [
2,
1
],
"name": "Grapple Teleport",
"entranceCondition": {
"comeInWithGrappleTeleport": {
"blockPositions": [
[
3,
12
],
[
3,
13
]
]
}
},
"requires": [],
"bypassesDoorShell": true
},
{
"link": [
2,
1
],
"name": "Carry Grapple Teleport (Top Position)",
"entranceCondition": {
"comeInWithGrappleTeleport": {
"blockPositions": [
[
3,
12
]
]
}
},
"requires": [],
"bypassesDoorShell": true,
"exitCondition": {
"leaveWithGrappleTeleport": {
"blockPositions": [
[
3,
12
]
]
}
}
},
{
"link": [
2,
1
],
"name": "Carry Grapple Teleport (Bottom Position)",
"entranceCondition": {
"comeInWithGrappleTeleport": {
"blockPositions": [
[
3,
13
]
]
}
},
"requires": [],
"bypassesDoorShell": true,
"exitCondition": {
"leaveWithGrappleTeleport": {
"blockPositions": [
[
3,
13
]
]
}
}
},
{
"link": [
2,
1
],
"name": "Grapple Teleport X-Ray Climb",
"entranceCondition": {
"comeInWithGrappleTeleport": {
"blockPositions": [
[
2,
18
],
[
2,
19
],
[
2,
28
],
[
2,
29
]
]
}
},
"requires": [
"canXRayClimb"
],
"bypassesDoorShell": true,
"note": [
"Exit the previous room with Samus in a standing pose (while grappled) with a horizontal position of 21 (as far right as possible).",
"After teleporting, press right to release Grapple while staying standing (not being forced into a crouch).",
"Then X-ray climb to get to the door transition above, without needing to open the door.",
"At the beginning of the climb, avoid pressing left without X-Ray being held, to prevent triggering the transition of the bottom door."
]
},
{
"link": [
2,
2
],
"name": "Leave with Runway",
"requires": [],
"exitCondition": {
"leaveWithRunway": {
"length": 3,
"openEnd": 0
}
}
},
{
"link": [
2,
2
],
"name": "G-Mode Setup - Get Hit By Geemer",
"requires": [
"h_ZebesIsAwake"
],
"exitCondition": {
"leaveWithGModeSetup": {}
},
"note": "Carefully shoot the shoot blocks at the right time to knock off a Geemer without killing it."
},
{
"link": [
2,
2
],
"name": "G-Mode Regain Mobility",
"requires": [
{
"enemyDamage": {
"enemy": "Geemer (blue)",
"type": "contact",
"hits": 1
}
},
"h_ZebesIsAwake",
{
"ammo": {
"type": "Super",
"count": 1
}
}
],
"gModeRegainMobility": {},
"note": "Shoot a Super at the wall, while the Geemer is moving vertically. If it is on the bottom of the shot blocks, it will not fall."
},
{
"link": [
2,
3
],
"name": "Carry Shinecharge",
"entranceCondition": {
"comeInShinecharged": {
"framesRequired": 160
}
},
"requires": [
"Morph",
"canShinechargeMovementComplex"
],
"exitCondition": {
"leaveShinecharged": {
"framesRemaining": "auto"
}
},
"unlocksDoors": [
{
"types": [
"super"
],
"requires": []
},
{
"types": [
"missiles",
"powerbomb"
],
"requires": [
"never"
]
}
]
},
{
"link": [
2,
3
],
"name": "Grapple Teleport",
"entranceCondition": {
"comeInWithGrappleTeleport": {
"blockPositions": [
[
2,
18
],
[
2,
19
],
[
2,
28
],
[
2,
29
]
]
}
},
"requires": [],
"bypassesDoorShell": true
},
{
"link": [
2,
3
],
"name": "Carry Grapple Teleport (Top Position)",
"entranceCondition": {
"comeInWithGrappleTeleport": {
"blockPositions": [
[
2,
18
]
]
}
},
"requires": [],
"bypassesDoorShell": true,
"exitCondition": {
"leaveWithGrappleTeleport": {
"blockPositions": [
[
2,
18
]
]
}
}
},
{
"link": [
2,
3
],
"name": "Carry Grapple Teleport (Upper Middle Position)",
"entranceCondition": {
"comeInWithGrappleTeleport": {
"blockPositions": [
[
2,
19
]
]
}
},
"requires": [],
"bypassesDoorShell": true,
"exitCondition": {
"leaveWithGrappleTeleport": {
"blockPositions": [
[
2,
19
]
]
}
}
},
{
"link": [
2,
3
],
"name": "Carry Grapple Teleport (Lower Middle Position)",
"entranceCondition": {
"comeInWithGrappleTeleport": {
"blockPositions": [
[
2,
28
]
]
}
},
"requires": [],
"bypassesDoorShell": true,
"exitCondition": {
"leaveWithGrappleTeleport": {
"blockPositions": [
[
2,
28
]
]
}
}
},
{
"link": [
2,
3
],
"name": "Carry Grapple Teleport (Bottom Position)",
"entranceCondition": {
"comeInWithGrappleTeleport": {
"blockPositions": [
[
2,
29
]
]
}
},
"requires": [],
"bypassesDoorShell": true,
"exitCondition": {
"leaveWithGrappleTeleport": {
"blockPositions": [
[
2,
29
]
]
}
}
},
{
"link": [
2,
4
],
"name": "Base",
"requires": []
},
{
"link": [
3,
1
],
"name": "Very Deep Stuck X-Ray Climb",
"entranceCondition": {
"comeInWithGMode": {
"mode": "direct",
"morphed": false
}
},
"requires": [
"canXRayClimb"
],
"bypassesDoorShell": true,
"note": [
"Enter with G-mode direct, back up to between 1 and 6 pixels from the door transition, and activate X-ray to get very deep stuck in the door.",
"Climb up 1 screen, and perform a turnaround buffered spin-jump away from the door to trigger the transition, bypassing any lock on the door."
]
},
{
"link": [
3,
2
],
"name": "Grapple Teleport",
"entranceCondition": {
"comeInWithGrappleTeleport": {
"blockPositions": [
[
12,
12
],
[
12,
13
]
]
}
},
"requires": [],
"bypassesDoorShell": true
},
{
"link": [
3,
2
],
"name": "Carry Grapple Teleport (Top Position)",
"entranceCondition": {
"comeInWithGrappleTeleport": {
"blockPositions": [
[
12,
12
]
]
}
},
"requires": [],
"bypassesDoorShell": true,
"exitCondition": {
"leaveWithGrappleTeleport": {
"blockPositions": [
[
12,
12
]
]
}
}
},
{
"link": [
3,
2
],
"name": "Carry Grapple Teleport (Bottom Position)",
"entranceCondition": {
"comeInWithGrappleTeleport": {
"blockPositions": [
[
12,
13
]
]
}
},
"requires": [],
"bypassesDoorShell": true,
"exitCondition": {
"leaveWithGrappleTeleport": {
"blockPositions": [
[
12,
13
]
]
}
}
},
{
"link": [
3,
3
],
"name": "Leave with Runway",
"requires": [],
"exitCondition": {
"leaveWithRunway": {
"length": 4,
"openEnd": 0
}
}
},
{
"link": [
3,
3
],
"name": "G-Mode Setup - Get Hit By Geemer",
"requires": [
"Morph",
"h_ZebesIsAwake"
],
"exitCondition": {
"leaveWithGModeSetup": {}
},
"note": "Carefully shoot the shoot blocks at the right time to knock off a Geemer without killing it."
},
{
"link": [
3,
4
],
"name": "Base",
"requires": [
"Morph"
]
},
{
"link": [
3,
4
],
"name": "X-Ray Climb",
"entranceCondition": {
"comeInWithDoorStuckSetup": {}
},
"requires": [
"canXRayClimb"
],
"note": "This is a short climb of only a few tiles."
},
{
"link": [
3,
4
],
"name": "G-Mode Morph",
"entranceCondition": {
"comeInWithGMode": {
"mode": "any",
"morphed": true
}
},
"requires": []
},
{
"link": [
4,
1
],
"name": "Base",
"requires": []
},
{
"link": [
4,
2
],
"name": "Base",
"requires": []
},
{
"link": [
4,
3
],
"name": "Base",
"requires": [
"Morph"
]
},
{
"link": [
4,
4
],
"name": "Geemer Farm",
"requires": [
"h_ZebesIsAwake",
{
"resetRoom": {
"nodes": [
1,
2
],
"mustStayPut": false
}
},
{
"refill": [
"Energy",
"Missile"
]
}
]
},
{
"link": [
4,
4
],
"name": "Crystal Flash",
"requires": [
"h_canCrystalFlash"
]
}
]
}