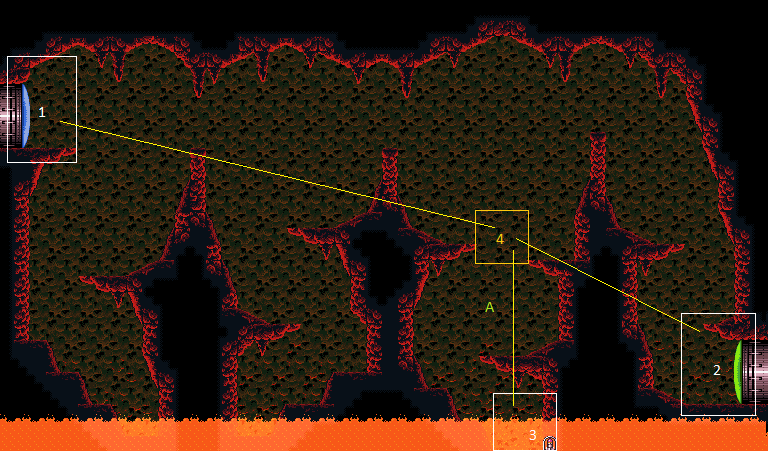
Cathedral
Room ID: 91
|
Exit condition: {
"leaveWithRunway": {
"length": 4,
"openEnd": 1
}
}
|
|
Requires: "h_canHeatedCrystalFlash" |
|
Entrance condition: {
"comeInWithSpark": {
"position": "top"
}
}
Requires: {
"heatFrames": 240
}
{
"shinespark": {
"frames": 57,
"excessFrames": 0
}
}
|
|
Requires: {
"heatFrames": 300
}
|
|
Entrance condition: {
"comeInRunning": {
"minTiles": 3,
"speedBooster": "any"
}
}
Requires: "SpaceJump"
{
"heatFrames": 200
}
|
|
Entrance condition: {
"comeInRunning": {
"minTiles": 3,
"speedBooster": "any"
}
}
Requires: "SpaceJump"
{
"heatFrames": 140
}
|
|
Requires: "canTrickyJump"
{
"heatFrames": 220
}
|
|
From: 1
Left Door
To: 4
Junction Above Item
Entrance condition: {
"comeInRunning": {
"minTiles": 5,
"speedBooster": true
}
}
Requires: "canTrickyJump" |
|
Upon room entry, jump and mockball on top of the first pillar. Entrance condition: {
"comeInRunning": {
"minTiles": 3,
"speedBooster": "any"
}
}
Requires: "canCarefulJump"
"canMockball"
{
"heatFrames": 180
}
|
|
Entrance condition: {
"comeInShinecharging": {
"length": 5,
"openEnd": 0,
"gentleUpTiles": 2
}
}
Requires: "canShinechargeMovementTricky"
"canHorizontalShinespark"
{
"heatFrames": 225
}
{
"shinespark": {
"frames": 53,
"excessFrames": 0
}
}
{
"heatFrames": 105
}
|
|
Entrance condition: {
"comeInWithGrappleTeleport": {
"blockPositions": [
[
5,
3
],
[
7,
2
]
]
}
}
Requires: {
"heatFrames": 45
}
|
|
Exit the previous room with Samus in a standing pose (while grappled). After teleporting, press right to release Grapple while staying standing (not being forced into a crouch). Then X-ray climb to get up to the door transition, without needing to open the door. Entrance condition: {
"comeInWithGrappleTeleport": {
"blockPositions": [
[
2,
28
],
[
2,
29
]
]
}
}
Requires: "canXRayClimb"
{
"heatFrames": 1600
}
Bypasses door shell: true |
|
Exit condition: {
"leaveWithRunway": {
"length": 6,
"openEnd": 0,
"gentleDownTiles": 2,
"startingDownTiles": 2
}
}
|
|
Requires: "h_canHeatedCrystalFlash" |
|
Requires: {
"heatFrames": 250
}
|
|
Requires: "canTrickyJump"
{
"or": [
"ScrewAttack",
{
"and": [
"canDodgeWhileShooting",
{
"or": [
"Wave",
"Spazer",
"Plasma",
"canPseudoScrew",
{
"ammo": {
"type": "Missile",
"count": 1
}
},
{
"ammo": {
"type": "Super",
"count": 1
}
}
]
}
]
},
{
"heatFrames": 5
}
]
}
{
"heatFrames": 220
}
|
|
Requires: {
"heatFrames": 200
}
{
"or": [
{
"lavaFrames": 50
},
{
"and": [
"Gravity",
{
"lavaFrames": 40
}
]
}
]
}
{
"or": [
{
"enemyDamage": {
"enemy": "Geruta",
"type": "contact",
"hits": 1
}
},
{
"obstaclesCleared": [
"A"
]
}
]
}
|
|
Requires: {
"or": [
"Plasma",
"ScrewAttack",
{
"ammo": {
"type": "Super",
"count": 1
}
},
{
"enemyDamage": {
"enemy": "Geruta",
"type": "contact",
"hits": 1
}
},
{
"obstaclesCleared": [
"A"
]
}
]
}
{
"heatFrames": 280
}
|
|
Build speed on the central platform and jump to the door. Requires: "canCarefulJump"
{
"heatFrames": 176
}
|
|
Requires: {
"heatFrames": 250
}
|
|
Requires: {
"heatFrames": 240
}
Exit condition: {
"leaveWithRunway": {
"length": 6,
"openEnd": 0,
"gentleDownTiles": 2,
"startingDownTiles": 2
}
}
|
|
Requires: "canTrickyJump"
{
"heatFrames": 160
}
|
|
From: 4
Junction Above Item
To: 2
Right Door
Requires: "canTrickyJump"
{
"heatFrames": 150
}
Exit condition: {
"leaveWithRunway": {
"length": 6,
"openEnd": 0,
"gentleDownTiles": 2,
"startingDownTiles": 2
}
}
|
|
Requires: "Morph"
{
"heatFrames": 350
}
{
"or": [
{
"lavaFrames": 70
},
{
"and": [
"Gravity",
{
"lavaFrames": 36
}
]
}
]
}
{
"or": [
{
"obstaclesCleared": [
"A"
]
},
{
"enemyKill": {
"enemies": [
[
"Geruta"
]
],
"explicitWeapons": [
"Super",
"Missile",
"PowerBomb",
"ScrewAttack",
"Plasma",
"Ice+Spazer",
"Ice+Wave",
"Wave+Spazer",
"Charge+Wave",
"Charge+Spazer",
"PseudoScrew"
]
}
}
]
}
Clears obstacles: A |
|
Requires: "Morph"
{
"heatFrames": 350
}
{
"or": [
{
"lavaFrames": 70
},
{
"and": [
"Gravity",
{
"lavaFrames": 36
}
]
}
]
}
{
"enemyDamage": {
"enemy": "Geruta",
"type": "contact",
"hits": 1
}
}
|
|
Requires: {
"resetRoom": {
"nodes": [
1,
2
],
"mustStayPut": false
}
}
"h_heatProof"
{
"refill": [
"Energy",
"Missile",
"Super"
]
}
|
|
Requires: "h_canHeatedCrystalFlash" Clears obstacles: A |
{
"$schema": "../../../schema/m3-room.schema.json",
"id": 91,
"name": "Cathedral",
"area": "Norfair",
"subarea": "Upper",
"subsubarea": "East",
"playable": true,
"roomAddress": "0x7A788",
"roomEnvironments": [
{
"heated": true
}
],
"nodes": [
{
"id": 1,
"name": "Left Door",
"nodeType": "door",
"nodeSubType": "blue",
"nodeAddress": "0x001928e",
"doorEnvironments": [
{
"physics": "air"
}
]
},
{
"id": 2,
"name": "Right Door",
"nodeType": "door",
"nodeSubType": "green",
"nodeAddress": "0x001929a",
"doorEnvironments": [
{
"physics": "air"
}
],
"locks": [
{
"name": "Cathedral Green Lock (to Rising Tide)",
"lockType": "coloredDoor",
"unlockStrats": [
{
"name": "Base",
"notable": false,
"requires": [
"h_canOpenGreenDoors"
]
}
]
}
]
},
{
"id": 3,
"name": "Hidden Item",
"nodeType": "item",
"nodeSubType": "hidden",
"nodeItem": "Missile",
"nodeAddress": "0x78AE4"
},
{
"id": 4,
"name": "Junction Above Item",
"nodeType": "junction",
"nodeSubType": "junction"
}
],
"obstacles": [
{
"id": "A",
"name": "Geruta Blocking the Missiles",
"obstacleType": "enemies"
}
],
"enemies": [
{
"id": "e1",
"groupName": "Cathedral Left Sovas",
"enemyName": "Sova",
"quantity": 3,
"homeNodes": [
1
],
"dropRequires": [
"h_heatProof"
]
},
{
"id": "e2",
"groupName": "Cathedral Left Geruta",
"enemyName": "Geruta",
"quantity": 1,
"homeNodes": [
1
],
"dropRequires": [
"h_heatProof"
]
},
{
"id": "e3",
"groupName": "Cathedral Right Sova",
"enemyName": "Sova",
"quantity": 1,
"homeNodes": [
2
],
"dropRequires": [
"h_heatProof"
]
},
{
"id": "e4",
"groupName": "Cathedral Right Gerutas",
"enemyName": "Geruta",
"quantity": 2,
"homeNodes": [
4
],
"dropRequires": [
"h_heatProof"
]
}
],
"links": [
{
"from": 1,
"to": [
{
"id": 1
},
{
"id": 2
},
{
"id": 4
}
]
},
{
"from": 2,
"to": [
{
"id": 1
},
{
"id": 2
},
{
"id": 4
}
]
},
{
"from": 3,
"to": [
{
"id": 4
}
]
},
{
"from": 4,
"to": [
{
"id": 1
},
{
"id": 2
},
{
"id": 3
},
{
"id": 4
}
]
}
],
"strats": [
{
"link": [
1,
1
],
"name": "Leave with Runway",
"requires": [],
"exitCondition": {
"leaveWithRunway": {
"length": 4,
"openEnd": 1
}
}
},
{
"link": [
1,
1
],
"name": "Crystal Flash",
"requires": [
"h_canHeatedCrystalFlash"
]
},
{
"link": [
1,
2
],
"name": "Shinespark",
"entranceCondition": {
"comeInWithSpark": {
"position": "top"
}
},
"requires": [
{
"heatFrames": 240
},
{
"shinespark": {
"frames": 57,
"excessFrames": 0
}
}
]
},
{
"link": [
1,
4
],
"name": "Base",
"requires": [
{
  "heatFrames": 300
}
]
},
{
"link": [
1,
4
],
"name": "Space Jump",
"entranceCondition": {
"comeInRunning": {
"minTiles": 3,
"speedBooster": "any"
}
},
"requires": [
"SpaceJump",
{
"heatFrames": 200
}
]
},
{
"link": [
1,
4
],
"name": "Space Jump (Come in Running)",
"entranceCondition": {
"comeInRunning": {
"minTiles": 3,
"speedBooster": "any"
}
},
"requires": [
"SpaceJump",
{
"heatFrames": 140
}
]
},
{
"link": [
1,
4
],
"name": "Tricky Platforming",
"requires": [
"canTrickyJump",
{
"heatFrames": 220
}
],
"devNote": "FIXME: Jumping fully over the platform, and killing the sova before landing on it is a little faster, with no movement items."
},
{
"link": [
1,
4
],
"name": "Tricky Platforming (Come In Running)",
"entranceCondition": {
"comeInRunning": {
"minTiles": 5,
"speedBooster": true
}
},
"requires": [
"canTrickyJump"
],
"devNote": "FIXME: Jumping fully over the platform, and killing the sova before landing on it is a little faster, with no movement items."
},
{
"link": [
1,
4
],
"name": "Mockball",
"entranceCondition": {
"comeInRunning": {
"minTiles": 3,
"speedBooster": "any"
}
},
"requires": [
"canCarefulJump",
"canMockball",
{
"heatFrames": 180
}
],
"note": "Upon room entry, jump and mockball on top of the first pillar."
},
{
"link": [
2,
1
],
"name": "Shinespark",
"entranceCondition": {
"comeInShinecharging": {
"length": 5,
"openEnd": 0,
"gentleUpTiles": 2
}
},
"requires": [
"canShinechargeMovementTricky",
"canHorizontalShinespark",
{
"heatFrames": 225
},
{
"shinespark": {
"frames": 53,
"excessFrames": 0
}
},
{
"heatFrames": 105
}
]
},
{
"link": [
2,
1
],
"name": "Grapple Teleport",
"entranceCondition": {
"comeInWithGrappleTeleport": {
"blockPositions": [
[
5,
3
],
[
7,
2
]
]
}
},
"requires": [
{
  "heatFrames": 45
}
]
},
{
"link": [
2,
1
],
"name": "Grapple Teleport X-Ray Climb",
"entranceCondition": {
"comeInWithGrappleTeleport": {
"blockPositions": [
[
2,
28
],
[
2,
29
]
]
}
},
"requires": [
"canXRayClimb",
{
"heatFrames": 1600
}
],
"bypassesDoorShell": true,
"note": [
"Exit the previous room with Samus in a standing pose (while grappled).",
"After teleporting, press right to release Grapple while staying standing (not being forced into a crouch).",
"Then X-ray climb to get up to the door transition, without needing to open the door."
]
},
{
"link": [
2,
2
],
"name": "Leave with Runway",
"requires": [],
"exitCondition": {
"leaveWithRunway": {
"length": 6,
"openEnd": 0,
"gentleDownTiles": 2,
"startingDownTiles": 2
}
}
},
{
"link": [
2,
2
],
"name": "Crystal Flash",
"requires": [
"h_canHeatedCrystalFlash"
]
},
{
"link": [
2,
4
],
"name": "Base",
"requires": [
{
  "heatFrames": 250
}
]
},
{
"link": [
2,
4
],
"name": "Tricky Platforming",
"requires": [
"canTrickyJump",
{
"or": [
"ScrewAttack",
{
"and": [
"canDodgeWhileShooting",
{
"or": [
"Wave",
"Spazer",
"Plasma",
"canPseudoScrew",
{
"ammo": {
"type": "Missile",
"count": 1
}
},
{
"ammo": {
"type": "Super",
"count": 1
}
}
]
}
]
},
{
"heatFrames": 5
}
]
},
{
"heatFrames": 220
}
]
},
{
"link": [
3,
4
],
"name": "Base",
"requires": [
{
"heatFrames": 200
},
{
"or": [
{
"lavaFrames": 50
},
{
"and": [
"Gravity",
{
"lavaFrames": 40
}
]
}
]
},
{
"or": [
{
"enemyDamage": {
"enemy": "Geruta",
"type": "contact",
"hits": 1
}
},
{
"obstaclesCleared": [
"A"
]
}
]
}
]
},
{
"link": [
4,
1
],
"name": "Base",
"requires": [
{
"or": [
"Plasma",
"ScrewAttack",
{
"ammo": {
"type": "Super",
"count": 1
}
},
{
"enemyDamage": {
"enemy": "Geruta",
"type": "contact",
"hits": 1
}
},
{
"obstaclesCleared": [
"A"
]
}
]
},
{
"heatFrames": 280
}
],
"unlocksDoors": [
{
"types": [
"powerbomb"
],
"requires": [
{
"heatFrames": 50
}
]
}
]
},
{
"link": [
4,
1
],
"name": "Careful Jump",
"requires": [
"canCarefulJump",
{
"heatFrames": 176
}
],
"unlocksDoors": [
{
"types": [
"missiles"
],
"requires": [
{
"heatFrames": 25
}
]
}
],
"note": "Build speed on the central platform and jump to the door."
},
{
"link": [
4,
2
],
"name": "Base",
"requires": [
{
  "heatFrames": 250
}
],
"unlocksDoors": [
{
"types": [
"missiles"
],
"requires": [
{
"heatFrames": 60
}
]
},
{
"types": [
"super"
],
"requires": []
},
{
"types": [
"powerbomb"
],
"requires": [
{
"heatFrames": 60
}
]
}
]
},
{
"link": [
4,
2
],
"name": "Base Platforming Leave with Runway",
"requires": [
{
  "heatFrames": 240
}
],
"exitCondition": {
"leaveWithRunway": {
"length": 6,
"openEnd": 0,
"gentleDownTiles": 2,
"startingDownTiles": 2
}
},
"unlocksDoors": [
{
"types": [
"missiles"
],
"requires": [
{
"heatFrames": 60
}
]
},
{
"types": [
"super"
],
"requires": []
},
{
"types": [
"powerbomb"
],
"requires": [
{
"heatFrames": 60
}
]
}
]
},
{
"link": [
4,
2
],
"name": "Tricky Platforming",
"requires": [
"canTrickyJump",
{
"heatFrames": 160
}
],
"unlocksDoors": [
{
"types": [
"missiles"
],
"requires": [
{
"heatFrames": 60
}
]
},
{
"types": [
"super"
],
"requires": []
},
{
"types": [
"powerbomb"
],
"requires": [
{
"heatFrames": 60
}
]
}
]
},
{
"link": [
4,
2
],
"name": "Tricky Platforming Leave with Runway",
"requires": [
"canTrickyJump",
{
"heatFrames": 150
}
],
"exitCondition": {
"leaveWithRunway": {
"length": 6,
"openEnd": 0,
"gentleDownTiles": 2,
"startingDownTiles": 2
}
},
"unlocksDoors": [
{
"types": [
"missiles"
],
"requires": [
{
"heatFrames": 60
}
]
},
{
"types": [
"super"
],
"requires": []
},
{
"types": [
"powerbomb"
],
"requires": [
{
"heatFrames": 60
}
]
}
]
},
{
"link": [
4,
3
],
"name": "Kill the Geruta",
"requires": [
"Morph",
{
"heatFrames": 350
},
{
"or": [
{
"lavaFrames": 70
},
{
"and": [
"Gravity",
{
"lavaFrames": 36
}
]
}
]
},
{
"or": [
{
"obstaclesCleared": [
"A"
]
},
{
"enemyKill": {
"enemies": [
[
"Geruta"
]
],
"explicitWeapons": [
"Super",
"Missile",
"PowerBomb",
"ScrewAttack",
"Plasma",
"Ice+Spazer",
"Ice+Wave",
"Wave+Spazer",
"Charge+Wave",
"Charge+Spazer",
"PseudoScrew"
]
}
}
]
}
],
"clearsObstacles": [
"A"
]
},
{
"link": [
4,
3
],
"name": "Tank the Geruta",
"requires": [
"Morph",
{
"heatFrames": 350
},
{
"or": [
{
"lavaFrames": 70
},
{
"and": [
"Gravity",
{
"lavaFrames": 36
}
]
}
]
},
{
"enemyDamage": {
"enemy": "Geruta",
"type": "contact",
"hits": 1
}
}
]
},
{
"link": [
4,
4
],
"name": "Sova Farm",
"requires": [
{
"resetRoom": {
"nodes": [
1,
2
],
"mustStayPut": false
}
},
"h_heatProof",
{
"refill": [
"Energy",
"Missile",
"Super"
]
}
]
},
{
"link": [
4,
4
],
"name": "Crystal Flash",
"requires": [
"h_canHeatedCrystalFlash"
],
"clearsObstacles": [
"A"
]
}
]
}