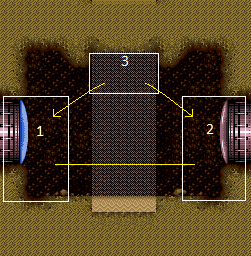
Butterfly Room
Room ID: 213
|
Exit condition: {
"leaveWithRunway": {
"length": 1,
"openEnd": 1
}
}
|
|
Freeze the Zoa just a few pixels higher than it would be if Samus was standing next to the farm. Dodge and freeze the other Zoas, or tank a hit then kill them and don't collect their drops. Maintain a half-tile runway between the frozen Zoa and the runway in order to extend it as much as possible. Requires: "h_canFrozenEnemyRunway"
{
"or": [
"h_canTrickyFrozenEnemyRunway",
{
"enemyDamage": {
"enemy": "Zoa",
"type": "contact",
"hits": 1
}
}
]
}
Exit condition: {
"leaveWithRunway": {
"length": 3,
"openEnd": 0
}
}
|
|
Requires: {
"refill": [
"Energy",
"Missile",
"Super"
]
}
|
|
Exit condition: {
"leaveWithGModeSetup": {}
}
|
|
Requires: {
"enemyDamage": {
"enemy": "Zoa",
"type": "contact",
"hits": 1
}
}
|
|
Requires: "Gravity" |
|
Requires: "canSuitlessMaridia" "HiJump" |
|
Use the frozen Zoas as a bridge. Falling will require Samus to use ice beam and a crouch jump to escape. Requires: "canSuitlessMaridia" "canUseFrozenEnemies" "canPlayInSand" |
|
It is relatively easy to get out of the sand by rapidly placing bombs. Requires: "canSuitlessMaridia" "canPlayInSand" "h_canUseMorphBombs" |
|
From: 1
Left Door
To: 2
Right Door
Notable: true 
Kill all the Zoas and don't pick up their drops. If the door is unlocked, stand in the doorframe and jump across the room. Otherwise, jump across the sand, starting 1.5 tiles away from the sandfall. Hold jump and forward the whole time. Samus will dip into the sand, but still make it to the other side. Requires: "canSuitlessMaridia"
"canCarefulJump"
{
"or": [
{
"doorUnlockedAtNode": 1
},
"canTrickyJump"
]
}
"canPlayInSand"
|
|
From: 1
Left Door
To: 2
Right Door
It is possible to get out of the sand with nothing. While holding down, crouch jump then press forward diagonal to clip into the wall enough to jump out. Requires: "canSuitlessMaridia" "h_canCrouchJumpDownGrab" "canEscapeSand" |
|
Entrance condition: {
"comeInWithSpark": {}
}
Requires: {
"shinespark": {
"frames": 22,
"excessFrames": 11
}
}
|
|
Only requires a runway of approximately 0.5 tiles in the adjacent room. Bomb boost through the doorway and hold right. Entrance condition: {
"comeInWithBombBoost": {}
}
Requires: "canCrossRoomJumpIntoWater" |
|
Entrance condition: {
"comeInWithGrappleTeleport": {
"blockPositions": [
[
12,
12
],
[
12,
13
]
]
}
}
Bypasses door shell: true |
|
Entrance condition: {
"comeInWithGrappleTeleport": {
"blockPositions": [
[
12,
12
]
]
}
}
Exit condition: {
"leaveWithGrappleTeleport": {
"blockPositions": [
[
12,
12
]
]
}
}
Bypasses door shell: true |
|
From: 1
Left Door
To: 2
Right Door
Entrance condition: {
"comeInWithGrappleTeleport": {
"blockPositions": [
[
12,
13
]
]
}
}
Exit condition: {
"leaveWithGrappleTeleport": {
"blockPositions": [
[
12,
13
]
]
}
}
Bypasses door shell: true |
|
Requires: "Gravity" |
|
Requires: "canSuitlessMaridia" "HiJump" |
|
Use the frozen Zoas as a bridge. Falling will require Samus to use ice beam and a crouch jump to escape. Requires: "canSuitlessMaridia" "canUseFrozenEnemies" "canPlayInSand" |
|
It is relatively easy to get out of the sand with rapidly placing bombs. Requires: "canSuitlessMaridia" "h_canUseMorphBombs" "canPlayInSand" |
|
From: 2
Right Door
To: 1
Left Door
Notable: true
Kill all the Zoas and don't pick up their drops. If the door is unlocked, stand in the doorframe and jump across the room. Otherwise, jump across the sand, starting 1.5 tiles away from the sandfall. Hold jump and forward the whole time. Samus will dip into the sand, but still make it to the other side. Requires: "canSuitlessMaridia"
"canCarefulJump"
{
"or": [
{
"doorUnlockedAtNode": 2
},
"canTrickyJump"
]
}
"canPlayInSand"
|
|
From: 2
Right Door
To: 1
Left Door
It is possible to get out of the sand with nothing. While holding down, crouch jump then press forward diagonal to clip into the wall enough to jump out. Requires: "canSuitlessMaridia" "h_canCrouchJumpDownGrab" "canEscapeSand" |
|
Entrance condition: {
"comeInWithSpark": {}
}
Requires: {
"shinespark": {
"frames": 22,
"excessFrames": 11
}
}
|
|
Only requires a runway of approximately 0.5 tiles in the adjacent room. Bomb boost through the doorway and hold left. Entrance condition: {
"comeInWithBombBoost": {}
}
Requires: "canCrossRoomJumpIntoWater" |
|
Entrance condition: {
"comeInWithGrappleTeleport": {
"blockPositions": [
[
3,
12
],
[
3,
13
]
]
}
}
Bypasses door shell: true |
|
Entrance condition: {
"comeInWithGrappleTeleport": {
"blockPositions": [
[
3,
12
]
]
}
}
Exit condition: {
"leaveWithGrappleTeleport": {
"blockPositions": [
[
3,
12
]
]
}
}
Bypasses door shell: true |
|
From: 2
Right Door
To: 1
Left Door
Entrance condition: {
"comeInWithGrappleTeleport": {
"blockPositions": [
[
3,
13
]
]
}
}
Exit condition: {
"leaveWithGrappleTeleport": {
"blockPositions": [
[
3,
13
]
]
}
}
Bypasses door shell: true |
|
Exit condition: {
"leaveWithRunway": {
"length": 1,
"openEnd": 1
}
}
|
|
Freeze the Zoa just a few pixels higher than it would be if Samus was standing next to the farm. Dodge and freeze the other Zoas, or tank a hit then kill them and don't collect their drops. Maintain a half-tile runway between the frozen Zoa and the runway in order to extend it as much as possible. Requires: "h_canFrozenEnemyRunway"
{
"or": [
"h_canTrickyFrozenEnemyRunway",
{
"enemyDamage": {
"enemy": "Zoa",
"type": "contact",
"hits": 1
}
}
]
}
Exit condition: {
"leaveWithRunway": {
"length": 3,
"openEnd": 0
}
}
|
|
Requires: {
"refill": [
"Energy",
"Missile",
"Super"
]
}
|
|
Notable: true 
Repeatedly freeze the Zoas to slowly push Samus into the wall and through the locked doorway. Requires: "h_canNavigateUnderwater"
"canWallIceClip"
"Wave"
{
"enemyDamage": {
"enemy": "Zoa",
"type": "contact",
"hits": 2
}
}
Bypasses door shell: true |
|
Exit condition: {
"leaveWithGModeSetup": {}
}
|
|
Requires: {
"enemyDamage": {
"enemy": "Zoa",
"type": "contact",
"hits": 1
}
}
|
|
Requires: "h_canNavigateUnderwater" |
|
Requires: "h_canNavigateUnderwater" |
{
"$schema": "../../../schema/m3-room.schema.json",
"id": 213,
"name": "Butterfly Room",
"area": "Maridia",
"subarea": "Inner",
"subsubarea": "Yellow",
"playable": true,
"roomAddress": "0x7D5EC",
"roomEnvironments": [
{
"heated": false
}
],
"nodes": [
{
"id": 1,
"name": "Left Door",
"nodeType": "door",
"nodeSubType": "blue",
"nodeAddress": "0x001a750",
"doorOrientation": "left",
"doorEnvironments": [
{
"physics": "water"
}
]
},
{
"id": 2,
"name": "Right Door",
"nodeType": "door",
"nodeSubType": "gray",
"nodeAddress": "0x001a75c",
"doorOrientation": "right",
"doorEnvironments": [
{
"physics": "water"
}
],
"locks": [
{
"name": "Butterfly Room Gray Lock (to West Cactus Alley)",
"lockType": "gameFlag",
"unlockStrats": [
{
"name": "Base",
"notable": false,
"requires": [
"f_DefeatedDraygon"
]
}
]
}
]
},
{
"id": 3,
"name": "Top Sand Entrance",
"nodeType": "entrance",
"nodeSubType": "sandpit",
"doorOrientation": "up"
}
],
"enemies": [
{
"id": "e1",
"groupName": "Butterfly Room Right Zoas",
"enemyName": "Zoa",
"quantity": 2,
"homeNodes": [
2
],
"farmCycles": [
{
"name": "Farm 2 Zoas out of 3",
"cycleFrames": 225,
"requires": []
},
{
"name": "Grapple",
"cycleFrames": 175,
"requires": [
"Grapple"
]
}
]
},
{
"id": "e2",
"groupName": "Butterfly Room Left Zoa",
"enemyName": "Zoa",
"quantity": 1,
"homeNodes": [
1
],
"farmCycles": [
{
"name": "Farm 1 Zoa out of 3",
"cycleFrames": 225,
"requires": []
},
{
"name": "Grapple",
"cycleFrames": 175,
"requires": [
"Grapple"
]
}
]
}
],
"reusableRoomwideNotable": [
{
"name": "Butterfly Room Careful Jump",
"note": [
"Kill all the Zoas and don't pick up their drops. If the door is unlocked, stand in the doorframe and jump across the room.",
"Otherwise, jump across the sand, starting 1.5 tiles away from the sandfall. Hold jump and forward the whole time. Samus will dip into the sand, but still make it to the other side."
]
}
],
"links": [
{
"from": 1,
"to": [
{
"id": 1
},
{
"id": 2
}
]
},
{
"from": 2,
"to": [
{
"id": 1
},
{
"id": 2
}
]
},
{
"from": 3,
"to": [
{
"id": 1,
"note": "When entering the room from above, fall to either side and avoid the sand, as it may lead to a softlock. It's best not to turn around during the fall."
},
{
"id": 2,
"note": "When entering the room from above, fall to either side and avoid the sand, as it may lead to a softlock. It's best not to turn around during the fall."
}
]
}
],
"strats": [
{
"link": [
1,
1
],
"name": "Leave with Runway",
"requires": [],
"exitCondition": {
"leaveWithRunway": {
"length": 1,
"openEnd": 1
}
}
},
{
"link": [
1,
1
],
"name": "Leave With Runway - Frozen Zoa",
"requires": [
"h_canFrozenEnemyRunway",
{
"or": [
"h_canTrickyFrozenEnemyRunway",
{
"enemyDamage": {
"enemy": "Zoa",
"type": "contact",
"hits": 1
}
}
]
}
],
"exitCondition": {
"leaveWithRunway": {
"length": 3,
"openEnd": 0
}
},
"note": [
"Freeze the Zoa just a few pixels higher than it would be if Samus was standing next to the farm.",
"Dodge and freeze the other Zoas, or tank a hit then kill them and don't collect their drops.",
"Maintain a half-tile runway between the frozen Zoa and the runway in order to extend it as much as possible."
]
},
{
"link": [
1,
1
],
"name": "Zoa Farm",
"requires": [
{
  "refill": [
    "Energy",
    "Missile",
    "Super"
  ]
}
]
},
{
"link": [
1,
1
],
"name": "G-Mode Setup - Get Hit By Zoa",
"notable": false,
"requires": [],
"exitCondition": {
"leaveWithGModeSetup": {}
},
"flashSuitChecked": true
},
{
"link": [
1,
1
],
"name": "G-Mode Regain Mobility",
"requires": [
{
  "enemyDamage": {
    "enemy": "Zoa",
    "type": "contact",
    "hits": 1
  }
}
],
"gModeRegainMobility": {},
"flashSuitChecked": true
},
{
"link": [
1,
2
],
"name": "Base",
"requires": [
"Gravity"
]
},
{
"link": [
1,
2
],
"name": "Suitless",
"requires": [
"canSuitlessMaridia",
"HiJump"
]
},
{
"link": [
1,
2
],
"name": "Frozen Zoa Bridge",
"requires": [
"canSuitlessMaridia",
"canUseFrozenEnemies",
"canPlayInSand"
],
"note": "Use the frozen Zoas as a bridge. Falling will require Samus to use ice beam and a crouch jump to escape."
},
{
"link": [
1,
2
],
"name": "Suitless Bombs",
"requires": [
"canSuitlessMaridia",
"canPlayInSand",
"h_canUseMorphBombs"
],
"note": "It is relatively easy to get out of the sand by rapidly placing bombs."
},
{
"link": [
1,
2
],
"name": "Butterfly Room Careful Jump (Left to Right)",
"notable": true,
"requires": [
"canSuitlessMaridia",
"canCarefulJump",
{
"or": [
{
"doorUnlockedAtNode": 1
},
"canTrickyJump"
]
},
"canPlayInSand"
],
"reusableRoomwideNotable": "Butterfly Room Careful Jump",
"note": [
"Kill all the Zoas and don't pick up their drops. If the door is unlocked, stand in the doorframe and jump across the room.",
"Otherwise, jump across the sand, starting 1.5 tiles away from the sandfall. Hold jump and forward the whole time. Samus will dip into the sand, but still make it to the other side."
]
},
{
"link": [
1,
2
],
"name": "Butterfly Room Suitless Sand Escape (Left to Right)",
"requires": [
"canSuitlessMaridia",
"h_canCrouchJumpDownGrab",
"canEscapeSand"
],
"note": [
"It is possible to get out of the sand with nothing.",
"While holding down, crouch jump then press forward diagonal to clip into the wall enough to jump out."
],
"devNote": "This will never be in logic because there are easier ways to cross the room, but can be used to escape the sand."
},
{
"link": [
1,
2
],
"name": "Shinespark",
"entranceCondition": {
"comeInWithSpark": {}
},
"requires": [
{
  "shinespark": {
    "frames": 22,
    "excessFrames": 11
  }
}
]
},
{
"link": [
1,
2
],
"name": "Cross Room Jump with Bomb Boost",
"entranceCondition": {
"comeInWithBombBoost": {}
},
"requires": [
"canCrossRoomJumpIntoWater"
],
"note": [
"Only requires a runway of approximately 0.5 tiles in the adjacent room.",
"Bomb boost through the doorway and hold right."
]
},
{
"link": [
1,
2
],
"name": "Grapple Teleport",
"entranceCondition": {
"comeInWithGrappleTeleport": {
"blockPositions": [
[
12,
12
],
[
12,
13
]
]
}
},
"requires": [],
"bypassesDoorShell": true
},
{
"link": [
1,
2
],
"name": "Carry Grapple Teleport (Top Position)",
"entranceCondition": {
"comeInWithGrappleTeleport": {
"blockPositions": [
[
12,
12
]
]
}
},
"requires": [],
"bypassesDoorShell": true,
"exitCondition": {
"leaveWithGrappleTeleport": {
"blockPositions": [
[
12,
12
]
]
}
}
},
{
"link": [
1,
2
],
"name": "Carry Grapple Teleport (Bottom Position)",
"entranceCondition": {
"comeInWithGrappleTeleport": {
"blockPositions": [
[
12,
13
]
]
}
},
"requires": [],
"bypassesDoorShell": true,
"exitCondition": {
"leaveWithGrappleTeleport": {
"blockPositions": [
[
12,
13
]
]
}
}
},
{
"link": [
2,
1
],
"name": "Base",
"requires": [
"Gravity"
]
},
{
"link": [
2,
1
],
"name": "Suitless",
"requires": [
"canSuitlessMaridia",
"HiJump"
]
},
{
"link": [
2,
1
],
"name": "Frozen Zoa Bridge",
"requires": [
"canSuitlessMaridia",
"canUseFrozenEnemies",
"canPlayInSand"
],
"note": "Use the frozen Zoas as a bridge. Falling will require Samus to use ice beam and a crouch jump to escape."
},
{
"link": [
2,
1
],
"name": "Suitless Bombs",
"requires": [
"canSuitlessMaridia",
"h_canUseMorphBombs",
"canPlayInSand"
],
"note": "It is relatively easy to get out of the sand with rapidly placing bombs."
},
{
"link": [
2,
1
],
"name": "Butterfly Room Careful Jump (Right to Left)",
"notable": true,
"requires": [
"canSuitlessMaridia",
"canCarefulJump",
{
"or": [
{
"doorUnlockedAtNode": 2
},
"canTrickyJump"
]
},
"canPlayInSand"
],
"reusableRoomwideNotable": "Butterfly Room Careful Jump",
"note": [
"Kill all the Zoas and don't pick up their drops. If the door is unlocked, stand in the doorframe and jump across the room.",
"Otherwise, jump across the sand, starting 1.5 tiles away from the sandfall. Hold jump and forward the whole time. Samus will dip into the sand, but still make it to the other side."
]
},
{
"link": [
2,
1
],
"name": "Butterfly Room Suitless Sand Escape (Right to Left)",
"requires": [
"canSuitlessMaridia",
"h_canCrouchJumpDownGrab",
"canEscapeSand"
],
"note": [
"It is possible to get out of the sand with nothing.",
"While holding down, crouch jump then press forward diagonal to clip into the wall enough to jump out."
],
"devNote": "This will never be in logic because there are easier ways to cross the room, but can be used to escape the sand."
},
{
"link": [
2,
1
],
"name": "Shinespark",
"entranceCondition": {
"comeInWithSpark": {}
},
"requires": [
{
  "shinespark": {
    "frames": 22,
    "excessFrames": 11
  }
}
]
},
{
"link": [
2,
1
],
"name": "Cross Room Jump with Bomb Boost",
"entranceCondition": {
"comeInWithBombBoost": {}
},
"requires": [
"canCrossRoomJumpIntoWater"
],
"note": [
"Only requires a runway of approximately 0.5 tiles in the adjacent room.",
"Bomb boost through the doorway and hold left."
]
},
{
"link": [
2,
1
],
"name": "Grapple Teleport Door Lock Skip",
"entranceCondition": {
"comeInWithGrappleTeleport": {
"blockPositions": [
[
3,
12
],
[
3,
13
]
]
}
},
"requires": [],
"bypassesDoorShell": true
},
{
"link": [
2,
1
],
"name": "Carry Grapple Teleport (Top Position)",
"entranceCondition": {
"comeInWithGrappleTeleport": {
"blockPositions": [
[
3,
12
]
]
}
},
"requires": [],
"bypassesDoorShell": true,
"exitCondition": {
"leaveWithGrappleTeleport": {
"blockPositions": [
[
3,
12
]
]
}
}
},
{
"link": [
2,
1
],
"name": "Carry Grapple Teleport (Bottom Position)",
"entranceCondition": {
"comeInWithGrappleTeleport": {
"blockPositions": [
[
3,
13
]
]
}
},
"requires": [],
"bypassesDoorShell": true,
"exitCondition": {
"leaveWithGrappleTeleport": {
"blockPositions": [
[
3,
13
]
]
}
}
},
{
"link": [
2,
2
],
"name": "Leave with Runway",
"requires": [],
"exitCondition": {
"leaveWithRunway": {
"length": 1,
"openEnd": 1
}
}
},
{
"link": [
2,
2
],
"name": "Leave With Runway - Frozen Zoa",
"requires": [
"h_canFrozenEnemyRunway",
{
"or": [
"h_canTrickyFrozenEnemyRunway",
{
"enemyDamage": {
"enemy": "Zoa",
"type": "contact",
"hits": 1
}
}
]
}
],
"exitCondition": {
"leaveWithRunway": {
"length": 3,
"openEnd": 0
}
},
"note": [
"Freeze the Zoa just a few pixels higher than it would be if Samus was standing next to the farm.",
"Dodge and freeze the other Zoas, or tank a hit then kill them and don't collect their drops.",
"Maintain a half-tile runway between the frozen Zoa and the runway in order to extend it as much as possible."
]
},
{
"link": [
2,
2
],
"name": "Zoa Farm",
"requires": [
{
  "refill": [
    "Energy",
    "Missile",
    "Super"
  ]
}
]
},
{
"link": [
2,
2
],
"name": "Butterfly Room Door Lock Wall Ice Clip",
"notable": true,
"requires": [
"h_canNavigateUnderwater",
"canWallIceClip",
"Wave",
{
"enemyDamage": {
"enemy": "Zoa",
"type": "contact",
"hits": 2
}
}
],
"bypassesDoorShell": true,
"note": "Repeatedly freeze the Zoas to slowly push Samus into the wall and through the locked doorway.",
"devNote": "The drops will keep Samus at high energy, but 2 hits enemy damage were added as a worst-case scenario where the next-to-last Zoa you kill doesn't give you energy."
},
{
"link": [
2,
2
],
"name": "G-Mode Setup - Get Hit By Zoa",
"notable": false,
"requires": [],
"exitCondition": {
"leaveWithGModeSetup": {}
},
"flashSuitChecked": true
},
{
"link": [
2,
2
],
"name": "G-Mode Regain Mobility",
"requires": [
{
  "enemyDamage": {
    "enemy": "Zoa",
    "type": "contact",
    "hits": 1
  }
}
],
"gModeRegainMobility": {},
"flashSuitChecked": true
},
{
"link": [
3,
1
],
"name": "Base",
"requires": [
"h_canNavigateUnderwater"
]
},
{
"link": [
3,
2
],
"name": "Base",
"requires": [
"h_canNavigateUnderwater"
]
},
{
"link": [
1,
1
],
"name": "Base (Unlock Door)",
"requires": [],
"unlocksDoors": [
{
"types": [
"ammo"
],
"requires": []
}
]
},
{
"link": [
1,
1
],
"name": "Base (Come In Normally)",
"entranceCondition": {
"comeInNormally": {}
},
"requires": []
},
{
"link": [
2,
2
],
"name": "Base (Unlock Door)",
"requires": [],
"unlocksDoors": [
{
"types": [
"ammo"
],
"requires": []
}
]
},
{
"link": [
2,
2
],
"name": "Base (Come In Normally)",
"entranceCondition": {
"comeInNormally": {}
},
"requires": []
},
{
"link": [
3,
3
],
"name": "Base (Come In Normally)",
"entranceCondition": {
"comeInNormally": {}
},
"requires": []
}
]
}