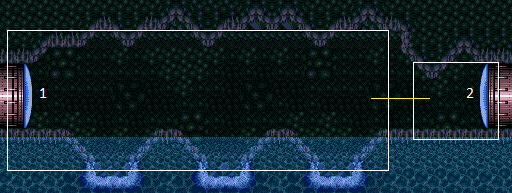
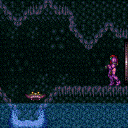
Bowling Alley Path
Room ID: 33
|
Exit condition: {
"leaveWithRunway": {
"length": 4,
"openEnd": 1,
"steepUpTiles": 1
}
}
|
|
Requires: "Gravity" Exit condition: {
"leaveWithRunway": {
"length": 5,
"openEnd": 1,
"steepUpTiles": 2
}
}
|
|
Freeze the Choot near the end of its descent or immediately after it jumps in order to be able to run onto and off of it without a problem. Requires: "h_canFrozenEnemyRunway" "Gravity" Exit condition: {
"leaveWithRunway": {
"length": 12,
"openEnd": 1,
"steepUpTiles": 4,
"steepDownTiles": 2
}
}
|
|
From: 1
Left Door
To: 1
Left Door
Freeze the Choot near the end of its descent or immediately after it jumps in order to be able to run onto and off of it without a problem. Requires: "h_canFrozenEnemyRunway" Exit condition: {
"leaveWithRunway": {
"length": 7,
"openEnd": 1,
"steepUpTiles": 2,
"steepDownTiles": 1
}
}
|
|
From: 1
Left Door
To: 1
Left Door
Notable: true 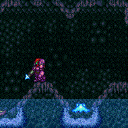
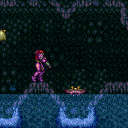
Freeze two Choots to significantly increase the length of the runway. Freeze each near the end of its descent or immediately after it jumps in order to be able to run onto and off of it without a problem. Standing between two Choots then precisely timing a crouched angle shot can help with the timing. A buffered X-Ray shot may also help. Requires: "h_canTrickyFrozenEnemyRunway" "Gravity" Exit condition: {
"leaveWithRunway": {
"length": 19,
"openEnd": 1,
"steepUpTiles": 6,
"steepDownTiles": 4
}
}
|
|
From: 1
Left Door
To: 1
Left Door
Notable: true
Freeze two Choots to significantly increase the length of the runway. Freeze each near the end of its descent or immediately after it jumps in order to be able to run onto and off of it without a problem. Standing between two Choots then precisely timing a crouched angle shot can help with the timing. A buffered X-Ray shot may also help. Requires: "h_canTrickyFrozenEnemyRunway" Exit condition: {
"leaveWithRunway": {
"length": 9,
"openEnd": 1,
"steepUpTiles": 3,
"steepDownTiles": 2
}
}
|
|
From: 1
Left Door
To: 1
Left Door
Notable: true 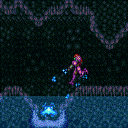
Freeze all three Choots to significantly increase the length of the runway and run across the entire room. Freeze each immediately after it jumps in order to be able to run onto and off of it without a problem. Jump between two of them and wait for them to fall and start to rise again, taking one Choot hit in the process. This will give Samus just enough time to shoot them both and jump and freeze the third and barely be able to use the runway before they thaw. With this runway, Samus can then get a suitless, in-room shinecharge, with just a 1-tap. Requires: "h_canTrickyFrozenEnemyRunway"
"Gravity"
"canInsaneJump"
{
"enemyDamage": {
"enemy": "Choot",
"type": "contact",
"hits": 1
}
}
Exit condition: {
"leaveWithRunway": {
"length": 28,
"openEnd": 0,
"steepUpTiles": 6,
"steepDownTiles": 6
}
}
|
|
From: 1
Left Door
To: 1
Left Door
Notable: true
Freeze all three Choots to significantly increase the length of the runway and run across the entire room. Freeze each immediately after it jumps in order to be able to run onto and off of it without a problem. Jump between two of them and wait for them to fall and start to rise again, taking one Choot hit in the process. This will give Samus just enough time to shoot them both and jump and freeze the third and barely be able to use the runway before they thaw. With this runway, Samus can then get a suitless, in-room shinecharge, with just a 1-tap. Requires: "h_canTrickyFrozenEnemyRunway"
"canInsaneJump"
{
"enemyDamage": {
"enemy": "Choot",
"type": "contact",
"hits": 1
}
}
Exit condition: {
"leaveWithRunway": {
"length": 15,
"openEnd": 1
}
}
|
|
Requires: {
"resetRoom": {
"nodes": [
1,
2
],
"mustStayPut": false
}
}
{
"refill": [
"Energy",
"Missile",
"Super"
]
}
|
|
Requires: "h_canCrystalFlash" |
|
Exit condition: {
"leaveWithGModeSetup": {}
}
|
|
Requires: {
"enemyDamage": {
"enemy": "Waver",
"type": "contact",
"hits": 1
}
}
|
|
|
|
Fire a Plasma shot while running into the room, jump and activate the shinespark wind-up mid-air. Wait to spark right until just as the Plasma shot goes off screen. Entrance condition: {
"comeInShinecharged": {
"framesRequired": 40
}
}
Requires: "Plasma"
"canHeroShot"
"canShinechargeMovementTricky"
"canMidairShinespark"
{
"shinespark": {
"frames": 37
}
}
Exit condition: {
"leaveWithSpark": {
"position": "bottom"
}
}
|
|
Use a Waver to damage boost across part of the room, then pass through any remaining enemies while IFrames are active. Killing the first waver and damage boosting with the second may be easier. Entrance condition: {
"comeInShinecharged": {
"framesRequired": 140
}
}
Requires: "canShinechargeMovementTricky"
"canHorizontalDamageBoost"
"canTrickyJump"
"canHitbox"
{
  "enemyDamage": {
    "enemy": "Waver",
    "type": "contact",
    "hits": 1
  }
}
Exit condition: {
"leaveShinecharged": {
"framesRemaining": "auto"
}
}
|
|
From: 1
Left Door
To: 2
Right Door
Gain a shinecharge while entering the room. Move quickly to the right, either dodging the enemies or using them to damage boost. Shoot open the door and spark through. Entrance condition: {
"comeInShinecharging": {
"length": 4,
"openEnd": 1,
"steepDownTiles": 2
}
}
Requires: "canShinechargeMovementTricky"
{
"shinespark": {
"frames": 15
}
}
Exit condition: {
"leaveWithSpark": {
"position": "bottom"
}
}
|
|
Freeze each of the three Choot enemies at the correct pixel height to walk across the room. Be careful about taking damage or falling on slopes. Entrance condition: {
"comeInWithStoredFallSpeed": {
"fallSpeedInTiles": 1
}
}
Requires: "h_canTrickyFrozenEnemyRunway" Exit condition: {
"leaveWithStoredFallSpeed": {
"fallSpeedInTiles": 1
}
}
|
|
From: 1
Left Door
To: 2
Right Door
Freeze each of the three Choot enemies at the correct pixel height to walk across the room. Be careful about taking damage or falling on slopes. Entrance condition: {
"comeInWithStoredFallSpeed": {
"fallSpeedInTiles": 2
}
}
Requires: "h_canTrickyFrozenEnemyRunway" Exit condition: {
"leaveWithStoredFallSpeed": {
"fallSpeedInTiles": 2
}
}
|
|
|
|
From: 2
Right Door
To: 1
Left Door
Run into the room, and just before Samus would run into the water, fire a Plasma shot and make a big jump across the room. The shot should clear the enemies and open the door. Activate the shinespark mid-air. Entrance condition: {
"comeInShinecharged": {
"framesRequired": 70
}
}
Requires: "Plasma"
"canShinechargeMovementComplex"
{
"shinespark": {
"frames": 24
}
}
Exit condition: {
"leaveWithSpark": {}
}
|
|
From: 2
Right Door
To: 1
Left Door
Run and jump through the room with Screw Attack. As the door starts to come on camera, shoot it open, carefully avoiding enemies from blocking the shot. Jump and activate the shinespark mid-air. Entrance condition: {
"comeInShinecharged": {
"framesRequired": 100
}
}
Requires: "ScrewAttack"
"canShinechargeMovementComplex"
{
"shinespark": {
"frames": 24
}
}
Exit condition: {
"leaveWithSpark": {}
}
|
|
Run into the room, and fire a Plasma shot. Depending on the vertical position needed for the spark, either stop on a dime and activate the shinespark from the ground, or continue running and jump into a midair shinespark. Wait to spark until just as the Plasma shot goes off screen. Entrance condition: {
"comeInShinecharged": {
"framesRequired": 40
}
}
Requires: "Plasma"
"canHeroShot"
"canShinechargeMovementTricky"
{
"shinespark": {
"frames": 28
}
}
Exit condition: {
"leaveWithSpark": {}
}
|
|
Jump into the Choot to damage boost across part of the room, then pass through any remaining enemies while IFrames are active. Entrance condition: {
"comeInShinecharged": {
"framesRequired": 150
}
}
Requires: "canShinechargeMovementTricky"
"canHorizontalDamageBoost"
"canTrickyJump"
"canHitbox"
{
"enemyDamage": {
"enemy": "Choot",
"type": "contact",
"hits": 1
}
}
Exit condition: {
"leaveShinecharged": {
"framesRemaining": "auto"
}
}
|
|
From: 2
Right Door
To: 1
Left Door
Gain a shinecharge while entering the room. Move quickly to the left, using Plasma or Screw Attack to avoid being hit by enemies. Shoot open the door and spark through. Entrance condition: {
"comeInShinecharging": {
"length": 8,
"openEnd": 1,
"steepDownTiles": 2
}
}
Requires: {
"or": [
"Plasma",
"ScrewAttack"
]
}
"canShinechargeMovementComplex"
{
"shinespark": {
"frames": 9
}
}
Exit condition: {
"leaveWithSpark": {}
}
|
|
From: 2
Right Door
To: 1
Left Door
Gain a shinecharge while entering the room. Move quickly to the left, dodging the enemies. Shoot open the door and spark through. Entrance condition: {
"comeInShinecharging": {
"length": 8,
"openEnd": 1,
"steepDownTiles": 2
}
}
Requires: "canShinechargeMovementTricky"
{
"shinespark": {
"frames": 9
}
}
Exit condition: {
"leaveWithSpark": {}
}
|
|
Freeze each of the three Choot enemies at the correct pixel height to walk across the room. Be careful about taking damage or falling on slopes. Entrance condition: {
"comeInWithStoredFallSpeed": {
"fallSpeedInTiles": 1
}
}
Requires: "h_canTrickyFrozenEnemyRunway" Exit condition: {
"leaveWithStoredFallSpeed": {
"fallSpeedInTiles": 1
}
}
|
|
From: 2
Right Door
To: 1
Left Door
Freeze each of the three Choot enemies at the correct pixel height to walk across the room. Be careful about taking damage or falling on slopes. Entrance condition: {
"comeInWithStoredFallSpeed": {
"fallSpeedInTiles": 2
}
}
Requires: "h_canTrickyFrozenEnemyRunway" Exit condition: {
"leaveWithStoredFallSpeed": {
"fallSpeedInTiles": 2
}
}
|
|
Entrance condition: {
"comeInWithGrappleTeleport": {
"blockPositions": [
[
3,
12
],
[
3,
13
]
]
}
}
Bypasses door shell: true |
|
From: 2
Right Door
To: 1
Left Door
Entrance condition: {
"comeInWithGrappleTeleport": {
"blockPositions": [
[
3,
12
]
]
}
}
Exit condition: {
"leaveWithGrappleTeleport": {
"blockPositions": [
[
3,
12
]
]
}
}
Bypasses door shell: true |
|
From: 2
Right Door
To: 1
Left Door
Entrance condition: {
"comeInWithGrappleTeleport": {
"blockPositions": [
[
3,
13
]
]
}
}
Exit condition: {
"leaveWithGrappleTeleport": {
"blockPositions": [
[
3,
13
]
]
}
}
Bypasses door shell: true |
|
Exit condition: {
"leaveWithRunway": {
"length": 8,
"openEnd": 1,
"steepUpTiles": 1
}
}
|
|
Requires: "Gravity" Exit condition: {
"leaveWithRunway": {
"length": 9,
"openEnd": 1,
"steepUpTiles": 2
}
}
|
|
Freeze the Choot near the end of its descent or immediately after it jumps in order to be able to run onto and off of it without a problem. Requires: "h_canFrozenEnemyRunway" "Gravity" Exit condition: {
"leaveWithRunway": {
"length": 16,
"openEnd": 1,
"steepUpTiles": 4,
"steepDownTiles": 2
}
}
|
|
From: 2
Right Door
To: 2
Right Door
Freeze the Choot near the end of its descent or immediately after it jumps in order to be able to run onto and off of it without a problem. Requires: "h_canFrozenEnemyRunway" Exit condition: {
"leaveWithRunway": {
"length": 11,
"openEnd": 1,
"steepUpTiles": 2,
"steepDownTiles": 1
}
}
|
|
From: 2
Right Door
To: 2
Right Door
Notable: true
Freeze two Choots to significantly increase the length of the runway. Freeze each near the end of its descent or immediately after it jumps in order to be able to run onto and off of it without a problem. Standing between two Choots then precisely timing a crouched angle shot can help with the timing. A buffered X-Ray shot may also help. Requires: "h_canTrickyFrozenEnemyRunway" "Gravity" Exit condition: {
"leaveWithRunway": {
"length": 23,
"openEnd": 1,
"steepUpTiles": 6,
"steepDownTiles": 4
}
}
|
|
From: 2
Right Door
To: 2
Right Door
Notable: true
Freeze two Choots to significantly increase the length of the runway. Freeze each near the end of its descent or immediately after it jumps in order to be able to run onto and off of it without a problem. Standing between two Choots then precisely timing a crouched angle shot can help with the timing. A buffered X-Ray shot may also help. Requires: "h_canTrickyFrozenEnemyRunway" Exit condition: {
"leaveWithRunway": {
"length": 16,
"openEnd": 1,
"steepUpTiles": 3,
"steepDownTiles": 2
}
}
|
|
From: 2
Right Door
To: 2
Right Door
Notable: true
Freeze all three Choots to significantly increase the length of the runway and run across the entire room. Freeze each immediately after it jumps in order to be able to run onto and off of it without a problem. Jump between two of them and wait for them to fall and start to rise again, taking one Choot hit in the process. This will give Samus just enough time to shoot them both and jump and freeze the third and barely be able to use the runway before they thaw. With this runway, Samus can then get a suitless, in-room shinecharge, with just a 1-tap. Requires: "h_canTrickyFrozenEnemyRunway"
"Gravity"
"canInsaneJump"
{
"enemyDamage": {
"enemy": "Choot",
"type": "contact",
"hits": 1
}
}
Exit condition: {
"leaveWithRunway": {
"length": 28,
"openEnd": 0,
"steepUpTiles": 6,
"steepDownTiles": 6
}
}
|
|
From: 2
Right Door
To: 2
Right Door
Notable: true
Freeze all three Choots to significantly increase the length of the runway and run across the entire room. Freeze each immediately after it jumps in order to be able to run onto and off of it without a problem. Jump between two of them and wait for them to fall and start to rise again, taking one Choot hit in the process. This will give Samus just enough time to shoot them both and jump and freeze the third and barely be able to use the runway before they thaw. With this runway, Samus can then get a suitless, in-room shinecharge, with just a 1-tap. Requires: "h_canTrickyFrozenEnemyRunway"
"canInsaneJump"
{
"enemyDamage": {
"enemy": "Choot",
"type": "contact",
"hits": 1
}
}
Exit condition: {
"leaveWithRunway": {
"length": 15,
"openEnd": 1
}
}
|
|
Exit condition: {
"leaveWithGModeSetup": {}
}
|
|
Requires: {
"enemyDamage": {
"enemy": "Waver",
"type": "contact",
"hits": 1
}
}
|
{
"$schema": "../../../schema/m3-room.schema.json",
"id": 33,
"name": "Bowling Alley Path",
"area": "Crateria",
"subarea": "East",
"playable": true,
"roomAddress": "0x79461",
"roomEnvironments": [
{
"heated": false
}
],
"nodes": [
{
"id": 1,
"name": "Left Door",
"nodeType": "door",
"nodeSubType": "blue",
"nodeAddress": "0x0018a12",
"doorEnvironments": [
{
"physics": "air"
}
]
},
{
"id": 2,
"name": "Right Door",
"nodeType": "door",
"nodeSubType": "blue",
"nodeAddress": "0x0018a1e",
"doorEnvironments": [
{
"physics": "air"
}
]
}
],
"enemies": [
{
"id": "e1",
"groupName": "Bowling Alley Path Wavers",
"enemyName": "Waver",
"quantity": 3,
"homeNodes": [
1,
2
]
},
{
"id": "e2",
"groupName": "Bowling Alley Path Choots",
"enemyName": "Choot",
"quantity": 3,
"homeNodes": [
1
]
}
],
"reusableRoomwideNotable": [
{
"name": "Bowling Alley Path Double Frozen Choot Runway",
"note": [
"Freeze two Choots to significantly increase the length of the runway.",
"Freeze each near the end of its descent or immediately after it jumps in order to be able to run onto and off of it without a problem.",
"Standing between two Choots then precisely timing a crouched angle shot can help with the timing. A buffered X-Ray shot may also help."
]
},
{
"name": "Bowling Alley Path Triple Frozen Choot Runway",
"note": [
"Freeze all three Choots to significantly increase the length of the runway and run across the entire room.",
"Freeze each immediately after it jumps in order to be able to run onto and off of it without a problem.",
"Jump between two of them and wait for them to fall and start to rise again, taking one Choot hit in the process.",
"This will give Samus just enough time to shoot them both and jump and freeze the third and barely be able to use the runway before they thaw.",
"With this runway, Samus can then get a suitless, in-room shinecharge, with just a 1-tap."
]
}
],
"links": [
{
"from": 1,
"to": [
{
"id": 1
},
{
"id": 2
}
]
},
{
"from": 2,
"to": [
{
"id": 1
},
{
"id": 2
}
]
}
],
"strats": [
{
"link": [
1,
1
],
"name": "Leave with Runway",
"requires": [],
"exitCondition": {
"leaveWithRunway": {
"length": 4,
"openEnd": 1,
"steepUpTiles": 1
}
}
},
{
"link": [
1,
1
],
"name": "Leave with Runway, With Gravity",
"requires": [
"Gravity"
],
"exitCondition": {
"leaveWithRunway": {
"length": 5,
"openEnd": 1,
"steepUpTiles": 2
}
}
},
{
"link": [
1,
1
],
"name": "Leave With Runway - Frozen Choot",
"requires": [
"h_canFrozenEnemyRunway",
"Gravity"
],
"exitCondition": {
"leaveWithRunway": {
"length": 12,
"openEnd": 1,
"steepUpTiles": 4,
"steepDownTiles": 2
}
},
"note": "Freeze the Choot near the end of its descent or immediately after it jumps in order to be able to run onto and off of it without a problem."
},
{
"link": [
1,
1
],
"name": "Leave With Runway, Suitless - Frozen Choot",
"requires": [
"h_canFrozenEnemyRunway"
],
"exitCondition": {
"leaveWithRunway": {
"length": 7,
"openEnd": 1,
"steepUpTiles": 2,
"steepDownTiles": 1
}
},
"note": "Freeze the Choot near the end of its descent or immediately after it jumps in order to be able to run onto and off of it without a problem.",
"devNote": "The submerged tiles don't contribute to the runway length."
},
{
"link": [
1,
1
],
"name": "Bowling Alley Path Double Frozen Choot Runway (Left)",
"notable": true,
"requires": [
"h_canTrickyFrozenEnemyRunway",
"Gravity"
],
"exitCondition": {
"leaveWithRunway": {
"length": 19,
"openEnd": 1,
"steepUpTiles": 6,
"steepDownTiles": 4
}
},
"reusableRoomwideNotable": "Bowling Alley Path Double Frozen Choot Runway",
"note": [
"Freeze two Choots to significantly increase the length of the runway.",
"Freeze each near the end of its descent or immediately after it jumps in order to be able to run onto and off of it without a problem.",
"Standing between two Choots then precisely timing a crouched angle shot can help with the timing. A buffered X-Ray shot may also help."
]
},
{
"link": [
1,
1
],
"name": "Bowling Alley Path Double Frozen Choot Runway, Suitless (Left)",
"notable": true,
"requires": [
"h_canTrickyFrozenEnemyRunway"
],
"exitCondition": {
"leaveWithRunway": {
"length": 9,
"openEnd": 1,
"steepUpTiles": 3,
"steepDownTiles": 2
}
},
"reusableRoomwideNotable": "Bowling Alley Path Double Frozen Choot Runway",
"note": [
"Freeze two Choots to significantly increase the length of the runway.",
"Freeze each near the end of its descent or immediately after it jumps in order to be able to run onto and off of it without a problem.",
"Standing between two Choots then precisely timing a crouched angle shot can help with the timing. A buffered X-Ray shot may also help."
],
"devNote": "The submerged tiles don't contribute to the runway length."
},
{
"link": [
1,
1
],
"name": "Bowling Alley Path Triple Frozen Choot Runway (Left)",
"notable": true,
"requires": [
"h_canTrickyFrozenEnemyRunway",
"Gravity",
"canInsaneJump",
{
"enemyDamage": {
"enemy": "Choot",
"type": "contact",
"hits": 1
}
}
],
"exitCondition": {
"leaveWithRunway": {
"length": 28,
"openEnd": 0,
"steepUpTiles": 6,
"steepDownTiles": 6
}
},
"reusableRoomwideNotable": "Bowling Alley Path Triple Frozen Choot Runway",
"note": [
"Freeze all three Choots to significantly increase the length of the runway and run across the entire room.",
"Freeze each immediately after it jumps in order to be able to run onto and off of it without a problem.",
"Jump between two of them and wait for them to fall and start to rise again, taking one Choot hit in the process.",
"This will give Samus just enough time to shoot them both and jump and freeze the third and barely be able to use the runway before they thaw.",
"With this runway, Samus can then get a suitless, in-room shinecharge, with just a 1-tap."
]
},
{
"link": [
1,
1
],
"name": "Bowling Alley Path Triple Frozen Choot Runway, Suitless (Left)",
"notable": true,
"requires": [
"h_canTrickyFrozenEnemyRunway",
"canInsaneJump",
{
"enemyDamage": {
"enemy": "Choot",
"type": "contact",
"hits": 1
}
}
],
"exitCondition": {
"leaveWithRunway": {
"length": 15,
"openEnd": 1
}
},
"reusableRoomwideNotable": "Bowling Alley Path Triple Frozen Choot Runway",
"note": [
"Freeze all three Choots to significantly increase the length of the runway and run across the entire room.",
"Freeze each immediately after it jumps in order to be able to run onto and off of it without a problem.",
"Jump between two of them and wait for them to fall and start to rise again, taking one Choot hit in the process.",
"This will give Samus just enough time to shoot them both and jump and freeze the third and barely be able to use the runway before they thaw.",
"With this runway, Samus can then get a suitless, in-room shinecharge, with just a 1-tap."
],
"devNote": [
"The submerged tiles don't contribute to the runway length.",
"Although there is a longer runway available for shinecharging, this is an equivalent for how fast Samus can leave the room.",
"It shouldn't be a problem, as this length should be enough for shinecharging at this difficulty."
]
},
{
"link": [
1,
1
],
"name": "Waver and Choot Farm",
"requires": [
{
"resetRoom": {
"nodes": [
1,
2
],
"mustStayPut": false
}
},
{
"refill": [
"Energy",
"Missile",
"Super"
]
}
]
},
{
"link": [
1,
1
],
"name": "Crystal Flash",
"requires": [
"h_canCrystalFlash"
]
},
{
"link": [
1,
1
],
"name": "G-Mode Setup - Get hit by Waver",
"notable": false,
"requires": [],
"exitCondition": {
"leaveWithGModeSetup": {}
}
},
{
"link": [
1,
1
],
"name": "G-Mode Regain Mobility",
"requires": [
{
  "enemyDamage": {
    "enemy": "Waver",
    "type": "contact",
    "hits": 1
  }
}
],
"gModeRegainMobility": {}
},
{
"link": [
1,
2
],
"name": "Base",
"requires": []
},
{
"link": [
1,
2
],
"name": "Plasma Hero Shot Spark",
"entranceCondition": {
"comeInShinecharged": {
"framesRequired": 40
}
},
"requires": [
"Plasma",
"canHeroShot",
"canShinechargeMovementTricky",
"canMidairShinespark",
{
"shinespark": {
"frames": 37
}
}
],
"exitCondition": {
"leaveWithSpark": {
"position": "bottom"
}
},
"unlocksDoors": [
{
"types": [
"super"
],
"requires": [],
"devNote": "FIXME: Using a Super seems extremely awkward but possible; add a higher-level tech requirement here."
},
{
"types": [
"missiles",
"powerbomb"
],
"requires": [
"never"
]
}
],
"note": [
"Fire a Plasma shot while running into the room, jump and activate the shinespark wind-up mid-air.",
"Wait to spark right until just as the Plasma shot goes off screen."
]
},
{
"link": [
1,
2
],
"name": "Shinecharged DamageBoost",
"entranceCondition": {
"comeInShinecharged": {
"framesRequired": 140
}
},
"requires": [
"canShinechargeMovementTricky",
"canHorizontalDamageBoost",
"canTrickyJump",
"canHitbox",
{
"enemyDamage": {
"enemy": "Waver",
"type": "contact",
"hits": 1
}
}
],
"exitCondition": {
"leaveShinecharged": {
"framesRemaining": "auto"
}
},
"unlocksDoors": [
{
"types": [
"super"
],
"requires": []
},
{
"types": [
"missiles",
"powerbomb"
],
"requires": [
"never"
]
}
],
"note": [
"Use a Waver to damage boost across part of the room, then pass through any remaining enemies while IFrames are active.",
"Killing the first waver and damage boosting with the second may be easier."
]
},
{
"link": [
1,
2
],
"name": "Come in Shinecharging, Leave With Spark",
"entranceCondition": {
"comeInShinecharging": {
"length": 4,
"openEnd": 1,
"steepDownTiles": 2
}
},
"requires": [
"canShinechargeMovementTricky",
{
"shinespark": {
"frames": 15
}
}
],
"exitCondition": {
"leaveWithSpark": {
"position": "bottom"
}
},
"unlocksDoors": [
{
"types": [
"super"
],
"requires": []
},
{
"types": [
"missiles",
"powerbomb"
],
"requires": [
"never"
]
}
],
"note": [
"Gain a shinecharge while entering the room.",
"Move quickly to the right, either dodging the enemies or using them to damage boost.",
"Shoot open the door and spark through."
]
},
{
"link": [
1,
2
],
"name": "Transition with Stored Fall Speed",
"entranceCondition": {
"comeInWithStoredFallSpeed": {
"fallSpeedInTiles": 1
}
},
"requires": [
"h_canTrickyFrozenEnemyRunway"
],
"exitCondition": {
"leaveWithStoredFallSpeed": {
"fallSpeedInTiles": 1
}
},
"unlocksDoors": [
{
"types": [
"missiles",
"super"
],
"requires": []
},
{
"types": [
"powerbomb"
],
"requires": [
"never"
]
}
],
"note": [
"Freeze each of the three Choot enemies at the correct pixel height to walk across the room.",
"Be careful about taking damage or falling on slopes."
]
},
{
"link": [
1,
2
],
"name": "Transition with Stored Fall Speed (more speed)",
"entranceCondition": {
"comeInWithStoredFallSpeed": {
"fallSpeedInTiles": 2
}
},
"requires": [
"h_canTrickyFrozenEnemyRunway"
],
"exitCondition": {
"leaveWithStoredFallSpeed": {
"fallSpeedInTiles": 2
}
},
"unlocksDoors": [
{
"types": [
"missiles",
"super"
],
"requires": []
},
{
"types": [
"powerbomb"
],
"requires": [
"never"
]
}
],
"note": [
"Freeze each of the three Choot enemies at the correct pixel height to walk across the room.",
"Be careful about taking damage or falling on slopes."
]
},
{
"link": [
2,
1
],
"name": "Base",
"requires": []
},
{
"link": [
2,
1
],
"name": "Leave With Spark (Come In Shinecharged, Plasma)",
"entranceCondition": {
"comeInShinecharged": {
"framesRequired": 70
}
},
"requires": [
"Plasma",
"canShinechargeMovementComplex",
{
"shinespark": {
"frames": 24
}
}
],
"exitCondition": {
"leaveWithSpark": {}
},
"unlocksDoors": [
{
"types": [
"super"
],
"requires": [],
"devNote": "FIXME: Using a Super seems very awkward but possible; add a higher-level tech requirement here."
},
{
"types": [
"missiles",
"powerbomb"
],
"requires": [
"never"
]
}
],
"note": [
"Run into the room, and just before Samus would run into the water, fire a Plasma shot and make a big jump across the room.",
"The shot should clear the enemies and open the door.",
"Activate the shinespark mid-air."
]
},
{
"link": [
2,
1
],
"name": "Leave With Spark (Come In Shinecharged, ScrewAttack)",
"entranceCondition": {
"comeInShinecharged": {
"framesRequired": 100
}
},
"requires": [
"ScrewAttack",
"canShinechargeMovementComplex",
{
"shinespark": {
"frames": 24
}
}
],
"exitCondition": {
"leaveWithSpark": {}
},
"unlocksDoors": [
{
"types": [
"super"
],
"requires": []
},
{
"types": [
"missiles",
"powerbomb"
],
"requires": [
"never"
]
}
],
"note": [
"Run and jump through the room with Screw Attack.",
"As the door starts to come on camera, shoot it open, carefully avoiding enemies from blocking the shot.",
"Jump and activate the shinespark mid-air."
]
},
{
"link": [
2,
1
],
"name": "Plasma Hero Shot Spark",
"entranceCondition": {
"comeInShinecharged": {
"framesRequired": 40
}
},
"requires": [
"Plasma",
"canHeroShot",
"canShinechargeMovementTricky",
{
"shinespark": {
"frames": 28
}
}
],
"exitCondition": {
"leaveWithSpark": {}
},
"unlocksDoors": [
{
"types": [
"super"
],
"requires": [],
"devNote": "FIXME: Using a Super seems extremely awkward but possible; add a higher-level tech requirement here."
},
{
"types": [
"missiles",
"powerbomb"
],
"requires": [
"never"
]
}
],
"note": [
"Run into the room, and fire a Plasma shot.",
"Depending on the vertical position needed for the spark, either stop on a dime and activate the shinespark from the ground, or continue running and jump into a midair shinespark.",
"Wait to spark until just as the Plasma shot goes off screen."
]
},
{
"link": [
2,
1
],
"name": "Shinecharged DamageBoost",
"entranceCondition": {
"comeInShinecharged": {
"framesRequired": 150
}
},
"requires": [
"canShinechargeMovementTricky",
"canHorizontalDamageBoost",
"canTrickyJump",
"canHitbox",
{
"enemyDamage": {
"enemy": "Choot",
"type": "contact",
"hits": 1
}
}
],
"exitCondition": {
"leaveShinecharged": {
"framesRemaining": "auto"
}
},
"unlocksDoors": [
{
"types": [
"super"
],
"requires": []
},
{
"types": [
"missiles",
"powerbomb"
],
"requires": [
"never"
]
}
],
"note": "Jump into the Choot to damage boost across part of the room, then pass through any remaining enemies while IFrames are active."
},
{
"link": [
2,
1
],
"name": "Come in Shinecharging, Leave With Spark (Plasma or ScrewAttack)",
"entranceCondition": {
"comeInShinecharging": {
"length": 8,
"openEnd": 1,
"steepDownTiles": 2
}
},
"requires": [
{
"or": [
"Plasma",
"ScrewAttack"
]
},
"canShinechargeMovementComplex",
{
"shinespark": {
"frames": 9
}
}
],
"exitCondition": {
"leaveWithSpark": {}
},
"unlocksDoors": [
{
"types": [
"super"
],
"requires": []
},
{
"types": [
"missiles",
"powerbomb"
],
"requires": [
"never"
]
}
],
"note": [
"Gain a shinecharge while entering the room.",
"Move quickly to the left, using Plasma or Screw Attack to avoid being hit by enemies.",
"Shoot open the door and spark through."
]
},
{
"link": [
2,
1
],
"name": "Come in Shinecharging, Leave With Spark (Dodge Enemies)",
"entranceCondition": {
"comeInShinecharging": {
"length": 8,
"openEnd": 1,
"steepDownTiles": 2
}
},
"requires": [
"canShinechargeMovementTricky",
{
"shinespark": {
"frames": 9
}
}
],
"exitCondition": {
"leaveWithSpark": {}
},
"unlocksDoors": [
{
"types": [
"super"
],
"requires": []
},
{
"types": [
"missiles",
"powerbomb"
],
"requires": [
"never"
]
}
],
"note": [
"Gain a shinecharge while entering the room.",
"Move quickly to the left, dodging the enemies.",
"Shoot open the door and spark through."
]
},
{
"link": [
2,
1
],
"name": "Transition with Stored Fall Speed",
"entranceCondition": {
"comeInWithStoredFallSpeed": {
"fallSpeedInTiles": 1
}
},
"requires": [
"h_canTrickyFrozenEnemyRunway"
],
"exitCondition": {
"leaveWithStoredFallSpeed": {
"fallSpeedInTiles": 1
}
},
"unlocksDoors": [
{
"types": [
"missiles",
"super"
],
"requires": []
},
{
"types": [
"powerbomb"
],
"requires": [
"never"
]
}
],
"note": [
"Freeze each of the three Choot enemies at the correct pixel height to walk across the room.",
"Be careful about taking damage or falling on slopes."
]
},
{
"link": [
2,
1
],
"name": "Transition with Stored Fall Speed (more speed)",
"entranceCondition": {
"comeInWithStoredFallSpeed": {
"fallSpeedInTiles": 2
}
},
"requires": [
"h_canTrickyFrozenEnemyRunway"
],
"exitCondition": {
"leaveWithStoredFallSpeed": {
"fallSpeedInTiles": 2
}
},
"unlocksDoors": [
{
"types": [
"missiles",
"super"
],
"requires": []
},
{
"types": [
"powerbomb"
],
"requires": [
"never"
]
}
],
"note": [
"Freeze each of the three Choot enemies at the correct pixel height to walk across the room.",
"Be careful about taking damage or falling on slopes."
]
},
{
"link": [
2,
1
],
"name": "Grapple Teleport",
"entranceCondition": {
"comeInWithGrappleTeleport": {
"blockPositions": [
[
3,
12
],
[
3,
13
]
]
}
},
"requires": [],
"bypassesDoorShell": true
},
{
"link": [
2,
1
],
"name": "Carry Grapple Teleport (Top Position)",
"entranceCondition": {
"comeInWithGrappleTeleport": {
"blockPositions": [
[
3,
12
]
]
}
},
"requires": [],
"bypassesDoorShell": true,
"exitCondition": {
"leaveWithGrappleTeleport": {
"blockPositions": [
[
3,
12
]
]
}
}
},
{
"link": [
2,
1
],
"name": "Carry Grapple Teleport (Bottom Position)",
"entranceCondition": {
"comeInWithGrappleTeleport": {
"blockPositions": [
[
3,
13
]
]
}
},
"requires": [],
"bypassesDoorShell": true,
"exitCondition": {
"leaveWithGrappleTeleport": {
"blockPositions": [
[
3,
13
]
]
}
}
},
{
"link": [
2,
2
],
"name": "Leave with Runway",
"requires": [],
"exitCondition": {
"leaveWithRunway": {
"length": 8,
"openEnd": 1,
"steepUpTiles": 1
}
}
},
{
"link": [
2,
2
],
"name": "Leave with Runway, With Gravity",
"requires": [
"Gravity"
],
"exitCondition": {
"leaveWithRunway": {
"length": 9,
"openEnd": 1,
"steepUpTiles": 2
}
}
},
{
"link": [
2,
2
],
"name": "Leave With Runway - Frozen Choot",
"requires": [
"h_canFrozenEnemyRunway",
"Gravity"
],
"exitCondition": {
"leaveWithRunway": {
"length": 16,
"openEnd": 1,
"steepUpTiles": 4,
"steepDownTiles": 2
}
},
"note": "Freeze the Choot near the end of its descent or immediately after it jumps in order to be able to run onto and off of it without a problem."
},
{
"link": [
2,
2
],
"name": "Leave With Runway, Suitless - Frozen Choot",
"requires": [
"h_canFrozenEnemyRunway"
],
"exitCondition": {
"leaveWithRunway": {
"length": 11,
"openEnd": 1,
"steepUpTiles": 2,
"steepDownTiles": 1
}
},
"note": "Freeze the Choot near the end of its descent or immediately after it jumps in order to be able to run onto and off of it without a problem.",
"devNote": "The submerged tiles don't contribute to the runway length."
},
{
"link": [
2,
2
],
"name": "Bowling Alley Path Double Frozen Choot Runway (Right)",
"notable": true,
"requires": [
"h_canTrickyFrozenEnemyRunway",
"Gravity"
],
"exitCondition": {
"leaveWithRunway": {
"length": 23,
"openEnd": 1,
"steepUpTiles": 6,
"steepDownTiles": 4
}
},
"reusableRoomwideNotable": "Bowling Alley Path Double Frozen Choot Runway",
"note": [
"Freeze two Choots to significantly increase the length of the runway.",
"Freeze each near the end of its descent or immediately after it jumps in order to be able to run onto and off of it without a problem.",
"Standing between two Choots then precisely timing a crouched angle shot can help with the timing. A buffered X-Ray shot may also help."
]
},
{
"link": [
2,
2
],
"name": "Bowling Alley Path Double Frozen Choot Runway, Suitless (Right)",
"notable": true,
"requires": [
"h_canTrickyFrozenEnemyRunway"
],
"exitCondition": {
"leaveWithRunway": {
"length": 16,
"openEnd": 1,
"steepUpTiles": 3,
"steepDownTiles": 2
}
},
"reusableRoomwideNotable": "Bowling Alley Path Double Frozen Choot Runway",
"note": [
"Freeze two Choots to significantly increase the length of the runway.",
"Freeze each near the end of its descent or immediately after it jumps in order to be able to run onto and off of it without a problem.",
"Standing between two Choots then precisely timing a crouched angle shot can help with the timing. A buffered X-Ray shot may also help."
],
"devNote": "The submerged tiles don't contribute to the runway length."
},
{
"link": [
2,
2
],
"name": "Bowling Alley Path Triple Frozen Choot Runway (Right)",
"notable": true,
"requires": [
"h_canTrickyFrozenEnemyRunway",
"Gravity",
"canInsaneJump",
{
"enemyDamage": {
"enemy": "Choot",
"type": "contact",
"hits": 1
}
}
],
"exitCondition": {
"leaveWithRunway": {
"length": 28,
"openEnd": 0,
"steepUpTiles": 6,
"steepDownTiles": 6
}
},
"reusableRoomwideNotable": "Bowling Alley Path Triple Frozen Choot Runway",
"note": [
"Freeze all three Choots to significantly increase the length of the runway and run across the entire room.",
"Freeze each immediately after it jumps in order to be able to run onto and off of it without a problem.",
"Jump between two of them and wait for them to fall and start to rise again, taking one Choot hit in the process.",
"This will give Samus just enough time to shoot them both and jump and freeze the third and barely be able to use the runway before they thaw.",
"With this runway, Samus can then get a suitless, in-room shinecharge, with just a 1-tap."
]
},
{
"link": [
2,
2
],
"name": "Bowling Alley Path Triple Frozen Choot Runway, Suitless (Right)",
"notable": true,
"requires": [
"h_canTrickyFrozenEnemyRunway",
"canInsaneJump",
{
"enemyDamage": {
"enemy": "Choot",
"type": "contact",
"hits": 1
}
}
],
"exitCondition": {
"leaveWithRunway": {
"length": 15,
"openEnd": 1
}
},
"reusableRoomwideNotable": "Bowling Alley Path Triple Frozen Choot Runway",
"note": [
"Freeze all three Choots to significantly increase the length of the runway and run across the entire room.",
"Freeze each immediately after it jumps in order to be able to run onto and off of it without a problem.",
"Jump between two of them and wait for them to fall and start to rise again, taking one Choot hit in the process.",
"This will give Samus just enough time to shoot them both and jump and freeze the third and barely be able to use the runway before they thaw.",
"With this runway, Samus can then get a suitless, in-room shinecharge, with just a 1-tap."
],
"devNote": [
"The submerged tiles don't contribute to the runway length.",
"Although there is a longer runway available for shinecharging, this is an equivalent for how fast Samus can leave the room.",
"It shouldn't be a problem, as this length should be enough for shinecharging at this difficulty."
]
},
{
"link": [
2,
2
],
"name": "G-Mode Setup - Get hit by Waver",
"notable": false,
"requires": [],
"exitCondition": {
"leaveWithGModeSetup": {}
}
},
{
"link": [
2,
2
],
"name": "G-Mode Regain Mobility",
"requires": [
{
"enemyDamage": {
"enemy": "Waver",
"type": "contact",
"hits": 1
}
}
],
"gModeRegainMobility": {}
}
]
}