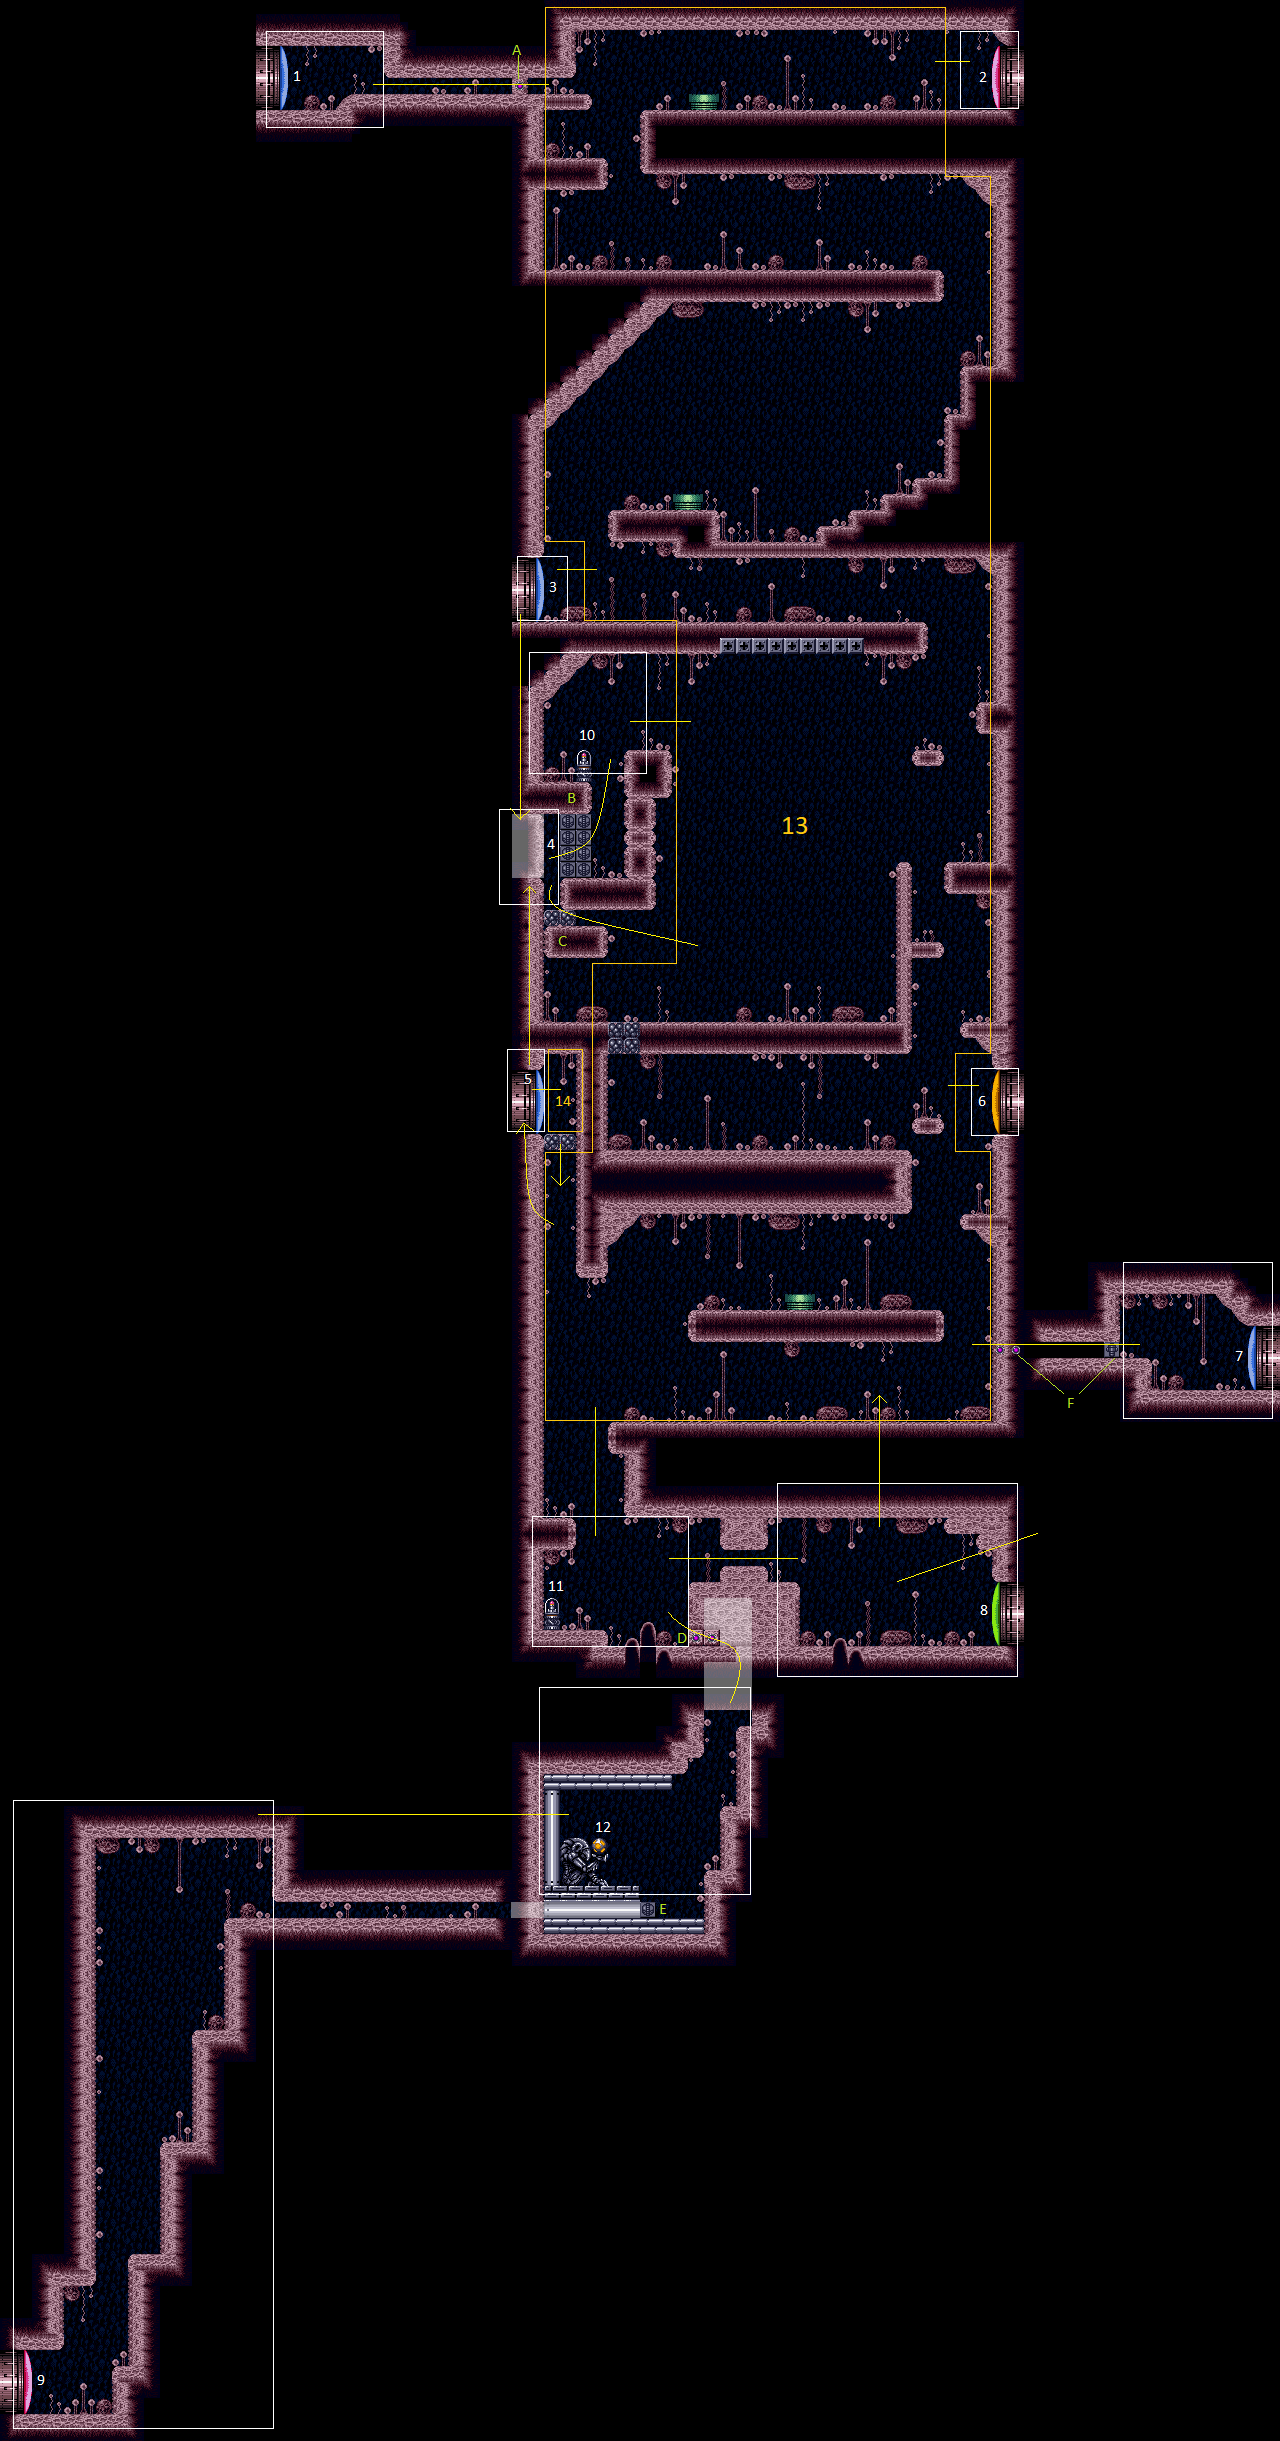
Big Pink
Room ID: 59
|
Exit condition: {
"leaveWithRunway": {
"length": 7,
"steepDownTiles": 1,
"openEnd": 0
}
}
|
|
From: 1
Left Side - Top Door
To: 1
Left Side - Top Door
Carefully lure a Zeb from the pipe. Requires: {
"or": [
"h_canBombThings",
{
"obstaclesCleared": [
"A"
]
}
]
}
Exit condition: {
"leaveWithGModeSetup": {}
}
|
|
From: 1
Left Side - Top Door
To: 4
Left Side - Middle Doorway (Behind the Power Bomb Blocks)
Roll through the camera scroll blocks and then through the bomb block. Avoiding the Sidehoppers can be tricky. Continue through the room to the Sidehoppers below the Grapple blocks, and carefully kill both of them with a single Power Bomb. Bounce up through the crumble blocks to the door to the left Entrance condition: {
"comeInWithGMode": {
"mode": "any",
"morphed": true
}
}
Requires: {
"or": [
"canTrickyJump",
"h_canArtificialMorphPowerBomb",
{
"enemyDamage": {
"enemy": "Sm. Sidehopper",
"hits": 1,
"type": "contact"
}
}
]
}
"h_canArtificialMorphSpringBall"
"h_canArtificialMorphPowerBomb"
Clears obstacles: C |
|
G-mode Morph Overload PLMs with Power Bombs and Spring Ball, Break Power Bomb Blocks (Extreme)
Big Pink
From: 1
Left Side - Top Door
To: 4
Left Side - Middle Doorway (Behind the Power Bomb Blocks)
Roll through the camera scroll blocks and then through the bomb block. Avoiding the Sidehoppers can be tricky. Continue through the room to the Sidehoppers below the Grapple blocks, and carefully kill both of them with a single Power Bomb. Bounce up through the crumble blocks to the door to the left Use a Power Bomb then quickly exit G-Mode before it explodes to also break the blocks. Entrance condition: {
"comeInWithGMode": {
"mode": "any",
"morphed": true
}
}
Requires: {
"or": [
"canTrickyJump",
"h_canArtificialMorphPowerBomb",
{
"enemyDamage": {
"enemy": "Sm. Sidehopper",
"hits": 1,
"type": "contact"
}
}
]
}
"h_canArtificialMorphSpringBall"
"h_canArtificialMorphPowerBomb"
"h_canArtificialMorphPowerBomb"
Clears obstacles: B, C |
|
From: 1
Left Side - Top Door
To: 12
Bottom Chozo Item
Roll through the camera scroll blocks and then through the bomb block. Avoiding the Sidehoppers can be tricky. Carefully roll through the rest of the room and through the bomb blocks to the lowest item. Entrance condition: {
"comeInWithGMode": {
"mode": "any",
"morphed": true
}
}
Requires: {
"or": [
"canTrickyJump",
"h_canArtificialMorphPowerBomb",
{
"enemyDamage": {
"enemy": "Sm. Sidehopper",
"hits": 1,
"type": "contact"
}
}
]
}
"h_canArtificialMorphPowerBomb"
"h_canArtificialMorphPowerBomb"
|
|
Requires: "Morph"
{
  "or": [
    "h_canBombThings",
    {
      "obstaclesCleared": [
        "A"
      ]
    }
  ]
}
Clears obstacles: A |
|
Entrance condition: {
"comeInSpeedballing": {
"runway": {
"length": 6,
"openEnd": 0
}
}
}
|
|
Entrance condition: {
"comeInShinecharging": {
"length": 5,
"steepUpTiles": 1,
"openEnd": 0
}
}
Requires: "canTemporaryBlue" "canSpringBallBounce" |
|
Roll through the camera scroll blocks and then through the bomb block. Entrance condition: {
"comeInWithGMode": {
"mode": "any",
"morphed": true
}
}
|
|
From: 1
Left Side - Top Door
To: 15
G-Mode Morph Junction (Middle Right)
Roll through the camera scroll blocks and then through the bomb block. Avoiding the hoppers can be tricky. Entrance condition: {
"comeInWithGMode": {
"mode": "any",
"morphed": true
}
}
Requires: {
"or": [
"Morph",
"canTrickyJump",
"h_canArtificialMorphPowerBomb",
{
"enemyDamage": {
"enemy": "Sm. Sidehopper",
"hits": 1,
"type": "contact"
}
}
]
}
{
  "or": [
    "h_canArtificialMorphMovement",
    {
      "and": [
        "h_canArtificialMorphPowerBomb",
        "h_canArtificialMorphPowerBomb"
      ]
    }
  ]
}
|
|
Roll through the camera scroll blocks and then through the bomb block. Entrance condition: {
"comeInWithGMode": {
"mode": "any",
"morphed": true
}
}
Requires: {
"or": [
"h_canArtificialMorphMovement",
{
"and": [
"h_canArtificialMorphPowerBomb",
"h_canArtificialMorphPowerBomb"
]
}
]
}
|
|
From: 2
Right Side - Top Door
To: 1
Left Side - Top Door
Jump over the bug pipe while blue and roll into the morph tunnel to break the bomb block. Shortcharge too much and the jump will not be able to reach the morph tunnel. Entrance condition: {
"comeInShinecharging": {
"length": 16,
"openEnd": 1
}
}
Requires: "canSpeedball" Clears obstacles: A |
|
Exit condition: {
"leaveWithRunway": {
"length": 18,
"openEnd": 0
}
}
|
|
From: 2
Right Side - Top Door
To: 2
Right Side - Top Door
Requires: {
"canShineCharge": {
"usedTiles": 25,
"openEnd": 1
}
}
"canShinechargeMovementComplex"
{
"or": [
"HiJump",
"canWalljump"
]
}
{
"shinespark": {
"frames": 28
}
}
Exit condition: {
"leaveWithSpark": {}
}
|
|
From: 2
Right Side - Top Door
To: 2
Right Side - Top Door
Lure a Zeb from the pipe. Exit condition: {
"leaveWithGModeSetup": {}
}
|
|
From: 2
Right Side - Top Door
To: 4
Left Side - Middle Doorway (Behind the Power Bomb Blocks)
Overload PLMs using the camera scroll blocks in front of the bomb blocks to the top left door. Avoiding the Sidehoppers can be tricky. Continue through the room to the Sidehoppers below the Grapple blocks, and carefully kill both of them with a single Power Bomb. Bounce up through the crumble blocks to the door to the left Entrance condition: {
"comeInWithGMode": {
"mode": "any",
"morphed": true
}
}
Requires: {
"or": [
"canTrickyJump",
"h_canArtificialMorphPowerBomb",
{
"enemyDamage": {
"enemy": "Sm. Sidehopper",
"hits": 1,
"type": "contact"
}
}
]
}
"h_canArtificialMorphSpringBall"
"h_canArtificialMorphPowerBomb"
Clears obstacles: C |
|
G-mode Morph Overload PLMs with Power Bombs and Spring Ball, Break Power Bomb Blocks (Extreme)
Big Pink
From: 2
Right Side - Top Door
To: 4
Left Side - Middle Doorway (Behind the Power Bomb Blocks)
Overload PLMs using the camera scroll blocks in front of the bomb blocks to the top left door. Avoiding the Sidehoppers can be tricky. Continue through the room to the Sidehoppers below the Grapple blocks, and carefully kill both of them with a single Power Bomb. Bounce up through the crumble blocks to the door to the left Use a Power Bomb then quickly exit G-Mode before it explodes to also break the blocks. Entrance condition: {
"comeInWithGMode": {
"mode": "any",
"morphed": true
}
}
Requires: {
"or": [
"canTrickyJump",
"h_canArtificialMorphPowerBomb",
{
"enemyDamage": {
"enemy": "Sm. Sidehopper",
"hits": 1,
"type": "contact"
}
}
]
}
"h_canArtificialMorphSpringBall"
"h_canArtificialMorphPowerBomb"
"h_canArtificialMorphPowerBomb"
Clears obstacles: B, C |
|
From: 2
Right Side - Top Door
To: 12
Bottom Chozo Item
Use a Power Bomb to boost horizontally to the Morph tunnel to the left and overload PLMs using the camera scroll blocks in front of the bomb blocks. Carefully roll through the rest of the room and through the bomb blocks to the lowest item. Entrance condition: {
"comeInWithGMode": {
"mode": "any",
"morphed": true
}
}
Requires: {
"ammo": {
"type": "PowerBomb",
"count": 4
}
}
|
|
|
|
From: 2
Right Side - Top Door
To: 15
G-Mode Morph Junction (Middle Right)
Avoiding the hoppers can be tricky. Entrance condition: {
"comeInWithGMode": {
"mode": "any",
"morphed": true
}
}
Requires: {
"or": [
"Morph",
{
"and": [
{
"or": [
"canTrickyJump",
{
"enemyDamage": {
"enemy": "Sm. Sidehopper",
"hits": 1,
"type": "contact"
}
}
]
},
{
"or": [
"h_canArtificialMorphSpringBall",
"h_canArtificialMorphIBJ"
]
}
]
},
"h_canArtificialMorphPowerBomb"
]
}
{
"or": [
"h_canArtificialMorphMovement",
{
"and": [
"h_canArtificialMorphPowerBomb",
"h_canArtificialMorphPowerBomb"
]
}
]
}
|
|
From: 3
Left Side - Top Middle Door (Main Entrance)
To: 3
Left Side - Top Middle Door (Main Entrance)
Exit condition: {
"leaveWithRunway": {
"length": 25,
"openEnd": 1
}
}
|
|
From: 3
Left Side - Top Middle Door (Main Entrance)
To: 3
Left Side - Top Middle Door (Main Entrance)
Carefully lure a Zeb from the pipe below while freezing it. Samus must start to the left of the pipe in order for the Zeb to move left at the end. Requires: "canTrickyUseFrozenEnemies" Exit condition: {
"leaveWithGModeSetup": {}
}
|
|
From: 3
Left Side - Top Middle Door (Main Entrance)
To: 4
Left Side - Middle Doorway (Behind the Power Bomb Blocks)
Notable: true 
Setup a Moondance such that Samus will fall through 2 tiles Moonfall towards the door, aim down while falling, and turn around twice. Entrance condition: {
"comeInWithStoredFallSpeed": {
"fallSpeedInTiles": 2
}
}
|
|
From: 3
Left Side - Top Middle Door (Main Entrance)
To: 10
Top Item (Above Hopper Pit)
Entrance condition: {
"comeInShinecharging": {
"length": 24,
"openEnd": 1
}
}
Requires: "canHorizontalShinespark"
{
"shinespark": {
"frames": 38,
"excessFrames": 7
}
}
|
|
|
|
From: 3
Left Side - Top Middle Door (Main Entrance)
To: 15
G-Mode Morph Junction (Middle Right)
Entrance condition: {
"comeInWithGMode": {
"mode": "any",
"morphed": true
}
}
|
|
From: 4
Left Side - Middle Doorway (Behind the Power Bomb Blocks)
To: 4
Left Side - Middle Doorway (Behind the Power Bomb Blocks)
Exit condition: {
"leaveWithRunway": {
"length": 1,
"openEnd": 1
}
}
|
|
From: 4
Left Side - Middle Doorway (Behind the Power Bomb Blocks)
To: 4
Left Side - Middle Doorway (Behind the Power Bomb Blocks)
Use the morph tunnel that used to have crumble blocks as a faster path to the Mission Impossible transition. Requires: "Morph"
{
"canShineCharge": {
"usedTiles": 16,
"openEnd": 0
}
}
{
"or": [
"canShinechargeMovementTricky",
{
"and": [
"canShinechargeMovement",
"h_canUseSpringBall"
]
}
]
}
{
"obstaclesCleared": [
"C"
]
}
Exit condition: {
"leaveShinecharged": {
"framesRemaining": 60
}
}
|
|
From: 4
Left Side - Middle Doorway (Behind the Power Bomb Blocks)
To: 4
Left Side - Middle Doorway (Behind the Power Bomb Blocks)
Use a Power Bomb, then exit G-Mode. Entrance condition: {
"comeInWithGMode": {
"mode": "any",
"morphed": true
}
}
Requires: "h_canArtificialMorphPowerBomb" Clears obstacles: B, C |
|
From: 4
Left Side - Middle Doorway (Behind the Power Bomb Blocks)
To: 4
Left Side - Middle Doorway (Behind the Power Bomb Blocks)
Carefully lure a Zeb from the pipe below while freezing it. Samus must start to the left of the pipe in order for the Zeb to move left at the end. Requires: "canTrickyUseFrozenEnemies"
{
"or": [
"h_canUsePowerBombs",
{
"obstaclesCleared": [
"B"
]
},
{
"and": [
"Morph",
{
"obstaclesCleared": [
"C"
]
}
]
}
]
}
{
"or": [
"canWalljump",
"HiJump",
"SpaceJump",
"canSpringBallJumpMidAir"
]
}
Exit condition: {
"leaveWithGModeSetup": {}
}
|
|
From: 4
Left Side - Middle Doorway (Behind the Power Bomb Blocks)
To: 10
Top Item (Above Hopper Pit)
Requires: {
"or": [
"h_canUsePowerBombs",
{
"obstaclesCleared": [
"B"
]
}
]
}
Clears obstacles: B |
|
From: 4
Left Side - Middle Doorway (Behind the Power Bomb Blocks)
To: 10
Top Item (Above Hopper Pit)
Perform a horizontal shinespark through the door transition, from a horizontal position that triggers a deep transition in the door. Sparking from one or two pixels away from the door is an example position that works (if possible in the neighboring room). In general, about one third of positions will work, with working positions occuring in periodic windows that are each approximately two pixels wide, separated by bad windows that are approximately 4 pixels wide. If successful, Samus will spawn inside the Power Bomb blocks. After the shinespark crash animation ends, Samus should be standing and able to X-Ray climb. Entrance condition: {
"comeInWithSpark": {}
}
Requires: "canDeepTransition"
{
"shinespark": {
"frames": 2,
"excessFrames": 2
}
}
"canXRayClimb"
|
|
From: 4
Left Side - Middle Doorway (Behind the Power Bomb Blocks)
To: 10
Top Item (Above Hopper Pit)
Stand facing the door in the previous room, at a specific distance from the door, approximately a 3-pixel window at an effective distance of a 6-tile closed-end runway (taking into account how slopes can modify the effective distance). Pause, then unpause while holding dash and right. If positioned correctly, the unpause fade-in will finish on the exact frame that the transition would occur, delaying the transition by a frame. Samus will spawn standing inside the Power Bomb blocks and be able to X-Ray climb. Entrance condition: {
"comeInRunning": {
"minTiles": 5.3906,
"maxTiles": 5.5859,
"speedBooster": "any"
}
}
Requires: "canDeepTransition" "canXRayClimb" |
|
From: 4
Left Side - Middle Doorway (Behind the Power Bomb Blocks)
To: 10
Top Item (Above Hopper Pit)
Stand facing away from the door in the previous room, at a specific distance from the door, approximately a 2-pixel window at an effective distance of 3.7 tiles (taking into account how slopes can modify the effective distance). Pause, then unpause while holding dash and right. If positioned correctly, the unpause fade-in will finish on the exact frame that the transition would occur, delaying the transition by a frame. Samus will spawn standing inside the Power Bomb blocks and be able to X-Ray climb. Entrance condition: {
"comeInRunning": {
"minTiles": 3.6445,
"maxTiles": 3.7851,
"speedBooster": "any"
}
}
Requires: "canDeepTransition" "canXRayClimb" |
|
From: 4
Left Side - Middle Doorway (Behind the Power Bomb Blocks)
To: 13
Central Junction
Requires: "Morph" Clears obstacles: C |
|
From: 5
Left Side - Bottom Middle Door (Blocked by Crumble Blocks)
To: 4
Left Side - Middle Doorway (Behind the Power Bomb Blocks)
Climb up 1 screen. Entrance condition: {
"comeInWithDoorStuckSetup": {}
}
Requires: "canXRayClimb" |
|
From: 5
Left Side - Bottom Middle Door (Blocked by Crumble Blocks)
To: 5
Left Side - Bottom Middle Door (Blocked by Crumble Blocks)
Exit condition: {
"leaveWithRunway": {
"length": 1,
"openEnd": 1
}
}
|
|
From: 5
Left Side - Bottom Middle Door (Blocked by Crumble Blocks)
To: 5
Left Side - Bottom Middle Door (Blocked by Crumble Blocks)
Requires: "h_canCrystalFlash" |
|
From: 5
Left Side - Bottom Middle Door (Blocked by Crumble Blocks)
To: 14
Left Side - Botom Middle Door Spawn At Junction
|
|
From: 6
Right Side - Top Middle Door
To: 2
Right Side - Top Door
Enter with G-mode direct, back up to between 1 and 6 pixels from the door transition, and activate X-ray to get very deep stuck in the door. Climb up 4 screens, and perform a turnaround buffered spin-jump away from the door to trigger the transition, bypassing any lock on the door. Entrance condition: {
"comeInWithGMode": {
"mode": "direct",
"morphed": false
}
}
Requires: "canXRayClimb" "canBePatient" Bypasses door shell: true |
|
From: 6
Right Side - Top Middle Door
To: 6
Right Side - Top Middle Door
Exit condition: {
"leaveWithRunway": {
"length": 1,
"openEnd": 1
}
}
|
|
From: 6
Right Side - Top Middle Door
To: 6
Right Side - Top Middle Door
Kill the Reos in the hallway in front of the door, then go down and stand to the right of the Zeb spawner. Freeze the Zeb before it starts going horizontally then go up and wait for it. As the Zeb gets high enough, walk out of the doorway at the right time to get it to move horizontally at the optimal height. This is much easier with Morph - instead be morphed in the hallway and once the Zeb starts moving towards Samus, freeze it. Requires: "h_canFrozenEnemyRunway"
{
"or": [
"Morph",
"canTrickyEnemyExtendRunway"
]
}
Exit condition: {
"leaveWithRunway": {
"length": 3,
"openEnd": 0
}
}
|
|
From: 6
Right Side - Top Middle Door
To: 6
Right Side - Top Middle Door
Requires: "canShinechargeMovement"
{
"canShineCharge": {
"usedTiles": 19,
"openEnd": 0
}
}
Exit condition: {
"leaveShinecharged": {
"framesRemaining": 110
}
}
|
|
From: 6
Right Side - Top Middle Door
To: 6
Right Side - Top Middle Door
Carefully lure a Zeb from the pipe below. Exit condition: {
"leaveWithGModeSetup": {}
}
|
|
Entrance condition: {
"comeInWithGMode": {
"mode": "any",
"morphed": true
}
}
Requires: "h_canArtificialMorphMovement" |
|
From: 6
Right Side - Top Middle Door
To: 12
Bottom Chozo Item
Overload PLMs by moving through the camera scroll blocks in front of the passageway leading to the exit of Spore Spawn Supers. Entrance condition: {
"comeInWithGMode": {
"mode": "any",
"morphed": true
}
}
Requires: "h_canArtificialMorphMovement" |
|
From: 6
Right Side - Top Middle Door
To: 12
Bottom Chozo Item
Carefully roll off of the edge and land on the platform holding the item. Roll through it until PLMs are overloaded, then roll through the bomb blocks and down below. Entrance condition: {
"comeInWithGMode": {
"mode": "direct",
"morphed": true
}
}
Requires: {
"itemNotCollectedAtNode": 11
}
"canRiskPermanentLossOfAccess"
"h_canArtificialMorphMovement"
|
|
|
|
From: 6
Right Side - Top Middle Door
To: 15
G-Mode Morph Junction (Middle Right)
If using Bombs, lure and kill the Reo. If using Spring Ball, it's important to release jump before reaching to peak of each jump to outrun the Reo. Entrance condition: {
"comeInWithGMode": {
"mode": "any",
"morphed": true
}
}
Requires: "h_canArtificialMorphMovement" |
|
From: 7
Right Side - Bottom Middle Door (Behind the Super Block)
To: 7
Right Side - Bottom Middle Door (Behind the Super Block)
Exit condition: {
"leaveWithRunway": {
"length": 7,
"openEnd": 0
}
}
|
|
From: 7
Right Side - Bottom Middle Door (Behind the Super Block)
To: 7
Right Side - Bottom Middle Door (Behind the Super Block)
Requires: {
"canShineCharge": {
"usedTiles": 24,
"openEnd": 1
}
}
"canShinechargeMovementComplex"
"Morph"
{
"obstaclesCleared": [
"F"
]
}
Exit condition: {
"leaveShinecharged": {
"framesRemaining": 25
}
}
|
|
From: 7
Right Side - Bottom Middle Door (Behind the Super Block)
To: 13
Central Junction
Requires: "Morph"
{
"or": [
{
"and": [
"h_canBombThings",
{
"ammo": {
"type": "Super",
"count": 1
}
}
]
},
{
"obstaclesCleared": [
"F"
]
}
]
}
Clears obstacles: F |
|
From: 7
Right Side - Bottom Middle Door (Behind the Super Block)
To: 13
Central Junction
Notable: true 
Quickly jump and precisely shoot the super block and in the same motion take out the bomb blocks with a speedball. Entrance condition: {
"comeInShinecharging": {
"length": 5,
"openEnd": 0
}
}
Requires: "canSpeedball"
"canTrickyJump"
"canSlowShortCharge"
{
"ammo": {
"type": "Super",
"count": 1
}
}
Clears obstacles: F |
|
From: 7
Right Side - Bottom Middle Door (Behind the Super Block)
To: 13
Central Junction
Position Samus next to the Super block, while keeping the speed effect with a Temporary Blue Chain, and break it. Then bounce into the morph tunnel, while keeping speed, and continuing all the way through with SpringBall Avoiding the Temporary Blue Chain is possible, but harder. Entrance condition: {
"comeInShinecharging": {
"length": 7,
"openEnd": 0
}
}
Requires: "canChainTemporaryBlue"
"canSpringBallBounce"
{
"ammo": {
"type": "Super",
"count": 1
}
}
Clears obstacles: F |
|
From: 8
Right Side - Bottom Door
To: 1
Left Side - Top Door
While using multiple Power Bomb boost Spring Ball jumps, to climb the room, overload PLMs by moving through the camera scroll blocks in front of the passageway leading to the exit of Spore Spawn Supers. Note that one Power Bomb can be saved by carefully jumping out of this morph passageway. Kill or carefully dodge the Sidehoppers at the top, then Power Bomb boost Spring Ball jump up to the top left door and exit G-Mode. Entrance condition: {
"comeInWithGMode": {
"mode": "any",
"morphed": true
}
}
Requires: "h_canArtificialMorphSpringBallBombJump"
{
"ammo": {
"type": "PowerBomb",
"count": 3
}
}
{
"or": [
"canTrickyJump",
"h_canArtificialMorphPowerBomb"
]
}
{
"or": [
"canTrickyJump",
"h_canArtificialMorphPowerBomb",
{
"enemyDamage": {
"enemy": "Sm. Sidehopper",
"hits": 1,
"type": "contact"
}
}
]
}
|
|
From: 8
Right Side - Bottom Door
To: 2
Right Side - Top Door
Enter with G-mode direct, back up to between 1 and 6 pixels from the door transition, and activate X-ray to get very deep stuck in the door. Climb up 6 screens, and perform a turnaround buffered spin-jump away from the door to trigger the transition, bypassing any lock on the door. Entrance condition: {
"comeInWithGMode": {
"mode": "direct",
"morphed": false
}
}
Requires: "canXRayClimb" "canBeVeryPatient" Bypasses door shell: true |
|
From: 8
Right Side - Bottom Door
To: 4
Left Side - Middle Doorway (Behind the Power Bomb Blocks)
While using multiple Power Bomb boost Spring Ball jumps, to climb the room, overload PLMs by moving through the camera scroll blocks in front of the passageway leading to the exit of Spore Spawn Supers. Carefully dodge the Reos to the left of the door leading to the Pink Hopper Room and lure them and the Sidehoppers close to each other. Place a Power Bomb to kill them and both Sidehoppers above. Get into the Sidehopper pit and jump up and into the tunnel and go through the crumble blocks to the door to the left. Entrance condition: {
"comeInWithGMode": {
"mode": "any",
"morphed": true
}
}
Requires: "h_canArtificialMorphSpringBallBombJump" "h_additionalBomb" "h_additionalBomb" Clears obstacles: C |
|
From: 8
Right Side - Bottom Door
To: 4
Left Side - Middle Doorway (Behind the Power Bomb Blocks)
While using multiple Power Bomb boost Spring Ball jumps, to climb the room, overload PLMs by moving through the camera scroll blocks in front of the passageway leading to the exit of Spore Spawn Supers. Carefully dodge the Reos to the left of the door leading to the Pink Hopper Room and lure them and the Sidehoppers close to each other. Place a Power Bomb to kill them and both Sidehoppers above. Get into the Sidehopper pit and jump up and into the tunnel and go through the crumble blocks to the door to the left. Use a Power Bomb then quickly exit G-Mode before it explodes to also break the blocks. Entrance condition: {
"comeInWithGMode": {
"mode": "any",
"morphed": true
}
}
Requires: "h_canArtificialMorphSpringBallBombJump" "h_additionalBomb" "h_additionalBomb" "h_additionalBomb" Clears obstacles: B, C |
|
From: 8
Right Side - Bottom Door
To: 6
Right Side - Top Middle Door
Enter with G-mode direct, back up to between 1 and 6 pixels from the door transition, and activate X-ray to get very deep stuck in the door. Climb up 2 screens, and perform a turnaround buffered spin-jump away from the door to trigger the transition, bypassing any lock on the door. Entrance condition: {
"comeInWithGMode": {
"mode": "direct",
"morphed": false
}
}
Requires: "canXRayClimb" Bypasses door shell: true |
|
Exit condition: {
"leaveWithRunway": {
"length": 13,
"openEnd": 0
}
}
|
|
Requires: "Morph" |
|
Entrance condition: {
"comeInWithGMode": {
"mode": "any",
"morphed": true
}
}
Requires: "h_canArtificialMorphMovement" |
|
From: 8
Right Side - Bottom Door
To: 12
Bottom Chozo Item
Overload PLMs by moving through the camera scroll blocks in front of the passageway leading to the exit of Spore Spawn Supers. Entrance condition: {
"comeInWithGMode": {
"mode": "any",
"morphed": true
}
}
Requires: {
"or": [
"Morph",
"h_canArtificialMorphIBJ",
{
"and": [
"h_canArtificialMorphSpringBall",
"HiJump"
]
}
]
}
|
|
From: 8
Right Side - Bottom Door
To: 12
Bottom Chozo Item
Roll through it until PLMs are overloaded, then roll through the bomb blocks and down below. Entrance condition: {
"comeInWithGMode": {
"mode": "direct",
"morphed": true
}
}
Requires: {
"itemNotCollectedAtNode": 11
}
"canRiskPermanentLossOfAccess"
"h_canArtificialMorphSpringBall"
|
|
From: 8
Right Side - Bottom Door
To: 13
Central Junction
Climb up 1 screen. Entrance condition: {
"comeInWithDoorStuckSetup": {}
}
Requires: "canXRayClimb" |
|
From: 8
Right Side - Bottom Door
To: 15
G-Mode Morph Junction (Middle Right)
Entrance condition: {
"comeInWithGMode": {
"mode": "any",
"morphed": true
}
}
Requires: {
"or": [
"h_canArtificialMorphIBJ",
"Morph",
{
"and": [
"h_canArtificialMorphSpringBall",
"HiJump"
]
},
{
"and": [
"h_canArtificialMorphSpringBallBombJump",
"h_additionalBomb"
]
}
]
}
|
|
From: 9
Left Side - Bottom Door
To: 4
Left Side - Middle Doorway (Behind the Power Bomb Blocks)
Go into the morph tunnel below the Charge Beam location and Crystal Flash to force a standup and jump through. Samus is now unable to use X-Ray. Overload PLMs using the camera scroll blocks on the path upward, then go through the bomb blocks. Go up to the Sidehopper pit and go up through the crumble blocks and through to the next room. Entrance condition: {
"comeInWithGMode": {
"mode": "any",
"morphed": false
}
}
Requires: "h_canCrystalFlash" "canMidAirMorph" |
|
Exit condition: {
"leaveWithRunway": {
"length": 6,
"openEnd": 0
}
}
|
|
From: 9
Left Side - Bottom Door
To: 11
Middle Item
Go into the morph tunnel below the Charge Beam location and Crystal Flash to force a standup and jump through. Samus is now unable to use X-Ray. Without Morph, be careful not to overload PLMs using the camera scroll blocks on the path upward. Then partially floor clip into the left side of the bomb block, and jump to clip through and escape. To exit G-Mode, damage down until the reserves trigger, which can be done most quickly using the Sidehoppers. Entrance condition: {
"comeInWithGMode": {
"mode": "any",
"morphed": true
}
}
Requires: {
"or": [
"h_canArtificialMorphIBJ",
"Morph",
{
"and": [
"h_canArtificialMorphSpringBall",
{
"or": [
"HiJump",
{
"and": [
"h_canArtificialMorphSpringBallBombJump",
"h_additionalBomb",
"h_additionalBomb",
"h_additionalBomb"
]
}
]
}
]
}
]
}
"h_canArtificialMorphCrystalFlash"
{
"or": [
"Morph",
{
"and": [
"canTwoTileSqueeze",
"canPartialFloorClip",
"canCeilingClip"
]
}
]
}
"canBePatient"
|
|
Requires: "Morph"
{
"or": [
"h_canUsePowerBombs",
{
"obstaclesCleared": [
"E"
]
}
]
}
Clears obstacles: E |
|
From: 10
Top Item (Above Hopper Pit)
To: 4
Left Side - Middle Doorway (Behind the Power Bomb Blocks)
Requires: {
"or": [
"h_canUsePowerBombs",
{
"obstaclesCleared": [
"B"
]
}
]
}
Clears obstacles: B |
|
|
|
Requires: "Morph" |
|
Requires: "Morph"
{
"or": [
"h_canBombThings",
{
"obstaclesCleared": [
"D"
]
}
]
}
Clears obstacles: D |
|
Requires: {
"canShineCharge": {
"usedTiles": 24,
"openEnd": 1
}
}
"canChainTemporaryBlue"
"canXRayTurnaround"
Clears obstacles: D |
|
|
|
Requires: "Morph"
{
"or": [
"h_canUsePowerBombs",
{
"obstaclesCleared": [
"E"
]
}
]
}
Clears obstacles: E |
|
Requires: "Morph"
{
"or": [
"h_canDestroyBombWalls",
{
"obstaclesCleared": [
"D"
]
}
]
}
Clears obstacles: D |
|
Partially floor clip into the left side of the bomb block above the charge beam location. Then jump to clip through the above tile. Requires: {
"or": [
"canTwoTileSqueeze",
{
"and": [
"Morph",
"canXRayStandUp"
]
}
]
}
"canPartialFloorClip"
"canCeilingClip"
|
|
Requires: "Morph"
{
"or": [
"h_canBombThings",
{
"obstaclesCleared": [
"A"
]
}
]
}
Clears obstacles: A |
|
Jump over the bug pipe while blue and roll into the morph tunnel to break the bomb block. Shortcharge too much and the jump will not be able to reach the morph tunnel. But you can airball and bounce into the tunnel. Requires: "canSpeedball"
{
"or": [
{
"canShineCharge": {
"usedTiles": 16,
"openEnd": 1
}
},
{
"and": [
{
"doorUnlockedAtNode": 2
},
{
"canShineCharge": {
"usedTiles": 17,
"openEnd": 1
}
}
]
}
]
}
Clears obstacles: A |
|
From: 13
Central Junction
To: 1
Left Side - Top Door
Build a ShineCharge on the below platform and bring it up to the morph tunnel by chaining Temporary Blue. Aim to bounce into the tunnel opening and use springball to bounce the rest of the way while blue. Requires: "canChainTemporaryBlue"
"canSpringBallBounce"
{
"or": [
{
"and": [
"canXRayTurnaround",
{
"canShineCharge": {
"usedTiles": 25,
"openEnd": 0
}
}
]
},
{
"canShineCharge": {
"usedTiles": 21,
"openEnd": 0
}
}
]
}
Clears obstacles: A |
|
From: 13
Central Junction
To: 1
Left Side - Top Door
Notable: true 
Shinecharge towards the top right door. Then turn around for a fast mockball after jumping the bug pipe. Requires: {
"obstaclesCleared": [
"A"
]
}
{
"canShineCharge": {
"usedTiles": 17,
"openEnd": 0
}
}
"canShinechargeMovementComplex"
"canMockball"
{
"shinespark": {
"frames": 10
}
}
Exit condition: {
"leaveWithSpark": {}
}
|
|
|
|
|
|
From: 13
Central Junction
To: 4
Left Side - Middle Doorway (Behind the Power Bomb Blocks)
Notable: true 
The Crumble Block next to the Power Bomb Blocks does not respawn, so it's possible to enter from this door, grab the items, and return without breaking the Power Bomb blocks. Requires: "Morph"
{
"obstaclesCleared": [
"C"
]
}
|
|
From: 13
Central Junction
To: 4
Left Side - Middle Doorway (Behind the Power Bomb Blocks)
Notable: true 
Freeze a Zeb inside of the crumble blocks below the entrance to the Power Bomb room and use it to get stuck inside the crumble blocks, breaking them. Repeatedly freeze a left facing Zeb from the enemy spawner lower in the room. Freeze it close to the right side of the crumble block so that Samus will attach to the enemy when rolling into it. Finally, jump with Bombs or SpringBall to break the crumble block. Requires: "canWallIceClip"
"Wave"
{
"or": [
"h_canUseSpringBall",
"h_canUseMorphBombs"
]
}
Clears obstacles: C |
|
From: 13
Central Junction
To: 5
Left Side - Bottom Middle Door (Blocked by Crumble Blocks)
Notable: true 
Lure the Reo (Bee) to the left to use it as a platform for ice clipping up through the crumbles to the Power Bomb room exit door. Watch the Reo bounce against the left wall until it does a slow hover towards Samus. There is a very small timing of when its right claw is above the small pale spore next to the big red spore, when Samus should jump to be above the Reo. Crouching with Samus' front toe beneath this spore (facing left) will cause the bee to fly with the correct timing after Samus takes knockback damage, with a 3 pixel window. This will cause it to fly left and into the two tile gap below the crumble blocks. Freeze it once to get above it, and then again for the ice clip. Once it is up there, the bee will become stuck and the room will need to be reset. But if the Reo does not fit in the hole, it is possible to just wait near the ledge for another slow hover to try again. With this strat, there is at most a two-frame window in which the Reo can be frozen. One frame (setup dependent) may let Samus crouch jump through the block; the next frame Samus can use Morph and X-Ray to clip through. Requires: "canTrickyUseFrozenEnemies" "canPreciseCeilingClip" "h_canXRayCeilingClip" |
|
From: 13
Central Junction
To: 5
Left Side - Bottom Middle Door (Blocked by Crumble Blocks)
Notable: true 
Lure the Reo (Bee) to the left to use it as a platform for ice clipping up through the crumbles to the Power Bomb room exit door. Watch the Reo bounce against the left wall until it does a slow hover towards Samus. There is a very small timing of when its right claw is above the small pale spore next to the big red spore, when Samus should jump to be above the Reo. Crouching with Samus' front toe beneath this spore (facing left) will cause the bee to fly with the correct timing after Samus takes knockback damage, with a 3 pixel window. This will cause it to fly left and into the two tile gap below the crumble blocks. Freeze it once to get above it, and then again for the ice clip. Once it is up there, the bee will become stuck and the room will need to be reset. But if the Reo does not fit in the hole, it is possible to just wait near the ledge for another slow hover to try again. With this setup, there is a one-frame window in which the Reo can be frozen. Without a precise setup, there is typically no way to clip through without Morph and X-Ray. Requires: "canTrickyUseFrozenEnemies" "canPreciseCeilingClip" |
|
From: 13
Central Junction
To: 5
Left Side - Bottom Middle Door (Blocked by Crumble Blocks)
Notable: true 
Raise a Zeb to be just below the crumble blocks and blindly freeze it to set up an ice clip to reach the Power Bomb room exit door. Get a bug from the pipe to spawn facing left and freeze it while moving to the ledge below the Hopper room door. While crouched, a spazer or wave beam shot will shoot through the floor in front of Samus. The bug must be frozen at a height between where Samus is crouched and where she is standing. Once frozen, somehow track how long until the freeze effect expires, and when the bug will reach the crumble blocks. If the bug is off camera when not frozen, it will despawn. Refreeze the Zeb below the crumble blocks and ice clip up to reach the door. Requires: "canTrickyUseFrozenEnemies"
"canStaggeredWalljump"
"canCameraManip"
{
"or": [
"Wave",
"Spazer"
]
}
"canPreciseCeilingClip"
|
|
|
|
From: 13
Central Junction
To: 7
Right Side - Bottom Middle Door (Behind the Super Block)
Requires: "Morph"
{
"obstaclesCleared": [
"F"
]
}
|
|
From: 13
Central Junction
To: 7
Right Side - Bottom Middle Door (Behind the Super Block)
Notable: true 
Break the bomb blocks then shoot a super into the morph tunnel to break the super block off screen. Requires pixel precision, although there are several pixels that work. The camera must be fully scrolled to the right, which may require going far left and back. Requires: "canOffScreenSuperShot" "h_canBombThings" "canCameraManip" Clears obstacles: F |
|
From: 13
Central Junction
To: 7
Right Side - Bottom Middle Door (Behind the Super Block)
Notable: true 
Crystal Flash in the morph tunnel to force a standup, making it possible to shoot the super block from the left while it's on-screen. Requires: "h_canBombThings"
"h_canCrystalFlash"
{
"ammo": {
"type": "Super",
"count": 1
}
}
Clears obstacles: F |
|
From: 13
Central Junction
To: 7
Right Side - Bottom Middle Door (Behind the Super Block)
Notable: true 
Break the bomb blocks by jumping into them with speed. These is more easily done at low run speed. Requires: "canSpeedball"
"canLateralMidAirMorph"
"canSlowShortCharge"
"canTrickyJump"
{
"canShineCharge": {
"usedTiles": 20,
"openEnd": 2
}
}
"canOffScreenSuperShot"
Clears obstacles: F |
|
From: 13
Central Junction
To: 7
Right Side - Bottom Middle Door (Behind the Super Block)
Notable: true
Stop with Temporary Blue in front of the bomb blocks then jump and bounce into the morph tunnel to clear them. Requires: "canTrickyJump"
"canTemporaryBlue"
"canLateralMidAirMorph"
{
"canShineCharge": {
"usedTiles": 22,
"openEnd": 2
}
}
"canOffScreenSuperShot"
Clears obstacles: F |
|
Requires: {
"or": [
"Grapple",
"h_canFly",
"canWalljump",
{
"and": [
"SpeedBooster",
"HiJump"
]
}
]
}
|
|
From: 13
Central Junction
To: 10
Top Item (Above Hopper Pit)
Requires: {
"or": [
{
"and": [
{
"canShineCharge": {
"usedTiles": 16,
"openEnd": 1
}
},
{
"shinespark": {
"frames": 24,
"excessFrames": 4
}
}
]
},
{
"and": [
"canHorizontalShinespark",
{
"canShineCharge": {
"usedTiles": 24,
"openEnd": 1
}
},
{
"shinespark": {
"frames": 38,
"excessFrames": 7
}
}
]
},
{
"and": [
"canHorizontalShinespark",
{
"doorUnlockedAtNode": 3
},
{
"canShineCharge": {
"usedTiles": 25,
"openEnd": 1
}
},
{
"shinespark": {
"frames": 38,
"excessFrames": 7
}
}
]
}
]
}
|
|
From: 13
Central Junction
To: 10
Top Item (Above Hopper Pit)
Lead an enemy through parts of the room as a way to reach the Mission Impossible missile location. The respawning Zeb can be used by carfeully keeping it on camera and staying high enough that it does not attack. Wait for it to respawn before attempting to guide it. Or a Reo can be brought up to this section of room, but sometimes gets stuck on the way. Requires: {
"or": [
"canTrickyUseFrozenEnemies",
{
"and": [
"canTrickyJump",
"canHorizontalDamageBoost",
{
"enemyDamage": {
"enemy": "Zeb",
"type": "contact",
"hits": 1
}
}
]
}
]
}
"canCameraManip"
|
|
|
|
Requires: {
"refill": [
"Energy",
"Missile",
"Super"
]
}
|
|
From: 14
Left Side - Botom Middle Door Spawn At Junction
To: 5
Left Side - Bottom Middle Door (Blocked by Crumble Blocks)
Jump through the door and shoot it open as you enter, landing on the door frame to avoid falling through the crumbles. Requires: "canPrepareForNextRoom" |
|
From: 14
Left Side - Botom Middle Door Spawn At Junction
To: 13
Central Junction
|
|
From: 15
G-Mode Morph Junction (Middle Right)
To: 1
Left Side - Top Door
Carefully dodge the Sidehoppers, or kill them with a Power Bomb. Be careful not to hit the bomb block with the Power Bomb or it will remain solid. With IBJ alone, it is easiest to IBJ from the bug pipe below to the ceiling, luring the Sidehoppers to the left. At the top, overload PLMs using the camera scroll block just in front of the block, then roll through it. Requires: {
"or": [
"Morph",
{
"and": [
"h_canArtificialMorphSpringBall",
"HiJump"
]
},
"h_canArtificialMorphIBJ"
]
}
{
"or": [
"Morph",
"canTrickyJump",
{
"enemyDamage": {
"enemy": "Sm. Sidehopper",
"hits": 1,
"type": "contact"
}
},
"h_canArtificialMorphPowerBomb"
]
}
|
|
From: 15
G-Mode Morph Junction (Middle Right)
To: 1
Left Side - Top Door
Go down and overload PLMs by moving through the camera scroll blocks in front of the passageway leading to the exit of Spore Spawn Supers. Use multiple Power Bomb boost Spring Ball jumps, to climb the room; note that one Power Bomb can be saved by carefully jumping out of this morph passageway. Kill or carefully dodge the Sidehoppers at the top, then Power Bomb boost Spring Ball jump up to the top left door and exit G-Mode. Requires: "h_canArtificialMorphSpringBallBombJump"
"h_canArtificialMorphPowerBomb"
"h_canArtificialMorphPowerBomb"
{
"or": [
"canTrickyJump",
"h_canArtificialMorphPowerBomb"
]
}
{
"or": [
"canTrickyJump",
"h_canArtificialMorphPowerBomb",
{
"enemyDamage": {
"enemy": "Sm. Sidehopper",
"hits": 1,
"type": "contact"
}
}
]
}
|
|
From: 15
G-Mode Morph Junction (Middle Right)
To: 4
Left Side - Middle Doorway (Behind the Power Bomb Blocks)
Overload PLMs by moving through the camera scroll blocks in front of the passageway leading to the exit of Spore Spawn Supers, or in front of the bomb block at the top left door. Safely kill the enemies, then mid-air morph and go through the crumble blocks. Requires: "canMidAirMorph" Clears obstacles: C |
|
From: 15
G-Mode Morph Junction (Middle Right)
To: 4
Left Side - Middle Doorway (Behind the Power Bomb Blocks)
If there are no Sidehoppers in the bottom right corner of their pen, roll down and carefully place bombs while luring and killing them. Otherwise, go down into the hallway below and carefully kill the two Reos and lure the Sidehoppers to the left. If they don't stay on the left, exit this hallway and enter it again to reset the camera and try again. Go up through the crumble blocks to the left. If PLMs are not yet overloaded, place Bombs next to the crumble blocks. Requires: "h_canArtificialMorphIBJ" Clears obstacles: C |
|
From: 15
G-Mode Morph Junction (Middle Right)
To: 4
Left Side - Middle Doorway (Behind the Power Bomb Blocks)
If there are no Sidehoppers in the bottom right corner of their pen, roll down and carefully place bombs while luring and killing them. Otherwise, go down into the hallway below and carefully kill the two Reos and lure the Sidehoppers to the left. If they don't stay on the left, exit this hallway and enter it again to reset the camera and try again. Go up through the crumble blocks to the left. If PLMs are not yet overloaded, place Bombs next to the crumble blocks. Use a Power Bomb then quickly exit G-Mode before it explodes to also break the blocks. Requires: "h_canArtificialMorphIBJ" "h_canArtificialMorphPowerBomb" Clears obstacles: B, C |
|
From: 15
G-Mode Morph Junction (Middle Right)
To: 4
Left Side - Middle Doorway (Behind the Power Bomb Blocks)
Carefully dodge the Reos to the left of the door leading to the Pink Hopper Room and lure them and the Sidehoppers close to each other. Place a Power Bomb to kill them and both Sidehoppers above. Go down below and lure the third Reo, below the Zeb pipe, off screen to the left. Overload PLMs by moving through the camera scroll blocks in front of the passageway leading to the exit of Spore Spawn Supers. Either carefully jump out of this morph tunnel or use a Power Bomb boost Spring Ball jump to get up to the ledge. Get into the Sidehopper pit and jump up and into the tunnel and go through the crumble blocks to the door to the left. Requires: "h_canArtificialMorphSpringBall"
"canCameraManip"
"h_canArtificialMorphPowerBomb"
{
"or": [
"HiJump",
"h_canArtificialMorphSpringBallBombJump",
"canTrickyJump"
]
}
Clears obstacles: C |
|
G-mode Morph Overload PLMs with Power Bombs and Spring Ball, Break Power Bomb Blocks (Medium)
Big Pink
From: 15
G-Mode Morph Junction (Middle Right)
To: 4
Left Side - Middle Doorway (Behind the Power Bomb Blocks)
Carefully dodge the Reos to the left of the door leading to the Pink Hopper Room and lure them and the Sidehoppers close to each other. Place a Power Bomb to kill them and both Sidehoppers above. Go down below and lure the third Reo, below the Zeb pipe, off screen to the left. Overload PLMs by moving through the camera scroll blocks in front of the passageway leading to the exit of Spore Spawn Supers. Either carefully jump out of this morph tunnel or use a Power Bomb boost Spring Ball jump to get up to the ledge. Get into the Sidehopper pit and jump up and into the tunnel and go through the crumble blocks to the door to the left. Use a Power Bomb then quickly exit G-Mode before it explodes to also break the blocks. Requires: "h_canArtificialMorphSpringBall"
"canCameraManip"
"h_canArtificialMorphPowerBomb"
"h_canArtificialMorphPowerBomb"
{
"or": [
"HiJump",
"h_canArtificialMorphSpringBallBombJump",
"canTrickyJump"
]
}
Clears obstacles: B, C |
|
From: 15
G-Mode Morph Junction (Middle Right)
To: 8
Right Side - Bottom Door
Requires: "h_canArtificialMorphMovement" |
|
From: 15
G-Mode Morph Junction (Middle Right)
To: 10
Top Item (Above Hopper Pit)
If there are no Sidehoppers in the bottom right corner of their pen, roll down and carefully place bombs while luring and killing them. Otherwise, go down into the hallway below and carefully kill the two Reos and lure the Sidehoppers to the left. If they don't stay on the left, exit this hallway and enter it again to reset the camera and try again. Then IBJ up to the item above. Requires: "h_canArtificialMorphIBJ" |
|
From: 15
G-Mode Morph Junction (Middle Right)
To: 12
Bottom Chozo Item
Overload PLMs by moving through the camera scroll blocks in front of the passageway leading to the exit of Spore Spawn Supers. Requires: "h_canArtificialMorphMovement" |
|
From: 15
G-Mode Morph Junction (Middle Right)
To: 13
Central Junction
Use a Power Bomb to kill any Sidehoppers in the pit below, then roll off and use a second, while exiting G-Mode to destroy the blocks in front of the door. Place the Power Bomb far enough left to hit the blocks, but not so far as to lure the Sidehopper. This is when Samus is on the right-most squiggly plant, or when there is one tile of air between the right wall and the edge of the screen. Requires: "h_canArtificialMorphPowerBomb" "h_canArtificialMorphPowerBomb" Clears obstacles: B |
{
"$schema": "../../../schema/m3-room.schema.json",
"id": 59,
"name": "Big Pink",
"area": "Brinstar",
"subarea": "Pink",
"playable": true,
"roomAddress": "0x79D19",
"roomEnvironments": [
{
"heated": false
}
],
"nodes": [
{
"id": 1,
"name": "Left Side - Top Door",
"nodeType": "door",
"nodeSubType": "blue",
"nodeAddress": "0x0018df6",
"doorEnvironments": [
{
"physics": "air"
}
]
},
{
"id": 2,
"name": "Right Side - Top Door",
"nodeType": "door",
"nodeSubType": "red",
"nodeAddress": "0x0018dc6",
"doorEnvironments": [
{
"physics": "air"
}
],
"locks": [
{
"name": "Big Pink Top Right Red Lock (to Kihunters)",
"lockType": "coloredDoor",
"unlockStrats": [
{
"name": "Base",
"notable": false,
"requires": [
"h_canOpenRedDoors"
]
}
]
}
]
},
{
"id": 3,
"name": "Left Side - Top Middle Door (Main Entrance)",
"nodeType": "door",
"nodeSubType": "blue",
"nodeAddress": "0x0018dd2",
"doorEnvironments": [
{
"physics": "air"
}
]
},
{
"id": 4,
"name": "Left Side - Middle Doorway (Behind the Power Bomb Blocks)",
"nodeType": "door",
"nodeSubType": "doorway",
"nodeAddress": "0x0018e02",
"doorEnvironments": [
{
"physics": "air"
}
]
},
{
"id": 5,
"name": "Left Side - Bottom Middle Door (Blocked by Crumble Blocks)",
"nodeType": "door",
"nodeSubType": "blue",
"nodeAddress": "0x0018dde",
"doorEnvironments": [
{
"physics": "air"
}
],
"spawnAt": 14,
"note": "Samus is considered to spawn at 14 because of the crumble blocks. This can be negated by performing a stationary spin jump when entering, allowing her to 'get back to 5'"
},
{
"id": 6,
"name": "Right Side - Top Middle Door",
"nodeType": "door",
"nodeSubType": "yellow",
"nodeAddress": "0x0018e1a",
"doorEnvironments": [
{
"physics": "air"
}
],
"locks": [
{
"name": "Big Pink Right Yellow Lock (to Hoppers)",
"lockType": "coloredDoor",
"unlockStrats": [
{
"name": "Base",
"notable": false,
"requires": [
"h_canOpenYellowDoors"
]
}
]
}
]
},
{
"id": 7,
"name": "Right Side - Bottom Middle Door (Behind the Super Block)",
"nodeType": "door",
"nodeSubType": "blue",
"nodeAddress": "0x0018e26",
"doorEnvironments": [
{
"physics": "air"
}
]
},
{
"id": 8,
"name": "Right Side - Bottom Door",
"nodeType": "door",
"nodeSubType": "green",
"nodeAddress": "0x0018dea",
"doorEnvironments": [
{
"physics": "air"
}
],
"locks": [
{
"name": "Big Pink Bottom Right Green Lock (to Green Hill Zone)",
"lockType": "coloredDoor",
"unlockStrats": [
{
"name": "Base",
"notable": false,
"requires": [
"h_canOpenGreenDoors"
]
}
]
}
]
},
{
"id": 9,
"name": "Left Side - Bottom Door",
"nodeType": "door",
"nodeSubType": "red",
"nodeAddress": "0x0018e0e",
"doorEnvironments": [
{
"physics": "air"
}
],
"locks": [
{
"name": "Big Pink Bottom Left Red Lock (to Waterway)",
"lockType": "coloredDoor",
"unlockStrats": [
{
"name": "Base",
"notable": false,
"requires": [
"h_canOpenRedDoors"
]
}
]
}
]
},
{
"id": 10,
"name": "Top Item (Above Hopper Pit)",
"nodeType": "item",
"nodeSubType": "visible",
"nodeItem": "Missile",
"nodeAddress": "0x78608"
},
{
"id": 11,
"name": "Middle Item",
"nodeType": "item",
"nodeSubType": "visible",
"nodeItem": "Missile",
"nodeAddress": "0x7860E"
},
{
"id": 12,
"name": "Bottom Chozo Item",
"nodeType": "item",
"nodeSubType": "chozo",
"nodeItem": "Charge",
"nodeAddress": "0x78614"
},
{
"id": 13,
"name": "Central Junction",
"nodeType": "junction",
"nodeSubType": "junction"
},
{
"id": 14,
"name": "Left Side - Botom Middle Door Spawn At Junction",
"nodeType": "junction",
"nodeSubType": "junction",
"note": "A junction used as a midpoint between 5 and 13 to express that a tech is required to access 5"
},
{
"id": 15,
"name": "G-Mode Morph Junction (Middle Right)",
"nodeType": "junction",
"nodeSubType": "g-mode",
"note": "Represents being on the second platform coming out of the right wall above the door to the Pink Hopper Room. This is below the floating platform by the Grapple blocks."
}
],
"obstacles": [
{
"id": "A",
"name": "Top Bomb Block",
"obstacleType": "inanimate",
"note": "The Bomb block that blocks the save room"
},
{
"id": "B",
"name": "Mid Power Bomb Blocks",
"obstacleType": "inanimate",
"note": "The Power Bomb Blocks that block Mission Impossible access"
},
{
"id": "C",
"name": "Crumble Blocks",
"obstacleType": "inanimate",
"note": "The Crumble Blocks that serve as an escape for the top Mission Impossible door"
},
{
"id": "D",
"name": "Bottom Bomb Blocks",
"obstacleType": "inanimate",
"note": "The Bomb blocks that separate Charge Beam from the main section"
},
{
"id": "E",
"name": "Bottom Power Bomb Block",
"obstacleType": "inanimate",
"note": "The Power Bomb block that separates Charge Beam from waterway"
},
{
"id": "F",
"name": "Spore Spawn Escape Barrier",
"obstacleType": "inanimate",
"note": "It's two bomb blocks and a Super block"
}
],
"enemies": [
{
"id": "e1",
"groupName": "Big Pink Top Zeb",
"enemyName": "Zeb",
"quantity": 1,
"homeNodes": [
13
],
"farmCycles": [
{
"name": "Crouch over spawn point",
"cycleFrames": 120,
"requires": []
}
]
},
{
"id": "e2",
"groupName": "Big Pink Middle Zeb",
"enemyName": "Zeb",
"quantity": 1,
"homeNodes": [
13
],
"farmCycles": [
{
"name": "Crouch over spawn point",
"cycleFrames": 120,
"requires": []
}
]
},
{
"id": "e3",
"groupName": "Big Pink Bottom Zeb",
"enemyName": "Zeb",
"quantity": 1,
"homeNodes": [
13
],
"farmCycles": [
{
"name": "Crouch over spawn point",
"cycleFrames": 120,
"requires": []
}
]
},
{
"id": "e4",
"groupName": "Big Pink Small Sidehoppers",
"enemyName": "Sm. Sidehopper",
"quantity": 4,
"homeNodes": [
13
]
},
{
"id": "e5",
"groupName": "Big Pink Reos",
"enemyName": "Reo",
"quantity": 3,
"homeNodes": [
13
]
}
],
"reusableRoomwideNotable": [
{
"name": "Big Pink Speedball into Raised Bomb Blocks",
"note": [
"Break the \"Spore Spawn Skip\" bomb blocks (from the left) using only speed.",
"Either by jump morphing into them, or by falling and bouncing through them with Temporary Blue."
]
}
],
"links": [
{
"from": 1,
"to": [
{
"id": 1
},
{
"id": 4
},
{
"id": 12
},
{
"id": 13
},
{
"id": 15
}
]
},
{
"from": 2,
"to": [
{
"id": 1
},
{
"id": 2
},
{
"id": 4
},
{
"id": 12
},
{
"id": 13
},
{
"id": 15
}
]
},
{
"from": 3,
"to": [
{
"id": 3
},
{
"id": 4
},
{
"id": 10
},
{
"id": 13
},
{
"id": 15
}
]
},
{
"from": 4,
"to": [
{
"id": 4
},
{
"id": 10
},
{
"id": 13
}
]
},
{
"from": 5,
"to": [
{
"id": 4
},
{
"id": 5
},
{
"id": 14
}
]
},
{
"from": 6,
"to": [
{
"id": 2
},
{
"id": 6
},
{
"id": 8
},
{
"id": 12
},
{
"id": 13
},
{
"id": 15
}
]
},
{
"from": 7,
"to": [
{
"id": 7
},
{
"id": 13,
"devNote": [
"FIXME: There are fancy (difficult) ways to jump into the room and shoot the super block and mockball at full speed.",
"The 135% strat uses spacejump to enter the room in a particular way, but maybe a normal jump would work.",
"And momentum is used to shoot the super block but takes a setup to aim."
]
}
]
},
{
"from": 8,
"to": [
{
"id": 1
},
{
"id": 2
},
{
"id": 4
},
{
"id": 6
},
{
"id": 8
},
{
"id": 11
},
{
"id": 12
},
{
"id": 13
},
{
"id": 15
}
]
},
{
"from": 9,
"to": [
{
"id": 4
},
{
"id": 9
},
{
"id": 11
},
{
"id": 12
}
]
},
{
"from": 10,
"to": [
{
"id": 4
},
{
"id": 13
}
]
},
{
"from": 11,
"to": [
{
"id": 8
},
{
"id": 12
},
{
"id": 13
}
]
},
{
"from": 12,
"to": [
{
"id": 9
},
{
"id": 11
}
]
},
{
"from": 13,
"to": [
{
"id": 1
},
{
"id": 2
},
{
"id": 3
},
{
"id": 4
},
{
"id": 5
},
{
"id": 6
},
{
"id": 7
},
{
"id": 10
},
{
"id": 11
},
{
"id": 13
}
]
},
{
"from": 14,
"to": [
{
"id": 5
},
{
"id": 13
}
]
},
{
"from": 15,
"to": [
{
"id": 1
},
{
"id": 4
},
{
"id": 8
},
{
"id": 10
},
{
"id": 12
},
{
"id": 13
}
]
}
],
"strats": [
{
"link": [
1,
1
],
"name": "Leave With Runway",
"requires": [],
"exitCondition": {
"leaveWithRunway": {
"length": 7,
"steepDownTiles": 1,
"openEnd": 0
}
}
},
{
"link": [
1,
1
],
"name": "G-Mode Setup - Get Hit By Zeb",
"notable": false,
"requires": [
{
"or": [
"h_canBombThings",
{
"obstaclesCleared": [
"A"
]
}
]
}
],
"exitCondition": {
"leaveWithGModeSetup": {}
},
"note": [
"Carefully lure a Zeb from the pipe."
]
},
{
"link": [
1,
4
],
"name": "G-mode Morph Overload PLMs with Power Bombs and Spring Ball",
"entranceCondition": {
"comeInWithGMode": {
"mode": "any",
"morphed": true
}
},
"requires": [
{
"or": [
"canTrickyJump",
"h_canArtificialMorphPowerBomb",
{
"enemyDamage": {
"enemy": "Sm. Sidehopper",
"hits": 1,
"type": "contact"
}
}
]
},
"h_canArtificialMorphSpringBall",
"h_canArtificialMorphPowerBomb"
],
"clearsObstacles": [
"C"
],
"note": [
"Roll through the camera scroll blocks and then through the bomb block.",
"Avoiding the Sidehoppers can be tricky.",
"Continue through the room to the Sidehoppers below the Grapple blocks, and carefully kill both of them with a single Power Bomb.",
"Bounce up through the crumble blocks to the door to the left"
]
},
{
"link": [
1,
4
],
"name": "G-mode Morph Overload PLMs with Power Bombs and Spring Ball, Break Power Bomb Blocks",
"entranceCondition": {
"comeInWithGMode": {
"mode": "any",
"morphed": true
}
},
"requires": [
{
"or": [
"canTrickyJump",
"h_canArtificialMorphPowerBomb",
{
"enemyDamage": {
"enemy": "Sm. Sidehopper",
"hits": 1,
"type": "contact"
}
}
]
},
"h_canArtificialMorphSpringBall",
"h_canArtificialMorphPowerBomb",
"h_canArtificialMorphPowerBomb"
],
"clearsObstacles": [
"B",
"C"
],
"note": [
"Roll through the camera scroll blocks and then through the bomb block.",
"Avoiding the Sidehoppers can be tricky.",
"Continue through the room to the Sidehoppers below the Grapple blocks, and carefully kill both of them with a single Power Bomb.",
"Bounce up through the crumble blocks to the door to the left",
"Use a Power Bomb then quickly exit G-Mode before it explodes to also break the blocks."
]
},
{
"link": [
1,
12
],
"name": "G-mode Morph Overload PLMs with Power Bombs",
"entranceCondition": {
"comeInWithGMode": {
"mode": "any",
"morphed": true
}
},
"requires": [
{
"or": [
"canTrickyJump",
"h_canArtificialMorphPowerBomb",
{
"enemyDamage": {
"enemy": "Sm. Sidehopper",
"hits": 1,
"type": "contact"
}
}
]
},
"h_canArtificialMorphPowerBomb",
"h_canArtificialMorphPowerBomb"
],
"note": [
"Roll through the camera scroll blocks and then through the bomb block.",
"Avoiding the Sidehoppers can be tricky.",
"Carefully roll through the rest of the room and through the bomb blocks to the lowest item."
],
"devNote": "With Morph, Bombs, or Spring Ball, 1->15->12 will be used instead."
},
{
"link": [
1,
13
],
"name": "Base",
"requires": [
"Morph",
{
"or": [
"h_canBombThings",
{
"obstaclesCleared": [
"A"
]
}
]
}
],
"clearsObstacles": [
"A"
]
},
{
"link": [
1,
13
],
"name": "Speedball",
"entranceCondition": {
"comeInSpeedballing": {
"runway": {
"length": 6,
"openEnd": 0
}
}
},
"requires": []
},
{
"link": [
1,
13
],
"name": "Temporary Blue Bounce",
"entranceCondition": {
"comeInShinecharging": {
"length": 5,
"steepUpTiles": 1,
"openEnd": 0
}
},
"requires": [
"canTemporaryBlue",
"canSpringBallBounce"
]
},
{
"link": [
1,
13
],
"name": "G-mode Morph",
"entranceCondition": {
"comeInWithGMode": {
"mode": "any",
"morphed": true
}
},
"requires": [],
"note": "Roll through the camera scroll blocks and then through the bomb block."
},
{
"link": [
1,
15
],
"name": "G-mode Morph",
"entranceCondition": {
"comeInWithGMode": {
"mode": "any",
"morphed": true
}
},
"requires": [
{
"or": [
"Morph",
"canTrickyJump",
"h_canArtificialMorphPowerBomb",
{
"enemyDamage": {
"enemy": "Sm. Sidehopper",
"hits": 1,
"type": "contact"
}
}
]
},
{
"or": [
"h_canArtificialMorphMovement",
{
"and": [
"h_canArtificialMorphPowerBomb",
"h_canArtificialMorphPowerBomb"
]
}
]
}
],
"note": [
"Roll through the camera scroll blocks and then through the bomb block.",
"Avoiding the hoppers can be tricky."
]
},
{
"link": [
2,
1
],
"name": "G-mode Morph",
"entranceCondition": {
"comeInWithGMode": {
"mode": "any",
"morphed": true
}
},
"requires": [
{
"or": [
"h_canArtificialMorphMovement",
{
"and": [
"h_canArtificialMorphPowerBomb",
"h_canArtificialMorphPowerBomb"
]
}
]
}
],
"note": "Roll through the camera scroll blocks and then through the bomb block."
},
{
"link": [
2,
1
],
"name": "Speedball (Come In Shinecharging)",
"entranceCondition": {
"comeInShinecharging": {
"length": 16,
"openEnd": 1
}
},
"requires": [
"canSpeedball"
],
"clearsObstacles": [
"A"
],
"note": [
"Jump over the bug pipe while blue and roll into the morph tunnel to break the bomb block.",
"Shortcharge too much and the jump will not be able to reach the morph tunnel."
],
"devNote": "Half a tile is unusable so you can jump over the pipe."
},
{
"link": [
2,
2
],
"name": "Leave With Runway",
"requires": [],
"exitCondition": {
"leaveWithRunway": {
"length": 18,
"openEnd": 0
}
}
},
{
"link": [
2,
2
],
"name": "Leave with Spark - Shinecharge Below and Jump Up",
"requires": [
{
"canShineCharge": {
"usedTiles": 25,
"openEnd": 1
}
},
"canShinechargeMovementComplex",
{
"or": [
"HiJump",
"canWalljump"
]
},
{
"shinespark": {
"frames": 28
}
}
],
"exitCondition": {
"leaveWithSpark": {}
}
},
{
"link": [
2,
2
],
"name": "G-Mode Setup - Get Hit By Zeb",
"notable": false,
"requires": [],
"exitCondition": {
"leaveWithGModeSetup": {}
},
"note": [
"Lure a Zeb from the pipe."
]
},
{
"link": [
2,
4
],
"name": "G-mode Morph Overload PLMs with Power Bombs and Spring Ball",
"entranceCondition": {
"comeInWithGMode": {
"mode": "any",
"morphed": true
}
},
"requires": [
{
"or": [
"canTrickyJump",
"h_canArtificialMorphPowerBomb",
{
"enemyDamage": {
"enemy": "Sm. Sidehopper",
"hits": 1,
"type": "contact"
}
}
]
},
"h_canArtificialMorphSpringBall",
"h_canArtificialMorphPowerBomb"
],
"clearsObstacles": [
"C"
],
"note": [
"Overload PLMs using the camera scroll blocks in front of the bomb blocks to the top left door.",
"Avoiding the Sidehoppers can be tricky.",
"Continue through the room to the Sidehoppers below the Grapple blocks, and carefully kill both of them with a single Power Bomb.",
"Bounce up through the crumble blocks to the door to the left"
]
},
{
"link": [
2,
4
],
"name": "G-mode Morph Overload PLMs with Power Bombs and Spring Ball, Break Power Bomb Blocks",
"entranceCondition": {
"comeInWithGMode": {
"mode": "any",
"morphed": true
}
},
"requires": [
{
"or": [
"canTrickyJump",
"h_canArtificialMorphPowerBomb",
{
"enemyDamage": {
"enemy": "Sm. Sidehopper",
"hits": 1,
"type": "contact"
}
}
]
},
"h_canArtificialMorphSpringBall",
"h_canArtificialMorphPowerBomb",
"h_canArtificialMorphPowerBomb"
],
"clearsObstacles": [
"B",
"C"
],
"note": [
"Overload PLMs using the camera scroll blocks in front of the bomb blocks to the top left door.",
"Avoiding the Sidehoppers can be tricky.",
"Continue through the room to the Sidehoppers below the Grapple blocks, and carefully kill both of them with a single Power Bomb.",
"Bounce up through the crumble blocks to the door to the left",
"Use a Power Bomb then quickly exit G-Mode before it explodes to also break the blocks."
]
},
{
"link": [
2,
12
],
"name": "G-mode Morph with Power Bombs and Overload PLMs",
"entranceCondition": {
"comeInWithGMode": {
"mode": "any",
"morphed": true
}
},
"requires": [
{
  "ammo": {
    "type": "PowerBomb",
    "count": 4
  }
}
],
"note": [
"Use a Power Bomb to boost horizontally to the Morph tunnel to the left and overload PLMs using the camera scroll blocks in front of the bomb blocks.",
"Carefully roll through the rest of the room and through the bomb blocks to the lowest item."
],
"devNote": "With Morph, Bombs, or Spring Ball, 1->15->12 will be used instead."
},
{
"link": [
2,
13
],
"name": "Base",
"requires": []
},
{
"link": [
2,
15
],
"name": "G-mode Morph",
"entranceCondition": {
"comeInWithGMode": {
"mode": "any",
"morphed": true
}
},
"requires": [
{
"or": [
"Morph",
{
"and": [
{
"or": [
"canTrickyJump",
{
"enemyDamage": {
"enemy": "Sm. Sidehopper",
"hits": 1,
"type": "contact"
}
}
]
},
{
"or": [
"h_canArtificialMorphSpringBall",
"h_canArtificialMorphIBJ"
]
}
]
},
"h_canArtificialMorphPowerBomb"
]
},
{
"or": [
"h_canArtificialMorphMovement",
{
"and": [
"h_canArtificialMorphPowerBomb",
"h_canArtificialMorphPowerBomb"
]
}
]
}
],
"note": "Avoiding the hoppers can be tricky."
},
{
"link": [
3,
3
],
"name": "Leave With Runway",
"requires": [],
"exitCondition": {
"leaveWithRunway": {
"length": 25,
"openEnd": 1
}
}
},
{
"link": [
3,
3
],
"name": "G-Mode Setup - Get Hit By Zeb",
"notable": false,
"requires": [
"canTrickyUseFrozenEnemies"
],
"exitCondition": {
"leaveWithGModeSetup": {}
},
"note": [
"Carefully lure a Zeb from the pipe below while freezing it.",
"Samus must start to the left of the pipe in order for the Zeb to move left at the end."
]
},
{
"link": [
3,
4
],
"name": "Big Pink Extended Moondance Clip",
"notable": true,
"entranceCondition": {
"comeInWithStoredFallSpeed": {
"fallSpeedInTiles": 2
}
},
"requires": [],
"note": [
"Setup a Moondance such that Samus will fall through 2 tiles",
"Moonfall towards the door, aim down while falling, and turn around twice."
],
"devNote": "FIXME: A different exact fall speed value changes the movements needed for the clip."
},
{
"link": [
3,
10
],
"name": "Shinespark (Come In Shinecharging)",
"entranceCondition": {
"comeInShinecharging": {
"length": 24,
"openEnd": 1
}
},
"requires": [
"canHorizontalShinespark",
{
"shinespark": {
"frames": 38,
"excessFrames": 7
}
}
]
},
{
"link": [
3,
13
],
"name": "Base",
"requires": []
},
{
"link": [
3,
15
],
"name": "G-mode Morph",
"entranceCondition": {
"comeInWithGMode": {
"mode": "any",
"morphed": true
}
},
"requires": []
},
{
"link": [
4,
4
],
"name": "Leave With Runway",
"requires": [],
"exitCondition": {
"leaveWithRunway": {
"length": 1,
"openEnd": 1
}
}
},
{
"link": [
4,
4
],
"name": "Big Pink Crumble Path Leave With Shinecharge",
"requires": [
"Morph",
{
"canShineCharge": {
"usedTiles": 16,
"openEnd": 0
}
},
{
"or": [
"canShinechargeMovementTricky",
{
"and": [
"canShinechargeMovement",
"h_canUseSpringBall"
]
}
]
},
{
"obstaclesCleared": [
"C"
]
}
],
"exitCondition": {
"leaveShinecharged": {
"framesRemaining": 60
}
},
"note": "Use the morph tunnel that used to have crumble blocks as a faster path to the Mission Impossible transition."
},
{
"link": [
4,
4
],
"name": "G-mode Morph Power Bomb",
"entranceCondition": {
"comeInWithGMode": {
"mode": "any",
"morphed": true
}
},
"requires": [
"h_canArtificialMorphPowerBomb"
],
"clearsObstacles": [
"B",
"C"
],
"note": "Use a Power Bomb, then exit G-Mode."
},
{
"link": [
4,
4
],
"name": "G-Mode Setup - Get Hit By Zeb",
"notable": false,
"requires": [
"canTrickyUseFrozenEnemies",
{
"or": [
"h_canUsePowerBombs",
{
"obstaclesCleared": [
"B"
]
},
{
"and": [
"Morph",
{
"obstaclesCleared": [
"C"
]
}
]
}
]
},
{
"or": [
"canWalljump",
"HiJump",
"SpaceJump",
"canSpringBallJumpMidAir"
]
}
],
"exitCondition": {
"leaveWithGModeSetup": {}
},
"note": [
"Carefully lure a Zeb from the pipe below while freezing it.",
"Samus must start to the left of the pipe in order for the Zeb to move left at the end."
]
},
{
"link": [
4,
10
],
"name": "Base",
"requires": [
{
  "or": [
    "h_canUsePowerBombs",
    {
      "obstaclesCleared": [
        "B"
      ]
    }
  ]
}
],
"clearsObstacles": [
"B"
]
},
{
"link": [
4,
10
],
"name": "Shinespark Deep Transition X-Ray Climb",
"entranceCondition": {
"comeInWithSpark": {}
},
"requires": [
"canDeepTransition",
{
"shinespark": {
"frames": 2,
"excessFrames": 2
}
},
"canXRayClimb"
],
"note": [
"Perform a horizontal shinespark through the door transition, from a horizontal position that triggers a deep transition in the door.",
"Sparking from one or two pixels away from the door is an example position that works (if possible in the neighboring room).",
"In general, about one third of positions will work, with working positions occuring in periodic windows that are each approximately two pixels wide, separated by bad windows that are approximately 4 pixels wide.",
"If successful, Samus will spawn inside the Power Bomb blocks.",
"After the shinespark crash animation ends, Samus should be standing and able to X-Ray climb."
]
},
{
"link": [
4,
10
],
"name": "Unpause Deep Transition X-Ray Climb (Run Forward)",
"entranceCondition": {
"comeInRunning": {
"minTiles": 5.3906,
"maxTiles": 5.5859,
"speedBooster": "any"
}
},
"requires": [
"canDeepTransition",
"canXRayClimb"
],
"note": [
"Stand facing the door in the previous room, at a specific distance from the door, approximately a 3-pixel window at an effective distance of a 6-tile closed-end runway (taking into account how slopes can modify the effective distance).",
"Pause, then unpause while holding dash and right.",
"If positioned correctly, the unpause fade-in will finish on the exact frame that the transition would occur, delaying the transition by a frame.",
"Samus will spawn standing inside the Power Bomb blocks and be able to X-Ray climb."
]
},
{
"link": [
4,
10
],
"name": "Unpause Deep Transition X-Ray Climb (Turnaround Run)",
"entranceCondition": {
"comeInRunning": {
"minTiles": 3.6445,
"maxTiles": 3.7851,
"speedBooster": "any"
}
},
"requires": [
"canDeepTransition",
"canXRayClimb"
],
"note": [
"Stand facing away from the door in the previous room, at a specific distance from the door, approximately a 2-pixel window at an effective distance of 3.7 tiles (taking into account how slopes can modify the effective distance).",
"Pause, then unpause while holding dash and right.",
"If positioned correctly, the unpause fade-in will finish on the exact frame that the transition would occur, delaying the transition by a frame.",
"Samus will spawn standing inside the Power Bomb blocks and be able to X-Ray climb."
]
},
{
"link": [
4,
13
],
"name": "Base",
"requires": [
"Morph"
],
"clearsObstacles": [
"C"
]
},
{
"link": [
5,
4
],
"name": "Big Pink Left-Side X-Ray Climb",
"entranceCondition": {
"comeInWithDoorStuckSetup": {}
},
"requires": [
"canXRayClimb"
],
"note": "Climb up 1 screen.",
"devNote": [
"Normally, an XRayClimb's resetRoom has mustStayPut true, but because node 5 is configured to spawn at 14, Samus will be expected to visit 14 before 5 when setting up.",
"This is a technicality based on the spawnAt at 14, since in reality Samus just gets doorstuck at 5 immediately in this scenario.",
"It's also possible to X-Ray Climb to 13, but that's reachable for free just by falling down the crumble blocks anyway."
]
},
{
"link": [
5,
5
],
"name": "Leave With Runway",
"requires": [],
"exitCondition": {
"leaveWithRunway": {
"length": 1,
"openEnd": 1
}
}
},
{
"link": [
5,
5
],
"name": "Crystal Flash",
"requires": [
"h_canCrystalFlash"
]
},
{
"link": [
5,
14
],
"name": "Base",
"requires": []
},
{
"link": [
6,
2
],
"name": "Very Deep Stuck X-Ray Climb",
"entranceCondition": {
"comeInWithGMode": {
"mode": "direct",
"morphed": false
}
},
"requires": [
"canXRayClimb",
"canBePatient"
],
"bypassesDoorShell": true,
"note": [
"Enter with G-mode direct, back up to between 1 and 6 pixels from the door transition, and activate X-ray to get very deep stuck in the door.",
"Climb up 4 screens, and perform a turnaround buffered spin-jump away from the door to trigger the transition, bypassing any lock on the door."
]
},
{
"link": [
6,
6
],
"name": "Leave With Runway",
"requires": [],
"exitCondition": {
"leaveWithRunway": {
"length": 1,
"openEnd": 1
}
}
},
{
"link": [
6,
6
],
"name": "Leave With Runway - Frozen Zeb",
"requires": [
"h_canFrozenEnemyRunway",
{
"or": [
"Morph",
"canTrickyEnemyExtendRunway"
]
}
],
"exitCondition": {
"leaveWithRunway": {
"length": 3,
"openEnd": 0
}
},
"note": [
"Kill the Reos in the hallway in front of the door, then go down and stand to the right of the Zeb spawner.",
"Freeze the Zeb before it starts going horizontally then go up and wait for it.",
"As the Zeb gets high enough, walk out of the doorway at the right time to get it to move horizontally at the optimal height.",
"This is much easier with Morph - instead be morphed in the hallway and once the Zeb starts moving towards Samus, freeze it."
],
"devNote": "FIXME: This could be used at 4, or a Reo could be used at 5, but that would be pretty terrible."
},
{
"link": [
6,
6
],
"name": "Leave Shinecharged",
"requires": [
"canShinechargeMovement",
{
"canShineCharge": {
"usedTiles": 19,
"openEnd": 0
}
}
],
"exitCondition": {
"leaveShinecharged": {
"framesRemaining": 110
}
}
},
{
"link": [
6,
6
],
"name": "G-Mode Setup - Get Hit By Zeb",
"notable": false,
"requires": [],
"exitCondition": {
"leaveWithGModeSetup": {}
},
"note": [
"Carefully lure a Zeb from the pipe below."
]
},
{
"link": [
6,
8
],
"name": "G-mode Morph",
"entranceCondition": {
"comeInWithGMode": {
"mode": "any",
"morphed": true
}
},
"requires": [
"h_canArtificialMorphMovement"
]
},
{
"link": [
6,
12
],
"name": "G-mode Morph Overload PLMs",
"entranceCondition": {
"comeInWithGMode": {
"mode": "any",
"morphed": true
}
},
"requires": [
"h_canArtificialMorphMovement"
],
"note": "Overload PLMs by moving through the camera scroll blocks in front of the passageway leading to the exit of Spore Spawn Supers."
},
{
"link": [
6,
12
],
"name": "G-mode Morph Direct Overload PLMs by Moving Through Missile Item",
"entranceCondition": {
"comeInWithGMode": {
"mode": "direct",
"morphed": true
}
},
"requires": [
{
"itemNotCollectedAtNode": 11
},
"canRiskPermanentLossOfAccess",
"h_canArtificialMorphMovement"
],
"note": "Carefully roll off of the edge and land on the platform holding the item. Roll through it until PLMs are overloaded, then roll through the bomb blocks and down below."
},
{
"link": [
6,
13
],
"name": "Base",
"requires": []
},
{
"link": [
6,
15
],
"name": "G-mode Morph",
"entranceCondition": {
"comeInWithGMode": {
"mode": "any",
"morphed": true
}
},
"requires": [
"h_canArtificialMorphMovement"
],
"note": "If using Bombs, lure and kill the Reo. If using Spring Ball, it's important to release jump before reaching to peak of each jump to outrun the Reo."
},
{
"link": [
7,
7
],
"name": "Leave With Runway",
"requires": [],
"exitCondition": {
"leaveWithRunway": {
"length": 7,
"openEnd": 0
}
}
},
{
"link": [
7,
7
],
"name": "Leave Shinecharged through Tunnel",
"requires": [
{
"canShineCharge": {
"usedTiles": 24,
"openEnd": 1
}
},
"canShinechargeMovementComplex",
"Morph",
{
"obstaclesCleared": [
"F"
]
}
],
"exitCondition": {
"leaveShinecharged": {
"framesRemaining": 25
}
}
},
{
"link": [
7,
13
],
"name": "Base",
"requires": [
"Morph",
{
"or": [
{
"and": [
"h_canBombThings",
{
"ammo": {
"type": "Super",
"count": 1
}
}
]
},
{
"obstaclesCleared": [
"F"
]
}
]
}
],
"clearsObstacles": [
"F"
]
},
{
"link": [
7,
13
],
"name": "Big Pink Super Block Speedball",
"notable": true,
"entranceCondition": {
"comeInShinecharging": {
"length": 5,
"openEnd": 0
}
},
"requires": [
"canSpeedball",
"canTrickyJump",
"canSlowShortCharge",
{
"ammo": {
"type": "Super",
"count": 1
}
}
],
"clearsObstacles": [
"F"
],
"note": "Quickly jump and precisely shoot the super block and in the same motion take out the bomb blocks with a speedball.",
"devNote": "The runway here has two unusable tiles."
},
{
"link": [
7,
13
],
"name": "Temporary Blue Chain with Springball Bounce",
"entranceCondition": {
"comeInShinecharging": {
"length": 7,
"openEnd": 0
}
},
"requires": [
"canChainTemporaryBlue",
"canSpringBallBounce",
{
"ammo": {
"type": "Super",
"count": 1
}
}
],
"clearsObstacles": [
"F"
],
"note": [
"Position Samus next to the Super block, while keeping the speed effect with a Temporary Blue Chain, and break it.",
"Then bounce into the morph tunnel, while keeping speed, and continuing all the way through with SpringBall",
"Avoiding the Temporary Blue Chain is possible, but harder."
]
},
{
"link": [
8,
1
],
"name": "G-mode Morph Overload PLMs with Power Bombs and Spring Ball",
"entranceCondition": {
"comeInWithGMode": {
"mode": "any",
"morphed": true
}
},
"requires": [
"h_canArtificialMorphSpringBallBombJump",
{
"ammo": {
"type": "PowerBomb",
"count": 3
}
},
{
"or": [
"canTrickyJump",
"h_canArtificialMorphPowerBomb"
]
},
{
"or": [
"canTrickyJump",
"h_canArtificialMorphPowerBomb",
{
"enemyDamage": {
"enemy": "Sm. Sidehopper",
"hits": 1,
"type": "contact"
}
}
]
}
],
"note": [
"While using multiple Power Bomb boost Spring Ball jumps, to climb the room,",
"overload PLMs by moving through the camera scroll blocks in front of the passageway leading to the exit of Spore Spawn Supers.",
"Note that one Power Bomb can be saved by carefully jumping out of this morph passageway.",
"Kill or carefully dodge the Sidehoppers at the top, then Power Bomb boost Spring Ball jump up to the top left door and exit G-Mode."
],
"devNote": "With Morph, Bombs, or Spring Ball + HiJump, 8->15->1 will be used instead."
},
{
"link": [
8,
2
],
"name": "Very Deep Stuck X-Ray Climb",
"entranceCondition": {
"comeInWithGMode": {
"mode": "direct",
"morphed": false
}
},
"requires": [
"canXRayClimb",
"canBeVeryPatient"
],
"bypassesDoorShell": true,
"note": [
"Enter with G-mode direct, back up to between 1 and 6 pixels from the door transition, and activate X-ray to get very deep stuck in the door.",
"Climb up 6 screens, and perform a turnaround buffered spin-jump away from the door to trigger the transition, bypassing any lock on the door."
]
},
{
"link": [
8,
4
],
"name": "G-mode Morph with Power Bombs and Spring Ball",
"entranceCondition": {
"comeInWithGMode": {
"mode": "any",
"morphed": true
}
},
"requires": [
"h_canArtificialMorphSpringBallBombJump",
"h_additionalBomb",
"h_additionalBomb"
],
"clearsObstacles": [
"C"
],
"note": [
"While using multiple Power Bomb boost Spring Ball jumps, to climb the room,",
"overload PLMs by moving through the camera scroll blocks in front of the passageway leading to the exit of Spore Spawn Supers.",
"Carefully dodge the Reos to the left of the door leading to the Pink Hopper Room and lure them and the Sidehoppers close to each other.",
"Place a Power Bomb to kill them and both Sidehoppers above.",
"Get into the Sidehopper pit and jump up and into the tunnel and go through the crumble blocks to the door to the left."
],
"devNote": "With Morph, Bombs, or Spring Ball + HiJump, 8->15->4 will be used instead."
},
{
"link": [
8,
4
],
"name": "G-mode Morph with Power Bombs and Spring Ball, Break Power Bomb Blocks",
"entranceCondition": {
"comeInWithGMode": {
"mode": "any",
"morphed": true
}
},
"requires": [
"h_canArtificialMorphSpringBallBombJump",
"h_additionalBomb",
"h_additionalBomb",
"h_additionalBomb"
],
"clearsObstacles": [
"B",
"C"
],
"note": [
"While using multiple Power Bomb boost Spring Ball jumps, to climb the room,",
"overload PLMs by moving through the camera scroll blocks in front of the passageway leading to the exit of Spore Spawn Supers.",
"Carefully dodge the Reos to the left of the door leading to the Pink Hopper Room and lure them and the Sidehoppers close to each other.",
"Place a Power Bomb to kill them and both Sidehoppers above.",
"Get into the Sidehopper pit and jump up and into the tunnel and go through the crumble blocks to the door to the left.",
"Use a Power Bomb then quickly exit G-Mode before it explodes to also break the blocks."
],
"devNote": "With Morph, Bombs, or Spring Ball + HiJump, 8->15->4 will be used instead."
},
{
"link": [
8,
6
],
"name": "Very Deep Stuck X-Ray Climb",
"entranceCondition": {
"comeInWithGMode": {
"mode": "direct",
"morphed": false
}
},
"requires": [
"canXRayClimb"
],
"bypassesDoorShell": true,
"note": [
"Enter with G-mode direct, back up to between 1 and 6 pixels from the door transition, and activate X-ray to get very deep stuck in the door.",
"Climb up 2 screens, and perform a turnaround buffered spin-jump away from the door to trigger the transition, bypassing any lock on the door."
]
},
{
"link": [
8,
8
],
"name": "Leave With Runway",
"requires": [],
"exitCondition": {
"leaveWithRunway": {
"length": 13,
"openEnd": 0
}
}
},
{
"link": [
8,
11
],
"name": "Base",
"requires": [
"Morph"
]
},
{
"link": [
8,
11
],
"name": "G-mode Morph",
"entranceCondition": {
"comeInWithGMode": {
"mode": "any",
"morphed": true
}
},
"requires": [
"h_canArtificialMorphMovement"
]
},
{
"link": [
8,
12
],
"name": "G-mode Morph Overload PLMs",
"entranceCondition": {
"comeInWithGMode": {
"mode": "any",
"morphed": true
}
},
"requires": [
{
  "or": [
    "Morph",
    "h_canArtificialMorphIBJ",
    {
      "and": [
        "h_canArtificialMorphSpringBall",
        "HiJump"
      ]
    }
  ]
}
],
"note": "Overload PLMs by moving through the camera scroll blocks in front of the passageway leading to the exit of Spore Spawn Supers.",
"devNote": "Using a Power Bomb boost into Spring Ball will not work, as it will make the blocks remain solid."
},
{
"link": [
8,
12
],
"name": "G-mode Morph Direct Overload PLMs by Moving Through Missile Item",
"entranceCondition": {
"comeInWithGMode": {
"mode": "direct",
"morphed": true
}
},
"requires": [
{
"itemNotCollectedAtNode": 11
},
"canRiskPermanentLossOfAccess",
"h_canArtificialMorphSpringBall"
],
"note": "Roll through it until PLMs are overloaded, then roll through the bomb blocks and down below.",
"devNote": "With more items, the strat with camera scroll blocks will be used."
},
{
"link": [
8,
13
],
"name": "Big Pink Right-Side X-Ray Climb",
"entranceCondition": {
"comeInWithDoorStuckSetup": {}
},
"requires": [
"canXRayClimb"
],
"note": "Climb up 1 screen."
},
{
"link": [
8,
15
],
"name": "G-mode Morph",
"entranceCondition": {
"comeInWithGMode": {
"mode": "any",
"morphed": true
}
},
"requires": [
{
  "or": [
    "h_canArtificialMorphIBJ",
    "Morph",
    {
      "and": [
        "h_canArtificialMorphSpringBall",
        "HiJump"
      ]
    },
    {
      "and": [
        "h_canArtificialMorphSpringBallBombJump",
        "h_additionalBomb"
      ]
    }
  ]
}
]
},
{
"link": [
9,
4
],
"name": "G-mode with Crystal Flash Clip and Overloading PLMs",
"entranceCondition": {
"comeInWithGMode": {
"mode": "any",
"morphed": false
}
},
"requires": [
"h_canCrystalFlash",
"canMidAirMorph"
],
"note": [
"Go into the morph tunnel below the Charge Beam location and Crystal Flash to force a standup and jump through.",
"Samus is now unable to use X-Ray. Overload PLMs using the camera scroll blocks on the path upward, then go through the bomb blocks.",
"Go up to the Sidehopper pit and go up through the crumble blocks and through to the next room."
],
"devNote": "This is only useful to save a wall jump."
},
{
"link": [
9,
9
],
"name": "Leave With Runway",
"requires": [],
"exitCondition": {
"leaveWithRunway": {
"length": 6,
"openEnd": 0
}
}
},
{
"link": [
9,
11
],
"name": "G-mode with Crystal Flash Clip",
"entranceCondition": {
"comeInWithGMode": {
"mode": "any",
"morphed": true
}
},
"requires": [
{
"or": [
"h_canArtificialMorphIBJ",
"Morph",
{
"and": [
"h_canArtificialMorphSpringBall",
{
"or": [
"HiJump",
{
"and": [
"h_canArtificialMorphSpringBallBombJump",
"h_additionalBomb",
"h_additionalBomb",
"h_additionalBomb"
]
}
]
}
]
}
]
},
"h_canArtificialMorphCrystalFlash",
{
"or": [
"Morph",
{
"and": [
"canTwoTileSqueeze",
"canPartialFloorClip",
"canCeilingClip"
]
}
]
},
"canBePatient"
],
"note": [
"Go into the morph tunnel below the Charge Beam location and Crystal Flash to force a standup and jump through.",
"Samus is now unable to use X-Ray. Without Morph, be careful not to overload PLMs using the camera scroll blocks on the path upward.",
"Then partially floor clip into the left side of the bomb block, and jump to clip through and escape.",
"To exit G-Mode, damage down until the reserves trigger, which can be done most quickly using the Sidehoppers."
],
"devNote": "This assumes Samus has many Energy Tanks, which will take a while to empty."
},
{
"link": [
9,
12
],
"name": "Base",
"requires": [
"Morph",
{
"or": [
"h_canUsePowerBombs",
{
"obstaclesCleared": [
"E"
]
}
]
}
],
"clearsObstacles": [
"E"
]
},
{
"link": [
10,
4
],
"name": "Base",
"requires": [
{
  "or": [
    "h_canUsePowerBombs",
    {
      "obstaclesCleared": [
        "B"
      ]
    }
  ]
}
],
"clearsObstacles": [
"B"
]
},
{
"link": [
10,
13
],
"name": "Base",
"requires": []
},
{
"link": [
11,
8
],
"name": "Base",
"requires": [
"Morph"
]
},
{
"link": [
11,
12
],
"name": "Base",
"requires": [
"Morph",
{
"or": [
"h_canBombThings",
{
"obstaclesCleared": [
"D"
]
}
]
}
],
"clearsObstacles": [
"D"
]
},
{
"link": [
11,
12
],
"name": "Temporary Blue Chain",
"requires": [
{
"canShineCharge": {
"usedTiles": 24,
"openEnd": 1
}
},
"canChainTemporaryBlue",
"canXRayTurnaround"
],
"clearsObstacles": [
"D"
]
},
{
"link": [
11,
13
],
"name": "Base",
"requires": []
},
{
"link": [
12,
9
],
"name": "Base",
"requires": [
"Morph",
{
"or": [
"h_canUsePowerBombs",
{
"obstaclesCleared": [
"E"
]
}
]
}
],
"clearsObstacles": [
"E"
]
},
{
"link": [
12,
11
],
"name": "Base",
"requires": [
"Morph",
{
"or": [
"h_canDestroyBombWalls",
{
"obstaclesCleared": [
"D"
]
}
]
}
],
"clearsObstacles": [
"D"
]
},
{
"link": [
12,
11
],
"name": "Charge Escape Clip",
"requires": [
{
"or": [
"canTwoTileSqueeze",
{
"and": [
"Morph",
"canXRayStandUp"
]
}
]
},
"canPartialFloorClip",
"canCeilingClip"
],
"note": "Partially floor clip into the left side of the bomb block above the charge beam location. Then jump to clip through the above tile."
},
{
"link": [
13,
1
],
"name": "Base",
"requires": [
"Morph",
{
"or": [
"h_canBombThings",
{
"obstaclesCleared": [
"A"
]
}
]
}
],
"clearsObstacles": [
"A"
]
},
{
"link": [
13,
1
],
"name": "Speedball (In-Room)",
"requires": [
"canSpeedball",
{
"or": [
{
"canShineCharge": {
"usedTiles": 16,
"openEnd": 1
}
},
{
"and": [
{
"doorUnlockedAtNode": 2
},
{
"canShineCharge": {
"usedTiles": 17,
"openEnd": 1
}
}
]
}
]
}
],
"clearsObstacles": [
"A"
],
"unlocksDoors": [
{
"nodeId": 2,
"types": [
"ammo"
],
"requires": []
}
],
"note": [
"Jump over the bug pipe while blue and roll into the morph tunnel to break the bomb block.",
"Shortcharge too much and the jump will not be able to reach the morph tunnel.",
"But you can airball and bounce into the tunnel."
],
"devNote": "Half a tile unusable so you can jump over the pipe."
},
{
"link": [
13,
1
],
"name": "Temporary Blue with SpringBall Bounce",
"requires": [
"canChainTemporaryBlue",
"canSpringBallBounce",
{
"or": [
{
"and": [
"canXRayTurnaround",
{
"canShineCharge": {
"usedTiles": 25,
"openEnd": 0
}
}
]
},
{
"canShineCharge": {
"usedTiles": 21,
"openEnd": 0
}
}
]
}
],
"clearsObstacles": [
"A"
],
"note": [
"Build a ShineCharge on the below platform and bring it up to the morph tunnel by chaining Temporary Blue.",
"Aim to bounce into the tunnel opening and use springball to bounce the rest of the way while blue."
]
},
{
"link": [
13,
1
],
"name": "Big Pink Fast Mockball Leave With Spark",
"notable": true,
"requires": [
{
"obstaclesCleared": [
"A"
]
},
{
"canShineCharge": {
"usedTiles": 17,
"openEnd": 0
}
},
"canShinechargeMovementComplex",
"canMockball",
{
"shinespark": {
"frames": 10
}
}
],
"exitCondition": {
"leaveWithSpark": {}
},
"unlocksDoors": [
{
"types": [
"ammo"
],
"requires": []
}
],
"note": "Shinecharge towards the top right door. Then turn around for a fast mockball after jumping the bug pipe.",
"devNote": "FIXME: add a leaveWithSpeedball here once the schema for that is ready."
},
{
"link": [
13,
2
],
"name": "Base",
"requires": []
},
{
"link": [
13,
3
],
"name": "Base",
"requires": []
},
{
"link": [
13,
4
],
"name": "Big Pink Return Through Crumble Blocks",
"notable": true,
"requires": [
"Morph",
{
"obstaclesCleared": [
"C"
]
}
],
"note": "The Crumble Block next to the Power Bomb Blocks does not respawn, so it's possible to enter from this door, grab the items, and return without breaking the Power Bomb blocks."
},
{
"link": [
13,
4
],
"name": "Big Pink Wall Ice Clip the Mission Impossible Crumble Blocks",
"notable": true,
"requires": [
"canWallIceClip",
"Wave",
{
"or": [
"h_canUseSpringBall",
"h_canUseMorphBombs"
]
}
],
"clearsObstacles": [
"C"
],
"note": [
"Freeze a Zeb inside of the crumble blocks below the entrance to the Power Bomb room and use it to get stuck inside the crumble blocks, breaking them.",
"Repeatedly freeze a left facing Zeb from the enemy spawner lower in the room.",
"Freeze it close to the right side of the crumble block so that Samus will attach to the enemy when rolling into it.",
"Finally, jump with Bombs or SpringBall to break the crumble block."
]
},
{
"link": [
13,
5
],
"name": "Big Pink Reo Ice Clip With Morph and X-Ray",
"notable": true,
"requires": [
"canTrickyUseFrozenEnemies",
"canPreciseCeilingClip",
"h_canXRayCeilingClip"
],
"note": [
"Lure the Reo (Bee) to the left to use it as a platform for ice clipping up through the crumbles to the Power Bomb room exit door.",
"Watch the Reo bounce against the left wall until it does a slow hover towards Samus.",
"There is a very small timing of when its right claw is above the small pale spore next to the big red spore, when Samus should jump to be above the Reo.",
"Crouching with Samus' front toe beneath this spore (facing left) will cause the bee to fly with the correct timing after Samus takes knockback damage, with a 3 pixel window.",
"This will cause it to fly left and into the two tile gap below the crumble blocks.",
"Freeze it once to get above it, and then again for the ice clip.",
"Once it is up there, the bee will become stuck and the room will need to be reset.",
"But if the Reo does not fit in the hole, it is possible to just wait near the ledge for another slow hover to try again.",
"With this strat, there is at most a two-frame window in which the Reo can be frozen.",
"One frame (setup dependent) may let Samus crouch jump through the block; the next frame Samus can use Morph and X-Ray to clip through."
]
},
{
"link": [
13,
5
],
"name": "Big Pink Reo Ice Clip Without Morph and X-Ray",
"notable": true,
"requires": [
"canTrickyUseFrozenEnemies",
"canPreciseCeilingClip"
],
"note": [
"Lure the Reo (Bee) to the left to use it as a platform for ice clipping up through the crumbles to the Power Bomb room exit door.",
"Watch the Reo bounce against the left wall until it does a slow hover towards Samus.",
"There is a very small timing of when its right claw is above the small pale spore next to the big red spore, when Samus should jump to be above the Reo.",
"Crouching with Samus' front toe beneath this spore (facing left) will cause the bee to fly with the correct timing after Samus takes knockback damage, with a 3 pixel window.",
"This will cause it to fly left and into the two tile gap below the crumble blocks.",
"Freeze it once to get above it, and then again for the ice clip.",
"Once it is up there, the bee will become stuck and the room will need to be reset.",
"But if the Reo does not fit in the hole, it is possible to just wait near the ledge for another slow hover to try again.",
"With this setup, there is a one-frame window in which the Reo can be frozen. Without a precise setup, there is typically no way to clip through without Morph and X-Ray."
]
},
{
"link": [
13,
5
],
"name": "Big Pink Zeb Ice Clip",
"notable": true,
"requires": [
"canTrickyUseFrozenEnemies",
"canStaggeredWalljump",
"canCameraManip",
{
"or": [
"Wave",
"Spazer"
]
},
"canPreciseCeilingClip"
],
"note": [
"Raise a Zeb to be just below the crumble blocks and blindly freeze it to set up an ice clip to reach the Power Bomb room exit door.",
"Get a bug from the pipe to spawn facing left and freeze it while moving to the ledge below the Hopper room door.",
"While crouched, a spazer or wave beam shot will shoot through the floor in front of Samus.",
"The bug must be frozen at a height between where Samus is crouched and where she is standing.",
"Once frozen, somehow track how long until the freeze effect expires, and when the bug will reach the crumble blocks.",
"If the bug is off camera when not frozen, it will despawn.",
"Refreeze the Zeb below the crumble blocks and ice clip up to reach the door."
]
},
{
"link": [
13,
6
],
"name": "Base",
"requires": []
},
{
"link": [
13,
7
],
"name": "Return Through Broken Super Block",
"requires": [
"Morph",
{
"obstaclesCleared": [
"F"
]
}
],
"devNote": "This base strat represents only backtracking after entering from 7."
},
{
"link": [
13,
7
],
"name": "Big Pink Off Screen Super Block",
"notable": true,
"requires": [
"canOffScreenSuperShot",
"h_canBombThings",
"canCameraManip"
],
"clearsObstacles": [
"F"
],
"note": [
"Break the bomb blocks then shoot a super into the morph tunnel to break the super block off screen.",
"Requires pixel precision, although there are several pixels that work. The camera must be fully scrolled to the right, which may require going far left and back."
]
},
{
"link": [
13,
7
],
"name": "Big Pink Crystal Flash Standup - Super Block",
"notable": true,
"requires": [
"h_canBombThings",
"h_canCrystalFlash",
{
"ammo": {
"type": "Super",
"count": 1
}
}
],
"clearsObstacles": [
"F"
],
"note": "Crystal Flash in the morph tunnel to force a standup, making it possible to shoot the super block from the left while it's on-screen."
},
{
"link": [
13,
7
],
"name": "Big Pink Speedball Jump into Raised Bomb Blocks",
"notable": true,
"requires": [
"canSpeedball",
"canLateralMidAirMorph",
"canSlowShortCharge",
"canTrickyJump",
{
"canShineCharge": {
"usedTiles": 20,
"openEnd": 2
}
},
"canOffScreenSuperShot"
],
"clearsObstacles": [
"F"
],
"reusableRoomwideNotable": "Big Pink Speedball into Raised Bomb Blocks",
"note": "Break the bomb blocks by jumping into them with speed. These is more easily done at low run speed."
},
{
"link": [
13,
7
],
"name": "Big Pink Temporary Blue Bounce into Raised Bomb Blocks",
"notable": true,
"requires": [
"canTrickyJump",
"canTemporaryBlue",
"canLateralMidAirMorph",
{
"canShineCharge": {
"usedTiles": 22,
"openEnd": 2
}
},
"canOffScreenSuperShot"
],
"clearsObstacles": [
"F"
],
"reusableRoomwideNotable": "Big Pink Speedball into Raised Bomb Blocks",
"note": "Stop with Temporary Blue in front of the bomb blocks then jump and bounce into the morph tunnel to clear them."
},
{
"link": [
13,
10
],
"name": "Base",
"requires": [
{
  "or": [
    "Grapple",
    "h_canFly",
    "canWalljump",
    {
      "and": [
        "SpeedBooster",
        "HiJump"
      ]
    }
  ]
}
]
},
{
"link": [
13,
10
],
"name": "Shinespark (In-Room Runway)",
"requires": [
{
  "or": [
    {
      "and": [
        {
          "canShineCharge": {
            "usedTiles": 16,
            "openEnd": 1
          }
        },
        {
          "shinespark": {
            "frames": 24,
            "excessFrames": 4
          }
        }
      ]
    },
    {
      "and": [
        "canHorizontalShinespark",
        {
          "canShineCharge": {
            "usedTiles": 24,
            "openEnd": 1
          }
        },
        {
          "shinespark": {
            "frames": 38,
            "excessFrames": 7
          }
        }
      ]
    },
    {
      "and": [
        "canHorizontalShinespark",
        {
          "doorUnlockedAtNode": 3
        },
        {
          "canShineCharge": {
            "usedTiles": 25,
            "openEnd": 1
          }
        },
        {
          "shinespark": {
            "frames": 38,
            "excessFrames": 7
          }
        }
      ]
    }
  ]
}
],
"unlocksDoors": [
{
"nodeId": 3,
"types": [
"ammo"
],
"requires": []
}
]
},
{
"link": [
13,
10
],
"name": "Guide Enemy to Grapple Blocks",
"requires": [
{
"or": [
"canTrickyUseFrozenEnemies",
{
"and": [
"canTrickyJump",
"canHorizontalDamageBoost",
{
"enemyDamage": {
"enemy": "Zeb",
"type": "contact",
"hits": 1
}
}
]
}
]
},
"canCameraManip"
],
"note": [
"Lead an enemy through parts of the room as a way to reach the Mission Impossible missile location.",
"The respawning Zeb can be used by carfeully keeping it on camera and staying high enough that it does not attack.",
"Wait for it to respawn before attempting to guide it.",
"Or a Reo can be brought up to this section of room, but sometimes gets stuck on the way."
],
"devNote": "This is just to avoid walljumping."
},
{
"link": [
13,
11
],
"name": "Base",
"requires": []
},
{
"link": [
13,
13
],
"name": "Zeb Farm",
"requires": [
{
  "refill": [
    "Energy",
    "Missile",
    "Super"
  ]
}
],
"devNote": "FIXME: Other nodes could be used to reset the room, with additional requirements."
},
{
"link": [
14,
5
],
"name": "Land in Door Frame",
"requires": [
"canPrepareForNextRoom"
],
"note": "Jump through the door and shoot it open as you enter, landing on the door frame to avoid falling through the crumbles."
},
{
"link": [
14,
13
],
"name": "Base",
"requires": []
},
{
"link": [
15,
1
],
"name": "G-mode Morph",
"requires": [
{
"or": [
"Morph",
{
"and": [
"h_canArtificialMorphSpringBall",
"HiJump"
]
},
"h_canArtificialMorphIBJ"
]
},
{
"or": [
"Morph",
"canTrickyJump",
{
"enemyDamage": {
"enemy": "Sm. Sidehopper",
"hits": 1,
"type": "contact"
}
},
"h_canArtificialMorphPowerBomb"
]
}
],
"note": [
"Carefully dodge the Sidehoppers, or kill them with a Power Bomb. Be careful not to hit the bomb block with the Power Bomb or it will remain solid.",
"With IBJ alone, it is easiest to IBJ from the bug pipe below to the ceiling, luring the Sidehoppers to the left.",
"At the top, overload PLMs using the camera scroll block just in front of the block, then roll through it."
]
},
{
"link": [
15,
1
],
"name": "G-mode Morph Overload PLMs with Power Bombs and Spring Ball",
"requires": [
"h_canArtificialMorphSpringBallBombJump",
"h_canArtificialMorphPowerBomb",
"h_canArtificialMorphPowerBomb",
{
"or": [
"canTrickyJump",
"h_canArtificialMorphPowerBomb"
]
},
{
"or": [
"canTrickyJump",
"h_canArtificialMorphPowerBomb",
{
"enemyDamage": {
"enemy": "Sm. Sidehopper",
"hits": 1,
"type": "contact"
}
}
]
}
],
"note": [
"Go down and overload PLMs by moving through the camera scroll blocks in front of the passageway leading to the exit of Spore Spawn Supers.",
"Use multiple Power Bomb boost Spring Ball jumps, to climb the room; note that one Power Bomb can be saved by carefully jumping out of this morph passageway.",
"Kill or carefully dodge the Sidehoppers at the top, then Power Bomb boost Spring Ball jump up to the top left door and exit G-Mode."
]
},
{
"link": [
15,
4
],
"name": "G-mode Overload PLMs with Morph",
"requires": [
"canMidAirMorph"
],
"clearsObstacles": [
"C"
],
"note": [
"Overload PLMs by moving through the camera scroll blocks in front of the passageway leading to the exit of Spore Spawn Supers,",
"or in front of the bomb block at the top left door. Safely kill the enemies, then mid-air morph and go through the crumble blocks."
]
},
{
"link": [
15,
4
],
"name": "G-mode Morph Overload PLMs with Bombs",
"requires": [
"h_canArtificialMorphIBJ"
],
"clearsObstacles": [
"C"
],
"note": [
"If there are no Sidehoppers in the bottom right corner of their pen, roll down and carefully place bombs while luring and killing them.",
"Otherwise, go down into the hallway below and carefully kill the two Reos and lure the Sidehoppers to the left.",
"If they don't stay on the left, exit this hallway and enter it again to reset the camera and try again.",
"Go up through the crumble blocks to the left. If PLMs are not yet overloaded, place Bombs next to the crumble blocks."
]
},
{
"link": [
15,
4
],
"name": "G-mode Morph Overload PLMs with Bombs, Break Power Bomb Blocks",
"requires": [
"h_canArtificialMorphIBJ",
"h_canArtificialMorphPowerBomb"
],
"clearsObstacles": [
"B",
"C"
],
"note": [
"If there are no Sidehoppers in the bottom right corner of their pen, roll down and carefully place bombs while luring and killing them.",
"Otherwise, go down into the hallway below and carefully kill the two Reos and lure the Sidehoppers to the left.",
"If they don't stay on the left, exit this hallway and enter it again to reset the camera and try again.",
"Go up through the crumble blocks to the left. If PLMs are not yet overloaded, place Bombs next to the crumble blocks.",
"Use a Power Bomb then quickly exit G-Mode before it explodes to also break the blocks."
]
},
{
"link": [
15,
4
],
"name": "G-mode Morph Overload PLMs with Power Bombs and Spring Ball",
"requires": [
"h_canArtificialMorphSpringBall",
"canCameraManip",
"h_canArtificialMorphPowerBomb",
{
"or": [
"HiJump",
"h_canArtificialMorphSpringBallBombJump",
"canTrickyJump"
]
}
],
"clearsObstacles": [
"C"
],
"note": [
"Carefully dodge the Reos to the left of the door leading to the Pink Hopper Room and lure them and the Sidehoppers close to each other.",
"Place a Power Bomb to kill them and both Sidehoppers above. Go down below and lure the third Reo, below the Zeb pipe, off screen to the left.",
"Overload PLMs by moving through the camera scroll blocks in front of the passageway leading to the exit of Spore Spawn Supers.",
"Either carefully jump out of this morph tunnel or use a Power Bomb boost Spring Ball jump to get up to the ledge.",
"Get into the Sidehopper pit and jump up and into the tunnel and go through the crumble blocks to the door to the left."
]
},
{
"link": [
15,
4
],
"name": "G-mode Morph Overload PLMs with Power Bombs and Spring Ball, Break Power Bomb Blocks",
"requires": [
"h_canArtificialMorphSpringBall",
"canCameraManip",
"h_canArtificialMorphPowerBomb",
"h_canArtificialMorphPowerBomb",
{
"or": [
"HiJump",
"h_canArtificialMorphSpringBallBombJump",
"canTrickyJump"
]
}
],
"clearsObstacles": [
"B",
"C"
],
"note": [
"Carefully dodge the Reos to the left of the door leading to the Pink Hopper Room and lure them and the Sidehoppers close to each other.",
"Place a Power Bomb to kill them and both Sidehoppers above. Go down below and lure the third Reo, below the Zeb pipe, off screen to the left.",
"Overload PLMs by moving through the camera scroll blocks in front of the passageway leading to the exit of Spore Spawn Supers.",
"Either carefully jump out of this morph tunnel or use a Power Bomb boost Spring Ball jump to get up to the ledge.",
"Get into the Sidehopper pit and jump up and into the tunnel and go through the crumble blocks to the door to the left.",
"Use a Power Bomb then quickly exit G-Mode before it explodes to also break the blocks."
]
},
{
"link": [
15,
8
],
"name": "G-mode Morph",
"requires": [
"h_canArtificialMorphMovement"
]
},
{
"link": [
15,
10
],
"name": "G-mode Morph with Bombs",
"requires": [
"h_canArtificialMorphIBJ"
],
"note": [
"If there are no Sidehoppers in the bottom right corner of their pen, roll down and carefully place bombs while luring and killing them.",
"Otherwise, go down into the hallway below and carefully kill the two Reos and lure the Sidehoppers to the left.",
"If they don't stay on the left, exit this hallway and enter it again to reset the camera and try again. Then IBJ up to the item above."
],
"devNote": "An equivalent strat with using a Power Bomb isn't needed as it is the same requirements as getting to 4 with the blocks broken."
},
{
"link": [
15,
12
],
"name": "G-mode Morph Overload PLMs",
"requires": [
"h_canArtificialMorphMovement"
],
"note": "Overload PLMs by moving through the camera scroll blocks in front of the passageway leading to the exit of Spore Spawn Supers."
},
{
"link": [
15,
13
],
"name": "G-mode Morph Power Bomb the Blocks",
"requires": [
"h_canArtificialMorphPowerBomb",
"h_canArtificialMorphPowerBomb"
],
"clearsObstacles": [
"B"
],
"note": [
"Use a Power Bomb to kill any Sidehoppers in the pit below, then roll off and use a second, while exiting G-Mode to destroy the blocks in front of the door.",
"Place the Power Bomb far enough left to hit the blocks, but not so far as to lure the Sidehopper.",
"This is when Samus is on the right-most squiggly plant, or when there is one tile of air between the right wall and the edge of the screen."
]
}
]
}