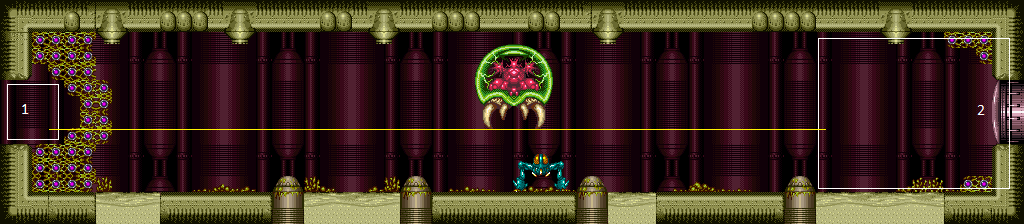
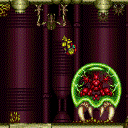
Big Boy Room
Room ID: 232
|
The Baby Metroid is not active when entering from the left side of the room. Entrance condition: {
"comeInNormally": {}
}
Clears obstacles: A |
|
From: 1
Left Doorway
To: 1
Left Doorway
Requires: {
"obstaclesCleared": [
"A"
]
}
Exit condition: {
"leaveWithRunway": {
"length": 5,
"openEnd": 1
}
}
|
|
Requires: {
"obstaclesCleared": [
"A"
]
}
"canShinechargeMovement"
{
"canShineCharge": {
"usedTiles": 15,
"openEnd": 0
}
}
Exit condition: {
"leaveShinecharged": {
"framesRemaining": 135
}
}
|
|
Requires: {
"obstaclesCleared": [
"A"
]
}
|
|
Gain a shinecharge by running right-to-left on the leftmost runway. Then run toward the right, jumping twice before sparking mid-air. Requires: {
"obstaclesCleared": [
"A"
]
}
"canShinechargeMovementTricky"
{
"canShineCharge": {
"usedTiles": 15,
"openEnd": 0
}
}
{
"shinespark": {
"frames": 35
}
}
Exit condition: {
"leaveWithSpark": {}
}
|
|
Requires: {
"energyAtMost": 1
}
Clears obstacles: A |
|
Requires: {
"obstaclesCleared": [
"A"
]
}
|
|
Jump over the Baby Metroid to avoid getting grabbed. Use Wave plus a Wide Beam to clear much of the seaweed with each shot. The classic counter clockwise skip ends with a mid air morph into the transition. Requires: {
"obstaclesNotCleared": [
"A"
]
}
"Wave"
{
"or": [
"Spazer",
"Plasma"
]
}
"canMidAirMorph"
"HiJump"
"SpeedBooster"
"canTrickyJump"
"canBabyMetroidAvoid"
|
|
Notable: true 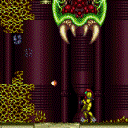
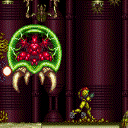
Avoid the Baby Metroid by jumping over it many times in order to clear a path through the seaweed. Requires: {
"obstaclesNotCleared": [
"A"
]
}
"canMidAirMorph"
"HiJump"
"canTrickyJump"
"canBabyMetroidAvoid"
|
|
Notable: true 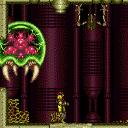
Avoid the Baby Metroid with no items at all. Jump over it many times in order to clear a path through the seaweed. With a counter clockwise setup, stand as close to the transition as possible while allowing the Baby to circle Samus. Then jump towards the transition and touch it with a walljump check. A clockwise setup is more difficult to clear the seaweed, but can jump directly into the transition. Requires: {
"obstaclesNotCleared": [
"A"
]
}
"canBabyMetroidAvoid"
"canInsaneJump"
|
|
Entrance condition: {
"comeInWithGrappleTeleport": {
"blockPositions": [
[
5,
3
],
[
7,
2
]
]
}
}
|
|
Entrance condition: {
"comeInWithGrappleTeleport": {
"blockPositions": [
[
3,
12
],
[
3,
13
]
]
}
}
Bypasses door shell: true |
|
Entrance condition: {
"comeInWithGrappleTeleport": {
"blockPositions": [
[
3,
12
]
]
}
}
Exit condition: {
"leaveWithGrappleTeleport": {
"blockPositions": [
[
3,
12
]
]
}
}
Bypasses door shell: true |
|
From: 2
Right Door
To: 1
Left Doorway
Entrance condition: {
"comeInWithGrappleTeleport": {
"blockPositions": [
[
3,
13
]
]
}
}
Exit condition: {
"leaveWithGrappleTeleport": {
"blockPositions": [
[
3,
13
]
]
}
}
Bypasses door shell: true |
|
Exit condition: {
"leaveWithRunway": {
"length": 1,
"openEnd": 1
}
}
|
|
Requires: "h_canCrystalFlash" |
{
"$schema": "../../../schema/m3-room.schema.json",
"id": 232,
"name": "Big Boy Room",
"area": "Tourian",
"subarea": "Main",
"playable": true,
"roomAddress": "0x7DCB1",
"roomEnvironments": [
{
"heated": false
}
],
"nodes": [
{
"id": 1,
"name": "Left Doorway",
"nodeType": "door",
"nodeSubType": "doorway",
"nodeAddress": "0x001aa44",
"doorEnvironments": [
{
"physics": "air"
}
]
},
{
"id": 2,
"name": "Right Door",
"nodeType": "door",
"nodeSubType": "grey",
"nodeAddress": "0x001aa38",
"doorEnvironments": [
{
"physics": "air"
}
],
"locks": [
{
"name": "Baby Metroid Grey Lock (to Dust Torizo)",
"lockType": "permanent",
"unlockStrats": [
{
"name": "Base",
"notable": false,
"requires": [
"never"
]
}
]
}
]
}
],
"obstacles": [
{
"id": "A",
"name": "Baby Inactive",
"obstacleType": "abstract"
}
],
"enemies": [],
"links": [
{
"from": 1,
"to": [
{
"id": 1
},
{
"id": 2
}
]
},
{
"from": 2,
"to": [
{
"id": 1,
"note": "The baby event happens every time you enter from the right"
},
{
"id": 2
}
]
}
],
"strats": [
{
"link": [
1,
1
],
"name": "Enter From Left",
"entranceCondition": {
"comeInNormally": {}
},
"requires": [],
"clearsObstacles": [
"A"
],
"note": "The Baby Metroid is not active when entering from the left side of the room."
},
{
"link": [
1,
1
],
"name": "Leave with Runway, Extended Seaweed Runway",
"requires": [
{
  "obstaclesCleared": [
    "A"
  ]
}
],
"exitCondition": {
"leaveWithRunway": {
"length": 5,
"openEnd": 1
}
}
},
{
"link": [
1,
1
],
"name": "Leave Shinecharged",
"requires": [
{
  "obstaclesCleared": [
    "A"
  ]
},
"canShinechargeMovement",
{
"canShineCharge": {
"usedTiles": 15,
"openEnd": 0
}
}
],
"exitCondition": {
"leaveShinecharged": {
"framesRemaining": 135
}
}
},
{
"link": [
1,
2
],
"name": "Base",
"requires": [
{
"obstaclesCleared": [
"A"
]
}
]
},
{
"link": [
1,
2
],
"name": "Leave With Spark",
"requires": [
{
"obstaclesCleared": [
"A"
]
},
"canShinechargeMovementTricky",
{
"canShineCharge": {
"usedTiles": 15,
"openEnd": 0
}
},
{
"shinespark": {
"frames": 35
}
}
],
"exitCondition": {
"leaveWithSpark": {}
},
"unlocksDoors": [
{
"types": [
"ammo"
],
"requires": []
}
],
"note": [
"Gain a shinecharge by running right-to-left on the leftmost runway.",
"Then run toward the right, jumping twice before sparking mid-air."
]
},
{
"link": [
2,
1
],
"name": "Get Drained",
"requires": [
{
  "energyAtMost": 1
}
],
"clearsObstacles": [
"A"
]
},
{
"link": [
2,
1
],
"name": "Baby Inactive",
"requires": [
{
  "obstaclesCleared": [
    "A"
  ]
}
]
},
{
"link": [
2,
1
],
"name": "Classic Baby Skip",
"requires": [
{
"obstaclesNotCleared": [
"A"
]
},
"Wave",
{
"or": [
"Spazer",
"Plasma"
]
},
"canMidAirMorph",
"HiJump",
"SpeedBooster",
"canTrickyJump",
"canBabyMetroidAvoid"
],
"note": [
"Jump over the Baby Metroid to avoid getting grabbed.",
"Use Wave plus a Wide Beam to clear much of the seaweed with each shot.",
"The classic counter clockwise skip ends with a mid air morph into the transition."
],
"devNote": "A wide beam is used to avoid picking off stray seaweeds since that is a skill used in waveless skip."
},
{
"link": [
2,
1
],
"name": "Baby Skip Without Wave or Speed",
"notable": true,
"requires": [
{
"obstaclesNotCleared": [
"A"
]
},
"canMidAirMorph",
"HiJump",
"canTrickyJump",
"canBabyMetroidAvoid"
],
"note": "Avoid the Baby Metroid by jumping over it many times in order to clear a path through the seaweed."
},
{
"link": [
2,
1
],
"name": "Baby Skip With Nothing",
"notable": true,
"requires": [
{
"obstaclesNotCleared": [
"A"
]
},
"canBabyMetroidAvoid",
"canInsaneJump"
],
"note": [
"Avoid the Baby Metroid with no items at all.",
"Jump over it many times in order to clear a path through the seaweed.",
"With a counter clockwise setup, stand as close to the transition as possible while allowing the Baby to circle Samus.",
"Then jump towards the transition and touch it with a walljump check.",
"A clockwise setup is more difficult to clear the seaweed, but can jump directly into the transition."
]
},
{
"link": [
2,
1
],
"name": "Grapple Teleport",
"entranceCondition": {
"comeInWithGrappleTeleport": {
"blockPositions": [
[
5,
3
],
[
7,
2
]
]
}
},
"requires": []
},
{
"link": [
2,
1
],
"name": "Grapple Teleport Door Lock Skip",
"entranceCondition": {
"comeInWithGrappleTeleport": {
"blockPositions": [
[
3,
12
],
[
3,
13
]
]
}
},
"requires": [],
"bypassesDoorShell": true
},
{
"link": [
2,
1
],
"name": "Carry Grapple Teleport (Top Position)",
"entranceCondition": {
"comeInWithGrappleTeleport": {
"blockPositions": [
[
3,
12
]
]
}
},
"requires": [],
"bypassesDoorShell": true,
"exitCondition": {
"leaveWithGrappleTeleport": {
"blockPositions": [
[
3,
12
]
]
}
}
},
{
"link": [
2,
1
],
"name": "Carry Grapple Teleport (Bottom Position)",
"entranceCondition": {
"comeInWithGrappleTeleport": {
"blockPositions": [
[
3,
13
]
]
}
},
"requires": [],
"bypassesDoorShell": true,
"exitCondition": {
"leaveWithGrappleTeleport": {
"blockPositions": [
[
3,
13
]
]
}
}
},
{
"link": [
2,
2
],
"name": "Leave with Runway",
"requires": [],
"exitCondition": {
"leaveWithRunway": {
"length": 1,
"openEnd": 1
}
}
},
{
"link": [
2,
2
],
"name": "Crystal Flash",
"requires": [
"h_canCrystalFlash"
]
}
]
}