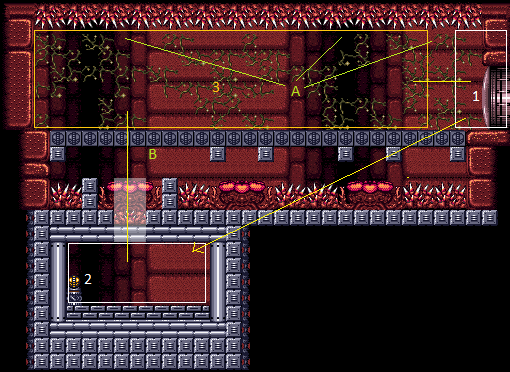
Beta Power Bomb Room
Room ID: 77
|
From: 1
Right Door
To: 1
Right Door
Kill the Sidehoppers without breaking the Power Bomb blocks. Requires: {
"obstaclesCleared": [
"A"
]
}
{
"obstaclesNotCleared": [
"B"
]
}
Exit condition: {
"leaveWithRunway": {
"length": 29,
"openEnd": 0
}
}
|
|
From: 1
Right Door
To: 1
Right Door
When using a Power Bomb, place it far against the left wall to keep as many tiles intact for the runway as possible. If any Sidehoppers remain after using a Power Bomb, safely kill them from the hole below. Requires: {
"obstaclesCleared": [
"A"
]
}
Exit condition: {
"leaveWithRunway": {
"length": 12,
"openEnd": 1
}
}
|
|
Requires: {
"obstaclesCleared": [
"A"
]
}
"h_canCrystalFlash"
Clears obstacles: B |
|
From: 1
Right Door
To: 1
Right Door
Requires: {
"obstaclesNotCleared": [
"A"
]
}
Exit condition: {
"leaveWithGModeSetup": {}
}
|
|
Requires: {
"enemyDamage": {
"enemy": "Sidehopper",
"type": "contact",
"hits": 1
}
}
|
|
Entrance condition: {
"comeInWithStoredFallSpeed": {
"fallSpeedInTiles": 1
}
}
Requires: "Plasma" "Wave" Clears obstacles: A |
|
Entrance condition: {
"comeInWithStoredFallSpeed": {
"fallSpeedInTiles": 2
}
}
Requires: "Plasma" "Wave" Clears obstacles: A |
|
Requires: {
"obstaclesCleared": [
"A"
]
}
|
|
Requires: {
"enemyDamage": {
"enemy": "Sidehopper",
"type": "contact",
"hits": 4
}
}
Clears obstacles: A |
|
From: 1
Right Door
To: 3
Top Left Junction
Requires: {
"enemyDamage": {
"enemy": "Sidehopper",
"type": "contact",
"hits": 2
}
}
{
"or": [
"Spazer",
"Wave"
]
}
Clears obstacles: A |
|
Requires: {
"enemyDamage": {
"enemy": "Sidehopper",
"type": "contact",
"hits": 1
}
}
{
"enemyKill": {
"enemies": [
[
"Sidehopper",
"Sidehopper",
"Sidehopper"
]
],
"explicitWeapons": [
"Missile"
]
}
}
Clears obstacles: A |
|
From: 1
Right Door
To: 3
Top Left Junction
The Sidehoppers can't hit a morphed Samus, so they can be picked off damage-free. Requires: "Morph" Clears obstacles: A |
|
Requires: {
"enemyKill": {
"enemies": [
[
"Sidehopper",
"Sidehopper",
"Sidehopper"
]
],
"explicitWeapons": [
"PowerBomb"
]
}
}
Clears obstacles: A, B |
|
Requires: {
"enemyKill": {
"enemies": [
[
"Sidehopper",
"Sidehopper",
"Sidehopper"
]
],
"explicitWeapons": [
"Super",
"ScrewAttack",
"Plasma"
]
}
}
Clears obstacles: A |
|
Entrance condition: {
"comeInWithGMode": {
"mode": "any",
"morphed": true
}
}
Requires: "h_canArtificialMorphPowerBomb" Clears obstacles: A, B |
|
From: 1
Right Door
To: 3
Top Left Junction
Samus is safe while morphed and on the ground unless near the door, where the Sidehoppers can jump into the open door and then jump lower Entrance condition: {
"comeInWithGMode": {
"mode": "any",
"morphed": true
}
}
Requires: "h_canArtificialMorphBombs" Clears obstacles: A |
|
Requires: "h_canUsePowerBombs" Clears obstacles: B |
|
Requires: {
"obstaclesCleared": [
"B"
]
}
{
"or": [
"HiJump",
"canWalljump",
"canSpringBallJumpMidAir",
"h_canFly",
"canSpringBallBombJump"
]
}
|
|
Requires: {
"obstaclesCleared": [
"B"
]
}
"canHorizontalDamageBoost"
{
"thornHits": 1
}
|
|
The thorns do not cover the entire blocks above. Jump barely only onto the corner to avoid the damage. Requires: {
"obstaclesCleared": [
"B"
]
}
"canTrickyJump"
|
|
Use the Solid Blocks next to the Samus Eater to clip up through the Power Bomb Blocks. Carefully jump around the thorns, use HiJump to jump over them, or walk through them using IFrames. Requires: "canCeilingClip"
"canPartialFloorClip"
{
"or": [
{
"and": [
"canCarefulJump",
"HiJump",
"canTwoTileSqueeze",
{
"or": [
"canTrickyJump",
{
"thornHits": 1
}
]
}
]
},
{
"and": [
"canNeutralDamageBoost",
"canIframeSpikeJump",
{
"thornHits": 1
}
]
},
{
"and": [
"canPreciseWalljump",
"canTwoTileSqueeze"
]
}
]
}
|
|
Use the Solid Blocks next to the Samus Eater to clip up through the Power Bomb Blocks. The thorns do not cover the entire blocks above. Jump barely only onto the corner to avoid the damage. Carefully jump around the thorns, tunnel crawl slightly to avoid touching the thorns when partial floor clipping. Morph and x-ray can be used instead to setup the clip much easier. Requires: "canTrickyJump"
{
"or": [
"h_canXRayCeilingClip",
{
"and": [
"canTunnelCrawl",
"canPartialFloorClip"
]
}
]
}
"canCeilingClip"
|
|
|
|
Requires: {
"or": [
"h_canUsePowerBombs",
{
"obstaclesCleared": [
"B"
]
}
]
}
Clears obstacles: B |
{
"$schema": "../../../schema/m3-room.schema.json",
"id": 77,
"name": "Beta Power Bomb Room",
"area": "Brinstar",
"subarea": "Red",
"playable": true,
"roomAddress": "0x7A37C",
"roomEnvironments": [
{
"heated": false
}
],
"nodes": [
{
"id": 1,
"name": "Right Door",
"nodeType": "door",
"nodeSubType": "grey",
"nodeAddress": "0x00190de",
"doorEnvironments": [
{
"physics": "air"
}
],
"locks": [
{
"name": "Beta Power Bomb Grey Lock (to Caterpillar Room)",
"lockType": "killEnemies",
"unlockStrats": [
{
"name": "Base",
"notable": false,
"requires": [
{
  "obstaclesCleared": [
    "A"
  ]
}
],
"note": "Killing the Sidehoppers requires going to 3 and back."
}
],
"yields": [
"f_ZebesAwake"
]
}
]
},
{
"id": 2,
"name": "Item",
"nodeType": "item",
"nodeSubType": "visible",
"nodeItem": "PowerBomb",
"nodeAddress": "0x788CA"
},
{
"id": 3,
"name": "Top Left Junction",
"nodeType": "junction",
"nodeSubType": "junction"
}
],
"obstacles": [
{
"id": "A",
"name": "Sidehoppers",
"obstacleType": "enemies"
},
{
"id": "B",
"name": "Power Bomb Blocks",
"obstacleType": "enemies"
}
],
"enemies": [
{
"id": "e1",
"groupName": "Beta Power Bomb Room Sidehoppers",
"enemyName": "Sidehopper",
"quantity": 3,
"homeNodes": [
1,
3
]
},
{
"id": "e2",
"groupName": "Beta Power Bomb Room Yapping Maws",
"enemyName": "Yapping Maw",
"quantity": 2,
"homeNodes": [
1
],
"note": "Wait for the Maws to reach up before killing them and the drops are reachable"
}
],
"links": [
{
"from": 1,
"to": [
{
"id": 1
},
{
"id": 2
},
{
"id": 3
}
]
},
{
"from": 2,
"to": [
{
"id": 2
},
{
"id": 3
}
]
},
{
"from": 3,
"to": [
{
"id": 1
},
{
"id": 2
}
]
}
],
"strats": [
{
"link": [
1,
1
],
"name": "Leave With Runway (Power Bomb Blocks Intact)",
"requires": [
{
"obstaclesCleared": [
"A"
]
},
{
"obstaclesNotCleared": [
"B"
]
}
],
"exitCondition": {
"leaveWithRunway": {
"length": 29,
"openEnd": 0
}
},
"note": "Kill the Sidehoppers without breaking the Power Bomb blocks."
},
{
"link": [
1,
1
],
"name": "Leave With Runway (Power Bomb Blocks Partially Broken)",
"requires": [
{
"obstaclesCleared": [
"A"
]
}
],
"exitCondition": {
"leaveWithRunway": {
"length": 12,
"openEnd": 1
}
},
"note": [
"When using a Power Bomb, place it far against the left wall to keep as many tiles intact for the runway as possible.",
"If any Sidehoppers remain after using a Power Bomb, safely kill them from the hole below."
]
},
{
"link": [
1,
1
],
"name": "Crystal Flash",
"requires": [
{
"obstaclesCleared": [
"A"
]
},
"h_canCrystalFlash"
],
"clearsObstacles": [
"B"
]
},
{
"link": [
1,
1
],
"name": "G-Mode Setup - Get Hit By Sidehopper",
"notable": false,
"requires": [
{
  "obstaclesNotCleared": [
    "A"
  ]
}
],
"exitCondition": {
"leaveWithGModeSetup": {}
}
},
{
"link": [
1,
1
],
"name": "G-Mode Regain Mobility",
"requires": [
{
  "enemyDamage": {
    "enemy": "Sidehopper",
    "type": "contact",
    "hits": 1
  }
}
],
"gModeRegainMobility": {}
},
{
"link": [
1,
2
],
"name": "Stored Moonfall Clip",
"entranceCondition": {
"comeInWithStoredFallSpeed": {
"fallSpeedInTiles": 1
}
},
"requires": [
"Plasma",
"Wave"
],
"clearsObstacles": [
"A"
],
"devNote": [
"Coming in with blue speed would be an alternative way to get past the hoppers, but this may be tricky to model.",
"Other weapon combinations are possible, but not reliable due to movement being limited."
]
},
{
"link": [
1,
2
],
"name": "Stored Moonfall Clip (more speed)",
"entranceCondition": {
"comeInWithStoredFallSpeed": {
"fallSpeedInTiles": 2
}
},
"requires": [
"Plasma",
"Wave"
],
"clearsObstacles": [
"A"
],
"devNote": [
"Coming in with blue speed would be an alternative way to get past the hoppers, but this may be tricky to model.",
"Other weapon combinations are possible, but not reliable due to movement being limited."
]
},
{
"link": [
1,
3
],
"name": "Already Killed",
"requires": [
{
  "obstaclesCleared": [
    "A"
  ]
}
]
},
{
"link": [
1,
3
],
"name": "Power Beam Sidehopper Kill",
"requires": [
{
  "enemyDamage": {
    "enemy": "Sidehopper",
    "type": "contact",
    "hits": 4
  }
}
],
"clearsObstacles": [
"A"
]
},
{
"link": [
1,
3
],
"name": "Intermediate Weapon Sidehopper Kill",
"requires": [
{
"enemyDamage": {
"enemy": "Sidehopper",
"type": "contact",
"hits": 2
}
},
{
"or": [
"Spazer",
"Wave"
]
}
],
"clearsObstacles": [
"A"
]
},
{
"link": [
1,
3
],
"name": "Sidehopper Missile Kill",
"requires": [
{
"enemyDamage": {
"enemy": "Sidehopper",
"type": "contact",
"hits": 1
}
},
{
"enemyKill": {
"enemies": [
[
"Sidehopper",
"Sidehopper",
"Sidehopper"
]
],
"explicitWeapons": [
"Missile"
]
}
}
],
"clearsObstacles": [
"A"
]
},
{
"link": [
1,
3
],
"name": "Morph Power Beam Sidehopper Kill",
"requires": [
"Morph"
],
"clearsObstacles": [
"A"
],
"note": "The Sidehoppers can't hit a morphed Samus, so they can be picked off damage-free."
},
{
"link": [
1,
3
],
"name": "PB Sidehopper Kill",
"requires": [
{
  "enemyKill": {
    "enemies": [
      [
        "Sidehopper",
        "Sidehopper",
        "Sidehopper"
      ]
    ],
    "explicitWeapons": [
      "PowerBomb"
    ]
  }
}
],
"clearsObstacles": [
"A",
"B"
],
"devNote": [
"This is essentially redundant with the Morph Power Beam kill.",
"It wouldn't be redundant if Power Beam were to be taken away, though."
]
},
{
"link": [
1,
3
],
"name": "Safe Weapon Sidehopper Kill",
"requires": [
{
  "enemyKill": {
    "enemies": [
      [
        "Sidehopper",
        "Sidehopper",
        "Sidehopper"
      ]
    ],
    "explicitWeapons": [
      "Super",
      "ScrewAttack",
      "Plasma"
    ]
  }
}
],
"clearsObstacles": [
"A"
]
},
{
"link": [
1,
3
],
"name": "G-Mode Morph Power Bomb",
"entranceCondition": {
"comeInWithGMode": {
"mode": "any",
"morphed": true
}
},
"requires": [
"h_canArtificialMorphPowerBomb"
],
"clearsObstacles": [
"A",
"B"
]
},
{
"link": [
1,
3
],
"name": "G-Mode Morph Sidehopper Bomb Kill",
"entranceCondition": {
"comeInWithGMode": {
"mode": "any",
"morphed": true
}
},
"requires": [
"h_canArtificialMorphBombs"
],
"clearsObstacles": [
"A"
],
"note": "Samus is safe while morphed and on the ground unless near the door, where the Sidehoppers can jump into the open door and then jump lower",
"devNote": [
"This can be done to unlock the door.",
"FIXME: It is possible to use artificial morph to lure the hoppers to the left to then use most of the runway out of the room."
]
},
{
"link": [
2,
2
],
"name": "Break the Power Bomb Blocks",
"requires": [
"h_canUsePowerBombs"
],
"clearsObstacles": [
"B"
]
},
{
"link": [
2,
3
],
"name": "Base",
"requires": [
{
"obstaclesCleared": [
"B"
]
},
{
"or": [
"HiJump",
"canWalljump",
"canSpringBallJumpMidAir",
"h_canFly",
"canSpringBallBombJump"
]
}
]
},
{
"link": [
2,
3
],
"name": "Damage Boost Escape",
"requires": [
{
"obstaclesCleared": [
"B"
]
},
"canHorizontalDamageBoost",
{
"thornHits": 1
}
]
},
{
"link": [
2,
3
],
"name": "Tricky Jump Escape",
"requires": [
{
"obstaclesCleared": [
"B"
]
},
"canTrickyJump"
],
"note": "The thorns do not cover the entire blocks above. Jump barely only onto the corner to avoid the damage."
},
{
"link": [
2,
3
],
"name": "Ceiling Clip",
"requires": [
"canCeilingClip",
"canPartialFloorClip",
{
"or": [
{
"and": [
"canCarefulJump",
"HiJump",
"canTwoTileSqueeze",
{
"or": [
"canTrickyJump",
{
"thornHits": 1
}
]
}
]
},
{
"and": [
"canNeutralDamageBoost",
"canIframeSpikeJump",
{
"thornHits": 1
}
]
},
{
"and": [
"canPreciseWalljump",
"canTwoTileSqueeze"
]
}
]
}
],
"note": [
"Use the Solid Blocks next to the Samus Eater to clip up through the Power Bomb Blocks.",
"Carefully jump around the thorns, use HiJump to jump over them, or walk through them using IFrames."
]
},
{
"link": [
2,
3
],
"name": "Minimalist Ceiling Clip",
"requires": [
"canTrickyJump",
{
"or": [
"h_canXRayCeilingClip",
{
"and": [
"canTunnelCrawl",
"canPartialFloorClip"
]
}
]
},
"canCeilingClip"
],
"note": [
"Use the Solid Blocks next to the Samus Eater to clip up through the Power Bomb Blocks.",
"The thorns do not cover the entire blocks above. Jump barely only onto the corner to avoid the damage.",
"Carefully jump around the thorns, tunnel crawl slightly to avoid touching the thorns when partial floor clipping.",
"Morph and x-ray can be used instead to setup the clip much easier."
]
},
{
"link": [
3,
1
],
"name": "Base",
"requires": []
},
{
"link": [
3,
2
],
"name": "Base",
"requires": [
{
  "or": [
    "h_canUsePowerBombs",
    {
      "obstaclesCleared": [
        "B"
      ]
    }
  ]
}
],
"clearsObstacles": [
"B"
]
}
]
}