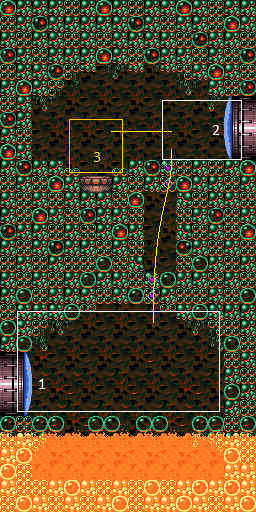
Bat Cave
Room ID: 100
|
Exit condition: {
"leaveWithRunway": {
"length": 3,
"openEnd": 1
}
}
|
|
Requires: "h_canHeatedCrystalFlash" |
|
Requires: {
"or": [
"canWalljump",
"HiJump",
"SpaceJump",
"canTrickyUseFrozenEnemies",
"canSpringBallJumpMidAir"
]
}
{
"heatFrames": 350
}
|
|
Shoot the Skree and shotblock from the door. While avoiding Skree projectiles, jump to the next bubble platform followed by jumping directly up where the shot block used to be. Requires: "canPreciseWalljump"
"canTrickyJump"
{
"heatFrames": 220
}
|
|
Requires: "canJumpIntoRespawningBlock"
{
"heatFrames": 625
}
|
|
Shoot diagonally to clear the Skree and shot block before jumping and sparking diagonally mid-air to the above area. Entrance condition: {
"comeInShinecharging": {
"length": 2,
"openEnd": 0
}
}
Requires: "canShinechargeMovementComplex"
"canMidairShinespark"
{
"heatFrames": 300
}
{
"shinespark": {
"frames": 14,
"excessFrames": 3
}
}
|
|
From: 1
Bottom Left Door
To: 2
Top Right Door
Shoot diagonally to clear the Skree and shot block before jumping and sparking diagonally mid-air to the above area. Entrance condition: {
"comeInShinecharged": {
"framesRequired": 80
}
}
Requires: "canShinechargeMovementComplex"
"canMidairShinespark"
{
"heatFrames": 270
}
{
"shinespark": {
"frames": 13,
"excessFrames": 3
}
}
|
|
Entrance condition: {
"comeInWithGrappleTeleport": {
"blockPositions": [
[
12,
12
],
[
12,
13
]
]
}
}
Bypasses door shell: true |
|
From: 1
Bottom Left Door
To: 2
Top Right Door
Entrance condition: {
"comeInWithGrappleTeleport": {
"blockPositions": [
[
12,
12
]
]
}
}
Exit condition: {
"leaveWithGrappleTeleport": {
"blockPositions": [
[
12,
12
]
]
}
}
Bypasses door shell: true |
|
From: 1
Bottom Left Door
To: 2
Top Right Door
Entrance condition: {
"comeInWithGrappleTeleport": {
"blockPositions": [
[
12,
13
]
]
}
}
Exit condition: {
"leaveWithGrappleTeleport": {
"blockPositions": [
[
12,
13
]
]
}
}
Bypasses door shell: true |
|
Climb up 1 screen. Entrance condition: {
"comeInWithDoorStuckSetup": {}
}
Requires: "canXRayClimb"
{
"heatFrames": 1600
}
Clears obstacles: A |
|
Requires: {
"or": [
{
"heatFrames": 230
},
{
"and": [
"canHorizontalDamageBoost",
{
"heatFrames": 160
},
{
"enemyDamage": {
"enemy": "Skree",
"type": "contact",
"hits": 1
}
}
]
}
]
}
|
|
From: 2
Top Right Door
To: 1
Bottom Left Door
Fall through the shot blocks and shoot around the Skree to open the door without falling into the lava to shinespark out of the room. Entrance condition: {
"comeInShinecharging": {
"length": 6,
"openEnd": 0
}
}
Requires: "canShinechargeMovementTricky"
{
"heatFrames": 165
}
{
"shinespark": {
"frames": 15
}
}
Exit condition: {
"leaveWithSpark": {}
}
|
|
From: 2
Top Right Door
To: 1
Bottom Left Door
Fall through the shot blocks and shoot around the Skree to open the door without falling into the lava to shinespark out of the room. Entrance condition: {
"comeInShinecharged": {
"framesRequired": 115
}
}
Requires: "canShinechargeMovementTricky"
{
"heatFrames": 165
}
{
"shinespark": {
"frames": 15
}
}
Exit condition: {
"leaveWithSpark": {}
}
|
|
Entrance condition: {
"comeInWithGrappleTeleport": {
"blockPositions": [
[
2,
18
],
[
2,
19
]
]
}
}
Bypasses door shell: true |
|
From: 2
Top Right Door
To: 1
Bottom Left Door
Entrance condition: {
"comeInWithGrappleTeleport": {
"blockPositions": [
[
2,
18
]
]
}
}
Exit condition: {
"leaveWithGrappleTeleport": {
"blockPositions": [
[
2,
18
]
]
}
}
Bypasses door shell: true |
|
From: 2
Top Right Door
To: 1
Bottom Left Door
Entrance condition: {
"comeInWithGrappleTeleport": {
"blockPositions": [
[
2,
19
]
]
}
}
Exit condition: {
"leaveWithGrappleTeleport": {
"blockPositions": [
[
2,
19
]
]
}
}
Bypasses door shell: true |
|
Destroy the shot block by standing on top of it, jumping, aiming down, and shooting at the moment that you land. This requires precision because the beam projectile will immediately despawn while off-camera. Less precise alternatives include using a bomb, Power Bomb, or Grapple, if available. With the shot block destroyed, fall down through the opening and jump back up, and the camera will be fixed. Requires: {
"obstaclesCleared": [
"A"
]
}
"canOffScreenMovement"
{
"heatFrames": 160
}
Resets obstacles: A |
|
Requires: {
"heatFrames": 10
}
|
|
Requires: {
"heatFrames": 50
}
|
|
Exit condition: {
"leaveWithRunway": {
"length": 7,
"openEnd": 1
}
}
|
|
Requires: {
"obstaclesNotCleared": [
"A"
]
}
{
"or": [
"canPauseAbuse",
{
"heatFrames": 50
}
]
}
{
"refill": [
"Energy",
"Missile",
"Super",
"PowerBomb"
]
}
|
|
When off-camera, the Gamets still spawn but cannot be destroyed with beams or other projectiles. Requires: {
"obstaclesCleared": [
"A"
]
}
"canOffScreenMovement"
{
"or": [
"ScrewAttack",
"h_canUseMorphBombs",
"Grapple"
]
}
{
"or": [
"canPauseAbuse",
{
"heatFrames": 50
}
]
}
{
"refill": [
"Energy",
"Missile",
"Super",
"PowerBomb"
]
}
|
{
"$schema": "../../../schema/m3-room.schema.json",
"id": 100,
"name": "Bat Cave",
"area": "Norfair",
"subarea": "Upper",
"subsubarea": "East",
"playable": true,
"roomAddress": "0x7B07A",
"roomEnvironments": [
{
"heated": true
}
],
"nodes": [
{
"id": 1,
"name": "Bottom Left Door",
"nodeType": "door",
"nodeSubType": "blue",
"nodeAddress": "0x00197aa",
"doorEnvironments": [
{
"physics": "air"
}
]
},
{
"id": 2,
"name": "Top Right Door",
"nodeType": "door",
"nodeSubType": "blue",
"nodeAddress": "0x00197b6",
"doorEnvironments": [
{
"physics": "air"
}
]
},
{
"id": 3,
"name": "Gamet Farm Junction",
"nodeType": "junction",
"nodeSubType": "junction"
}
],
"enemies": [
{
"id": "e1",
"groupName": "Bat Cave Skrees",
"enemyName": "Skree",
"quantity": 3,
"homeNodes": [
1
],
"dropRequires": [
"h_heatProof"
]
},
{
"id": "e2",
"groupName": "Bat Cave Gamets",
"enemyName": "Gamet",
"quantity": 5,
"homeNodes": [
3
],
"farmCycles": [
{
"name": "Crouch over Gamets",
"cycleFrames": 120,
"requires": [
{
"heatFrames": 120
}
]
}
]
}
],
"obstacles": [
{
"id": "A",
"name": "Camera Broken",
"obstacleType": "abstract",
"note": "Represents being off-camera in the top part of the room."
}
],
"links": [
{
"from": 1,
"to": [
{
"id": 1
},
{
"id": 2
},
{
"id": 3
}
]
},
{
"from": 2,
"to": [
{
"id": 1
},
{
"id": 2
},
{
"id": 3
}
]
},
{
"from": 3,
"to": [
{
"id": 2
},
{
"id": 3
}
]
}
],
"strats": [
{
"link": [
1,
1
],
"name": "Leave with Runway",
"requires": [],
"exitCondition": {
"leaveWithRunway": {
"length": 3,
"openEnd": 1
}
}
},
{
"link": [
1,
1
],
"name": "Crystal Flash",
"requires": [
"h_canHeatedCrystalFlash"
]
},
{
"link": [
1,
2
],
"name": "Base",
"requires": [
{
"or": [
"canWalljump",
"HiJump",
"SpaceJump",
"canTrickyUseFrozenEnemies",
"canSpringBallJumpMidAir"
]
},
{
"heatFrames": 350
}
]
},
{
"link": [
1,
2
],
"name": "Precise Walljump",
"requires": [
"canPreciseWalljump",
"canTrickyJump",
{
"heatFrames": 220
}
],
"note": [
"Shoot the Skree and shotblock from the door.",
"While avoiding Skree projectiles, jump to the next bubble platform followed by jumping directly up where the shot block used to be."
]
},
{
"link": [
1,
2
],
"name": "Jump into Respawning Block",
"requires": [
"canJumpIntoRespawningBlock",
{
"heatFrames": 625
}
]
},
{
"link": [
1,
2
],
"name": "Enter Running Shinespark",
"entranceCondition": {
"comeInShinecharging": {
"length": 2,
"openEnd": 0
}
},
"requires": [
"canShinechargeMovementComplex",
"canMidairShinespark",
{
"heatFrames": 300
},
{
"shinespark": {
"frames": 14,
"excessFrames": 3
}
}
],
"note": "Shoot diagonally to clear the Skree and shot block before jumping and sparking diagonally mid-air to the above area."
},
{
"link": [
1,
2
],
"name": "Enter Shinecharged and Shinespark",
"entranceCondition": {
"comeInShinecharged": {
"framesRequired": 80
}
},
"requires": [
"canShinechargeMovementComplex",
"canMidairShinespark",
{
"heatFrames": 270
},
{
"shinespark": {
"frames": 13,
"excessFrames": 3
}
}
],
"note": "Shoot diagonally to clear the Skree and shot block before jumping and sparking diagonally mid-air to the above area."
},
{
"link": [
1,
2
],
"name": "Grapple Teleport",
"entranceCondition": {
"comeInWithGrappleTeleport": {
"blockPositions": [
[
12,
12
],
[
12,
13
]
]
}
},
"requires": [],
"bypassesDoorShell": true
},
{
"link": [
1,
2
],
"name": "Carry Grapple Teleport (Top Position)",
"entranceCondition": {
"comeInWithGrappleTeleport": {
"blockPositions": [
[
12,
12
]
]
}
},
"requires": [],
"bypassesDoorShell": true,
"exitCondition": {
"leaveWithGrappleTeleport": {
"blockPositions": [
[
12,
12
]
]
}
}
},
{
"link": [
1,
2
],
"name": "Carry Grapple Teleport (Bottom Position)",
"entranceCondition": {
"comeInWithGrappleTeleport": {
"blockPositions": [
[
12,
13
]
]
}
},
"requires": [],
"bypassesDoorShell": true,
"exitCondition": {
"leaveWithGrappleTeleport": {
"blockPositions": [
[
12,
13
]
]
}
}
},
{
"link": [
1,
3
],
"name": "X-Ray Climb",
"entranceCondition": {
"comeInWithDoorStuckSetup": {}
},
"requires": [
"canXRayClimb",
{
"heatFrames": 1600
}
],
"clearsObstacles": [
"A"
],
"note": "Climb up 1 screen."
},
{
"link": [
2,
1
],
"name": "Base",
"requires": [
{
  "or": [
    {
      "heatFrames": 230
    },
    {
      "and": [
        "canHorizontalDamageBoost",
        {
          "heatFrames": 160
        },
        {
          "enemyDamage": {
            "enemy": "Skree",
            "type": "contact",
            "hits": 1
          }
        }
      ]
    }
  ]
}
]
},
{
"link": [
2,
1
],
"name": "Enter Running and Leave Shinesparking",
"entranceCondition": {
"comeInShinecharging": {
"length": 6,
"openEnd": 0
}
},
"requires": [
"canShinechargeMovementTricky",
{
"heatFrames": 165
},
{
"shinespark": {
"frames": 15
}
}
],
"exitCondition": {
"leaveWithSpark": {}
},
"unlocksDoors": [
{
"types": [
"super"
],
"requires": []
},
{
"types": [
"missiles",
"powerbomb"
],
"requires": [
"never"
]
}
],
"note": "Fall through the shot blocks and shoot around the Skree to open the door without falling into the lava to shinespark out of the room."
},
{
"link": [
2,
1
],
"name": "Enter Shinecharged and Leave Shinesparking",
"entranceCondition": {
"comeInShinecharged": {
"framesRequired": 115
}
},
"requires": [
"canShinechargeMovementTricky",
{
"heatFrames": 165
},
{
"shinespark": {
"frames": 15
}
}
],
"exitCondition": {
"leaveWithSpark": {}
},
"unlocksDoors": [
{
"types": [
"super"
],
"requires": []
},
{
"types": [
"missiles",
"powerbomb"
],
"requires": [
"never"
]
}
],
"note": "Fall through the shot blocks and shoot around the Skree to open the door without falling into the lava to shinespark out of the room."
},
{
"link": [
2,
1
],
"name": "Grapple Teleport",
"entranceCondition": {
"comeInWithGrappleTeleport": {
"blockPositions": [
[
2,
18
],
[
2,
19
]
]
}
},
"requires": [],
"bypassesDoorShell": true
},
{
"link": [
2,
1
],
"name": "Carry Grapple Teleport (Top Position)",
"entranceCondition": {
"comeInWithGrappleTeleport": {
"blockPositions": [
[
2,
18
]
]
}
},
"requires": [],
"bypassesDoorShell": true,
"exitCondition": {
"leaveWithGrappleTeleport": {
"blockPositions": [
[
2,
18
]
]
}
}
},
{
"link": [
2,
1
],
"name": "Carry Grapple Teleport (Bottom Position)",
"entranceCondition": {
"comeInWithGrappleTeleport": {
"blockPositions": [
[
2,
19
]
]
}
},
"requires": [],
"bypassesDoorShell": true,
"exitCondition": {
"leaveWithGrappleTeleport": {
"blockPositions": [
[
2,
19
]
]
}
}
},
{
"link": [
2,
2
],
"name": "Fix the Camera",
"requires": [
{
"obstaclesCleared": [
"A"
]
},
"canOffScreenMovement",
{
"heatFrames": 160
}
],
"resetsObstacles": [
"A"
],
"note": [
"Destroy the shot block by standing on top of it, jumping, aiming down, and shooting at the moment that you land.",
"This requires precision because the beam projectile will immediately despawn while off-camera.",
"Less precise alternatives include using a bomb, Power Bomb, or Grapple, if available.",
"With the shot block destroyed, fall down through the opening and jump back up, and the camera will be fixed."
]
},
{
"link": [
2,
3
],
"name": "Base",
"requires": [
{
  "heatFrames": 10
}
],
"devNote": [
"Heat frames here are artifically lower to allow using canPauseAbuse on the farm.",
"This is compensated for by extra heat frames on the farm itself as an alternative to canPauseAbuse."
]
},
{
"link": [
3,
2
],
"name": "Base",
"requires": [
{
  "heatFrames": 50
}
]
},
{
"link": [
3,
2
],
"name": "Leave with Runway",
"requires": [],
"exitCondition": {
"leaveWithRunway": {
"length": 7,
"openEnd": 1
}
},
"unlocksDoors": [
{
"types": [
"ammo"
],
"requires": []
}
],
"devNote": [
"The blocks respawn, so no need to split this in two runways.",
"While waiting for respawn would take additional heat frames, the spawner makes that more or less inconsequential."
]
},
{
"link": [
3,
3
],
"name": "Gamet Farm",
"requires": [
{
"obstaclesNotCleared": [
"A"
]
},
{
"or": [
"canPauseAbuse",
{
"heatFrames": 50
}
]
},
{
"refill": [
"Energy",
"Missile",
"Super",
"PowerBomb"
]
}
]
},
{
"link": [
3,
3
],
"name": "Off-Camera Gamet Farm",
"requires": [
{
"obstaclesCleared": [
"A"
]
},
"canOffScreenMovement",
{
"or": [
"ScrewAttack",
"h_canUseMorphBombs",
"Grapple"
]
},
{
"or": [
"canPauseAbuse",
{
"heatFrames": 50
}
]
},
{
"refill": [
"Energy",
"Missile",
"Super",
"PowerBomb"
]
}
],
"note": "When off-camera, the Gamets still spawn but cannot be destroyed with beams or other projectiles."
}
]
}