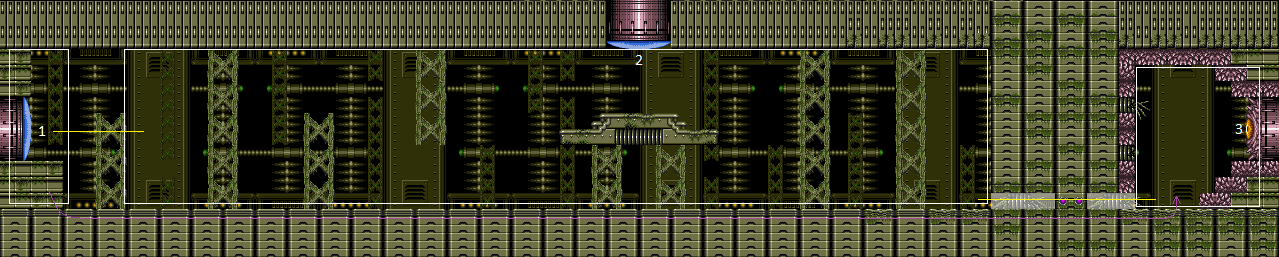
Basement
Room ID: 156
|
Exit condition: {
"leaveWithRunway": {
"length": 3,
"openEnd": 1
}
}
|
|
Requires: {
"not": "f_DefeatedPhantoon"
}
"canRiskPermanentLossOfAccess"
Exit condition: {
"leaveWithRunway": {
"length": 5,
"openEnd": 0
}
}
|
|
One way to position the Atomic is to lure it to the right by standing on the ground, then jump over it and freeze it while standing in the corner on the ground once it is just under 2 tiles away from the ledge. Stand on the ledge and freeze it again once it is in position, maintaining a half-tile gap between the Atomic and the runway to extend it as much as possible. Requires: "h_canFrozenEnemyRunway" Exit condition: {
"leaveWithRunway": {
"length": 5,
"openEnd": 0
}
}
|
|
Requires: "canShinechargeMovement"
{
"canShineCharge": {
"usedTiles": 33,
"openEnd": 2
}
}
Exit condition: {
"leaveShinecharged": {
"framesRemaining": 135
}
}
|
|
Requires: "h_canCrystalFlash" Clears obstacles: A |
|
Requires: "f_DefeatedPhantoon" Exit condition: {
"leaveWithGModeSetup": {}
}
|
|
Requires: {
"enemyDamage": {
"enemy": "Atomic",
"type": "contact",
"hits": 1
}
}
"f_DefeatedPhantoon"
|
|
|
|
Use the camera scroll blocks just left of the bomb blocks, in order to overload PLMs and go through them. Entrance condition: {
"comeInWithGMode": {
"mode": "any",
"morphed": true
}
}
Requires: "h_canArtificialMorphMovement" |
|
Notable: true 

On room entry, place a Power Bomb to kill the Atomic and land on the Workrobot. Wait for the Workrobot to move across the room until it meets with a second robot. Depending on where the robots meet, either roll off and quickly roll under the Atomic, stay on for a second to try to lure the Atomic left a bit, or use a Power Bomb to kill it. Be careful not to hit any of the invisible, stationary lasers, and don't place any Power Bombs too close to the right wall or it will hit the bomb block and it will no longer be passable. Quickly use the camera scroll blocks just left of the bomb blocks, in order to overload PLMs and go through them before the Atomic hits Samus. Entrance condition: {
"comeInWithGMode": {
"mode": "any",
"morphed": true
}
}
Requires: "f_DefeatedPhantoon"
"canBePatient"
"h_canArtificialMorphPowerBomb"
{
"or": [
"canTrickyJump",
"h_canArtificialMorphPowerBomb"
]
}
|
|
|
|
Freeze an Atomic at a precise distance below the door in order to jump up and clip through the door shell. The pixel window is larger and higher with Morph and an X-Ray stand-up. Requires: "f_DefeatedPhantoon" "h_canIceClip" Bypasses door shell: true |
|
Requires: "canShinechargeMovement"
{
"canShineCharge": {
"usedTiles": 33,
"openEnd": 2
}
}
Exit condition: {
"leaveShinecharged": {
"framesRemaining": 110
}
}
|
|
Requires: "f_DefeatedPhantoon"
{
"or": [
"ScrewAttack",
"Wave",
"Spazer",
"Plasma"
]
}
{
"resetRoom": {
"nodes": [
1,
2
],
"mustStayPut": false
}
}
{
"refill": [
"Energy",
"Missile"
]
}
|
|
Exit condition: {
"leaveWithDoorFrameBelow": {
"height": 2
}
}
|
|
Exit condition: {
"leaveWithPlatformBelow": {
"height": 6,
"leftPosition": -5.5,
"rightPosition": 5.5
}
}
|
|
Stand on one frozen Atomic to bring a second Atomic to the correct height to use as a crouch platform. Requires: "canUpwardGModeSetup" "canTwoTileSqueeze" "canTrickyUseFrozenEnemies" "f_DefeatedPhantoon" Exit condition: {
"leaveWithGModeSetup": {}
}
|
|
Requires: {
"enemyDamage": {
"enemy": "Atomic",
"type": "contact",
"hits": 1
}
}
"f_DefeatedPhantoon"
|
|
Entrance condition: {
"comeInWithGMode": {
"mode": "direct",
"morphed": false
},
"comesThroughToilet": "any"
}
Exit condition: {
"leaveWithGMode": {
"morphed": false
}
}
Bypasses door shell: true |
|
With Bombs, it may be helpful to roll off the platform and kill the Atomics before safely leaving the room. Entrance condition: {
"comeInWithGMode": {
"mode": "direct",
"morphed": true
},
"comesThroughToilet": "any"
}
Requires: "h_canArtificialMorphMovement" Exit condition: {
"leaveWithGMode": {
"morphed": true
}
}
Bypasses door shell: true |
|
Requires: {
"or": [
"h_canBombThings",
{
"and": [
"Morph",
{
"obstaclesCleared": [
"A"
]
}
]
}
]
}
Clears obstacles: A |
|
This speedball is easier with Phantoon dead, since you can push the robots all the way left. It's even possible to setup the short hop mockball by bonking the center platform. Requires: "canSpeedball"
"f_DefeatedPhantoon"
{
"canShineCharge": {
"usedTiles": 33,
"openEnd": 2
}
}
Clears obstacles: A |
|
This speedball is harder with Phantoon alive and has a shorter runway because of the robot standing in the way. Requires: "canSpeedball"
{
"canShineCharge": {
"usedTiles": 22,
"openEnd": 0
}
}
Clears obstacles: A |
|
Use the camera scroll blocks just left of the bomb blocks, in order to overload PLMs and go through them. Entrance condition: {
"comeInWithGMode": {
"mode": "any",
"morphed": true
},
"comesThroughToilet": "any"
}
Requires: "h_canArtificialMorphMovement" |
|
From: 2
Top Door
To: 3
Right Door
On room entry, dodge the atomic and quickly place a Power Bomb to kill both Atomics. It is tricky but possible to kill them both with a single Power Bomb placed on the right half of the platform. Wait for the Workrobot to pass, then roll off to the right of it. Be careful not to hit any of the invisible, stationary lasers. Use the camera scroll blocks just left of the bomb blocks, in order to overload PLMs and go through them. Entrance condition: {
"comeInWithGMode": {
"mode": "any",
"morphed": true
},
"comesThroughToilet": "any"
}
Requires: "f_DefeatedPhantoon"
"h_canArtificialMorphPowerBomb"
{
"or": [
"canTrickyJump",
"h_canArtificialMorphPowerBomb"
]
}
|
|
Entrance condition: {
"comeInWithGrappleTeleport": {
"blockPositions": [
[
7,
2
]
]
}
}
|
|
Entrance condition: {
"comeInWithGrappleTeleport": {
"blockPositions": [
[
3,
12
],
[
3,
13
]
]
}
}
Bypasses door shell: true |
|
Entrance condition: {
"comeInWithGrappleTeleport": {
"blockPositions": [
[
3,
12
]
]
}
}
Exit condition: {
"leaveWithGrappleTeleport": {
"blockPositions": [
[
3,
12
]
]
}
}
Bypasses door shell: true |
|
Entrance condition: {
"comeInWithGrappleTeleport": {
"blockPositions": [
[
3,
13
]
]
}
}
Exit condition: {
"leaveWithGrappleTeleport": {
"blockPositions": [
[
3,
13
]
]
}
}
Bypasses door shell: true |
|
Requires: {
"or": [
"h_canBombThings",
{
"and": [
"Morph",
{
"obstaclesCleared": [
"A"
]
}
]
}
]
}
Clears obstacles: A |
|
Entrance condition: {
"comeInBlueSpinning": {
"unusableTiles": 1
}
}
Requires: "canSpeedball" "canCarefulJump" "canSlowShortCharge" Clears obstacles: A |
|
Use the camera scroll blocks just right of the bomb blocks, in order to overload PLMs and go through them. Cancel g-mode and return into the morph tunnel to fix the camera. Entrance condition: {
"comeInWithGMode": {
"mode": "any",
"morphed": false
}
}
Requires: "Morph" |
|
Use the camera scroll blocks just right of the bomb blocks, in order to overload PLMs and go through them. Dodge the enemies while getting to the door. Entrance condition: {
"comeInWithGMode": {
"mode": "any",
"morphed": true
}
}
Requires: "canOffScreenMovement" |
|
Exit condition: {
"leaveWithRunway": {
"length": 2,
"openEnd": 1
}
}
|
|
Lure an Atomic from the left half of the room. Morph in the corner against the top stair and wait for the Atomic to approach. Quickly unmorph just before and freeze the Atomic just after it hits Samus. Requires: "f_DefeatedPhantoon"
{
  "or": [
    "h_canBombThings",
    {
      "and": [
        "Morph",
        {
          "obstaclesCleared": [
            "A"
          ]
        }
      ]
    }
  ]
}
"h_canFrozenEnemyRunway"
{
"enemyDamage": {
"enemy": "Atomic",
"type": "contact",
"hits": 1
}
}
Exit condition: {
"leaveWithRunway": {
"length": 4,
"openEnd": 0
}
}
|
|
Requires: "SpeedBooster"
"canShinechargeMovementTricky"
"canMockball"
{
"obstaclesCleared": [
"A"
]
}
{
"shinespark": {
"frames": 3
}
}
Exit condition: {
"leaveWithSpark": {}
}
|
|
Requires: "f_DefeatedPhantoon"
"SpeedBooster"
"canShinechargeMovementComplex"
{
"obstaclesCleared": [
"A"
]
}
Exit condition: {
"leaveShinecharged": {
"framesRemaining": 50
}
}
|
|
Requires: "h_canCrystalFlash" Clears obstacles: A |
|
From: 3
Right Door
To: 3
Right Door
Requires: "f_DefeatedPhantoon"
{
  "or": [
    "h_canBombThings",
    {
      "and": [
        "Morph",
        {
          "obstaclesCleared": [
            "A"
          ]
        }
      ]
    }
  ]
}
Exit condition: {
"leaveWithGModeSetup": {}
}
|
{
"$schema": "../../../schema/m3-room.schema.json",
"id": 156,
"name": "Basement",
"area": "Wrecked Ship",
"subarea": "Main",
"playable": true,
"roomAddress": "0x7CC6F",
"roomEnvironments": [
{
"heated": false
}
],
"nodes": [
{
"id": 1,
"name": "Left Door",
"nodeType": "door",
"nodeSubType": "blue",
"nodeAddress": "0x001a2a0",
"doorOrientation": "left",
"doorEnvironments": [
{
"physics": "air"
}
]
},
{
"id": 2,
"name": "Top Door",
"nodeType": "door",
"nodeSubType": "blue",
"nodeAddress": "0x001a294",
"doorOrientation": "up",
"doorEnvironments": [
{
"physics": "air"
}
]
},
{
"id": 3,
"name": "Right Door",
"nodeType": "door",
"nodeSubType": "eye",
"nodeAddress": "0x001a2ac",
"doorOrientation": "right",
"doorEnvironments": [
{
"physics": "air"
}
]
}
],
"obstacles": [
{
"id": "A",
"name": "Right Bomb Blocks",
"obstacleType": "inanimate",
"note": "The bomb blocks that separate the right door from the main section"
}
],
"enemies": [
{
"id": "e1",
"groupName": "Basement Atomics",
"enemyName": "Atomic",
"quantity": 3,
"homeNodes": [
1,
2
],
"spawn": [
"f_DefeatedPhantoon"
]
},
{
"id": "e2",
"groupName": "Basement Workrobots",
"enemyName": "Workrobot",
"quantity": 2,
"homeNodes": [
1,
2
],
"spawn": [
"f_DefeatedPhantoon"
]
}
],
"links": [
{
"from": 1,
"to": [
{
"id": 1
},
{
"id": 2
},
{
"id": 3
}
]
},
{
"from": 2,
"to": [
{
"id": 1
},
{
"id": 2
},
{
"id": 3
}
]
},
{
"from": 3,
"to": [
{
"id": 1
},
{
"id": 2
},
{
"id": 3
}
]
}
],
"strats": [
{
"link": [
1,
1
],
"name": "Leave with Runway",
"requires": [],
"exitCondition": {
"leaveWithRunway": {
"length": 3,
"openEnd": 1
}
}
},
{
"link": [
1,
1
],
"name": "Leave with Runway - Phantoon Alive",
"requires": [
{
"not": "f_DefeatedPhantoon"
},
"canRiskPermanentLossOfAccess"
],
"exitCondition": {
"leaveWithRunway": {
"length": 5,
"openEnd": 0
}
},
"devNote": "The length is more similar to 5 with 0 open end, than 4 with 1."
},
{
"link": [
1,
1
],
"name": "Leave With Runway - Frozen Atomic",
"requires": [
"h_canFrozenEnemyRunway"
],
"exitCondition": {
"leaveWithRunway": {
"length": 5,
"openEnd": 0
}
},
"note": [
"One way to position the Atomic is to lure it to the right by standing on the ground,",
"then jump over it and freeze it while standing in the corner on the ground once it is just under 2 tiles away from the ledge.",
"Stand on the ledge and freeze it again once it is in position, maintaining a half-tile gap between the Atomic and the runway to extend it as much as possible."
],
"devNote": "This does not require Phantoon to be killed, as the broken workrobot is there otherwise."
},
{
"link": [
1,
1
],
"name": "Leave Charged",
"requires": [
"canShinechargeMovement",
{
"canShineCharge": {
"usedTiles": 33,
"openEnd": 2
}
}
],
"exitCondition": {
"leaveShinecharged": {
"framesRemaining": 135
}
},
"flashSuitChecked": true
},
{
"link": [
1,
1
],
"name": "Crystal Flash",
"requires": [
"h_canCrystalFlash"
],
"clearsObstacles": [
"A"
],
"flashSuitChecked": true
},
{
"link": [
1,
1
],
"name": "G-Mode Setup - Get Hit By Atomic",
"notable": false,
"requires": [
"f_DefeatedPhantoon"
],
"exitCondition": {
"leaveWithGModeSetup": {}
},
"flashSuitChecked": true
},
{
"link": [
1,
1
],
"name": "G-Mode Regain Mobility",
"requires": [
{
"enemyDamage": {
"enemy": "Atomic",
"type": "contact",
"hits": 1
}
},
"f_DefeatedPhantoon"
],
"gModeRegainMobility": {},
"flashSuitChecked": true
},
{
"link": [
1,
2
],
"name": "Base",
"requires": []
},
{
"link": [
1,
3
],
"name": "G-mode Morph",
"entranceCondition": {
"comeInWithGMode": {
"mode": "any",
"morphed": true
}
},
"requires": [
"h_canArtificialMorphMovement"
],
"flashSuitChecked": true,
"note": "Use the camera scroll blocks just left of the bomb blocks, in order to overload PLMs and go through them."
},
{
"link": [
1,
3
],
"name": "Basement G-mode Morph Workrobot Ride",
"notable": true,
"entranceCondition": {
"comeInWithGMode": {
"mode": "any",
"morphed": true
}
},
"requires": [
"f_DefeatedPhantoon",
"canBePatient",
"h_canArtificialMorphPowerBomb",
{
"or": [
"canTrickyJump",
"h_canArtificialMorphPowerBomb"
]
}
],
"flashSuitChecked": true,
"note": [
"On room entry, place a Power Bomb to kill the Atomic and land on the Workrobot.",
"Wait for the Workrobot to move across the room until it meets with a second robot.",
"Depending on where the robots meet, either roll off and quickly roll under the Atomic,",
"stay on for a second to try to lure the Atomic left a bit, or use a Power Bomb to kill it.",
"Be careful not to hit any of the invisible, stationary lasers,",
"and don't place any Power Bombs too close to the right wall or it will hit the bomb block and it will no longer be passable.",
"Quickly use the camera scroll blocks just left of the bomb blocks, in order to overload PLMs and go through them before the Atomic hits Samus."
]
},
{
"link": [
2,
1
],
"name": "Base",
"requires": []
},
{
"link": [
2,
2
],
"name": "Atomic Ice Clip Door Lock Skip",
"requires": [
"f_DefeatedPhantoon",
"h_canIceClip"
],
"bypassesDoorShell": true,
"flashSuitChecked": true,
"note": [
"Freeze an Atomic at a precise distance below the door in order to jump up and clip through the door shell.",
"The pixel window is larger and higher with Morph and an X-Ray stand-up."
]
},
{
"link": [
2,
2
],
"name": "Leave Charged",
"requires": [
"canShinechargeMovement",
{
"canShineCharge": {
"usedTiles": 33,
"openEnd": 2
}
}
],
"exitCondition": {
"leaveShinecharged": {
"framesRemaining": 110
}
},
"flashSuitChecked": true
},
{
"link": [
2,
2
],
"name": "Atomic Farm",
"requires": [
"f_DefeatedPhantoon",
{
"or": [
"ScrewAttack",
"Wave",
"Spazer",
"Plasma"
]
},
{
"resetRoom": {
"nodes": [
1,
2
],
"mustStayPut": false
}
},
{
"refill": [
"Energy",
"Missile"
]
}
]
},
{
"link": [
2,
2
],
"name": "Leave With Door Frame Below",
"requires": [],
"exitCondition": {
"leaveWithDoorFrameBelow": {
"height": 2
}
}
},
{
"link": [
2,
2
],
"name": "Leave With Platform Below",
"requires": [],
"exitCondition": {
"leaveWithPlatformBelow": {
"height": 6,
"leftPosition": -5.5,
"rightPosition": 5.5
}
},
"devNote": "We could add another jumpway (or two) for the long platform below but it does not yet seem to have an application."
},
{
"link": [
2,
2
],
"name": "G-Mode Setup - Frozen Atomic",
"notable": false,
"requires": [
"canUpwardGModeSetup",
"canTwoTileSqueeze",
"canTrickyUseFrozenEnemies",
"f_DefeatedPhantoon"
],
"exitCondition": {
"leaveWithGModeSetup": {}
},
"flashSuitChecked": true,
"note": [
"Stand on one frozen Atomic to bring a second Atomic to the correct height to use as a crouch platform."
]
},
{
"link": [
2,
2
],
"name": "G-Mode Regain Mobility",
"requires": [
{
"enemyDamage": {
"enemy": "Atomic",
"type": "contact",
"hits": 1
}
},
"f_DefeatedPhantoon"
],
"gModeRegainMobility": {},
"flashSuitChecked": true
},
{
"link": [
2,
2
],
"name": "Carry G-Mode Back Up",
"entranceCondition": {
"comeInWithGMode": {
"mode": "direct",
"morphed": false
},
"comesThroughToilet": "any"
},
"requires": [],
"exitCondition": {
"leaveWithGMode": {
"morphed": false
}
},
"bypassesDoorShell": true,
"flashSuitChecked": true
},
{
"link": [
2,
2
],
"name": "Carry G-Mode Morph Back Up",
"entranceCondition": {
"comeInWithGMode": {
"mode": "direct",
"morphed": true
},
"comesThroughToilet": "any"
},
"requires": [
"h_canArtificialMorphMovement"
],
"exitCondition": {
"leaveWithGMode": {
"morphed": true
}
},
"bypassesDoorShell": true,
"flashSuitChecked": true,
"note": "With Bombs, it may be helpful to roll off the platform and kill the Atomics before safely leaving the room."
},
{
"link": [
2,
3
],
"name": "Base",
"requires": [
{
"or": [
"h_canBombThings",
{
"and": [
"Morph",
{
"obstaclesCleared": [
"A"
]
}
]
}
]
}
],
"clearsObstacles": [
"A"
]
},
{
"link": [
2,
3
],
"name": "Basement Speedball (Phantoon Dead)",
"requires": [
"canSpeedball",
"f_DefeatedPhantoon",
{
"canShineCharge": {
"usedTiles": 33,
"openEnd": 2
}
}
],
"clearsObstacles": [
"A"
],
"note": [
"This speedball is easier with Phantoon dead, since you can push the robots all the way left.",
"It's even possible to setup the short hop mockball by bonking the center platform."
]
},
{
"link": [
2,
3
],
"name": "Basement Speedball (Phantoon Alive)",
"requires": [
"canSpeedball",
{
"canShineCharge": {
"usedTiles": 22,
"openEnd": 0
}
}
],
"clearsObstacles": [
"A"
],
"note": "This speedball is harder with Phantoon alive and has a shorter runway because of the robot standing in the way."
},
{
"link": [
2,
3
],
"name": "G-mode Morph",
"entranceCondition": {
"comeInWithGMode": {
"mode": "any",
"morphed": true
},
"comesThroughToilet": "any"
},
"requires": [
"h_canArtificialMorphMovement"
],
"flashSuitChecked": true,
"note": "Use the camera scroll blocks just left of the bomb blocks, in order to overload PLMs and go through them."
},
{
"link": [
2,
3
],
"name": "G-mode Morph Power Bombs, Wait for the Workrobot",
"entranceCondition": {
"comeInWithGMode": {
"mode": "any",
"morphed": true
},
"comesThroughToilet": "any"
},
"requires": [
"f_DefeatedPhantoon",
"h_canArtificialMorphPowerBomb",
{
"or": [
"canTrickyJump",
"h_canArtificialMorphPowerBomb"
]
}
],
"flashSuitChecked": true,
"note": [
"On room entry, dodge the atomic and quickly place a Power Bomb to kill both Atomics.",
"It is tricky but possible to kill them both with a single Power Bomb placed on the right half of the platform.",
"Wait for the Workrobot to pass, then roll off to the right of it. Be careful not to hit any of the invisible, stationary lasers.",
"Use the camera scroll blocks just left of the bomb blocks, in order to overload PLMs and go through them."
]
},
{
"link": [
3,
1
],
"name": "Grapple Teleport",
"entranceCondition": {
"comeInWithGrappleTeleport": {
"blockPositions": [
[
7,
2
]
]
}
},
"requires": []
},
{
"link": [
3,
1
],
"name": "Grapple Teleport Door Lock Skip",
"entranceCondition": {
"comeInWithGrappleTeleport": {
"blockPositions": [
[
3,
12
],
[
3,
13
]
]
}
},
"requires": [],
"bypassesDoorShell": true
},
{
"link": [
3,
1
],
"name": "Carry Grapple Teleport (Top Position)",
"entranceCondition": {
"comeInWithGrappleTeleport": {
"blockPositions": [
[
3,
12
]
]
}
},
"requires": [],
"bypassesDoorShell": true,
"exitCondition": {
"leaveWithGrappleTeleport": {
"blockPositions": [
[
3,
12
]
]
}
}
},
{
"link": [
3,
1
],
"name": "Carry Grapple Teleport (Bottom Position)",
"entranceCondition": {
"comeInWithGrappleTeleport": {
"blockPositions": [
[
3,
13
]
]
}
},
"requires": [],
"bypassesDoorShell": true,
"exitCondition": {
"leaveWithGrappleTeleport": {
"blockPositions": [
[
3,
13
]
]
}
}
},
{
"link": [
3,
2
],
"name": "Base",
"requires": [
{
"or": [
"h_canBombThings",
{
"and": [
"Morph",
{
"obstaclesCleared": [
"A"
]
}
]
}
]
}
],
"clearsObstacles": [
"A"
]
},
{
"link": [
3,
2
],
"name": "Speedball",
"entranceCondition": {
"comeInBlueSpinning": {
"unusableTiles": 1
}
},
"requires": [
"canSpeedball",
"canCarefulJump",
"canSlowShortCharge"
],
"clearsObstacles": [
"A"
],
"devNote": [
"A more controlled angle is needed entering the room for this strat.",
"FIXME: Develop a proper way to represent a maximum speed limit for the jump to work."
]
},
{
"link": [
3,
2
],
"name": "G-mode",
"entranceCondition": {
"comeInWithGMode": {
"mode": "any",
"morphed": false
}
},
"requires": [
"Morph"
],
"flashSuitChecked": true,
"note": "Use the camera scroll blocks just right of the bomb blocks, in order to overload PLMs and go through them. Cancel g-mode and return into the morph tunnel to fix the camera."
},
{
"link": [
3,
2
],
"name": "G-mode Morph While Blind",
"entranceCondition": {
"comeInWithGMode": {
"mode": "any",
"morphed": true
}
},
"requires": [
"canOffScreenMovement"
],
"flashSuitChecked": true,
"note": "Use the camera scroll blocks just right of the bomb blocks, in order to overload PLMs and go through them. Dodge the enemies while getting to the door."
},
{
"link": [
3,
3
],
"name": "Leave with Runway",
"requires": [],
"exitCondition": {
"leaveWithRunway": {
"length": 2,
"openEnd": 1
}
}
},
{
"link": [
3,
3
],
"name": "Leave With Runway - Frozen Atomic",
"requires": [
"f_DefeatedPhantoon",
{
"or": [
"h_canBombThings",
{
"and": [
"Morph",
{
"obstaclesCleared": [
"A"
]
}
]
}
]
},
"h_canFrozenEnemyRunway",
{
"enemyDamage": {
"enemy": "Atomic",
"type": "contact",
"hits": 1
}
}
],
"exitCondition": {
"leaveWithRunway": {
"length": 4,
"openEnd": 0
}
},
"note": [
"Lure an Atomic from the left half of the room. Morph in the corner against the top stair and wait for the Atomic to approach.",
"Quickly unmorph just before and freeze the Atomic just after it hits Samus."
]
},
{
"link": [
3,
3
],
"name": "Leave With Spark",
"requires": [
"SpeedBooster",
"canShinechargeMovementTricky",
"canMockball",
{
"obstaclesCleared": [
"A"
]
},
{
"shinespark": {
"frames": 3
}
}
],
"exitCondition": {
"leaveWithSpark": {}
}
},
{
"link": [
3,
3
],
"name": "Leave Shinecharged",
"requires": [
"f_DefeatedPhantoon",
"SpeedBooster",
"canShinechargeMovementComplex",
{
"obstaclesCleared": [
"A"
]
}
],
"exitCondition": {
"leaveShinecharged": {
"framesRemaining": 50
}
},
"flashSuitChecked": true
},
{
"link": [
3,
3
],
"name": "Crystal Flash",
"requires": [
"h_canCrystalFlash"
],
"clearsObstacles": [
"A"
],
"flashSuitChecked": true,
"devNote": "The Gadora won't attack if you position all the way to the left."
},
{
"link": [
3,
3
],
"name": "G-Mode Setup - Get Hit By Atomic, Lured from the Left",
"notable": false,
"requires": [
"f_DefeatedPhantoon",
{
"or": [
"h_canBombThings",
{
"and": [
"Morph",
{
"obstaclesCleared": [
"A"
]
}
]
}
]
}
],
"exitCondition": {
"leaveWithGModeSetup": {}
},
"flashSuitChecked": true
},
{
"link": [
1,
1
],
"name": "Base (Unlock Door)",
"requires": [],
"unlocksDoors": [
{
"types": [
"ammo"
],
"requires": []
}
]
},
{
"link": [
1,
1
],
"name": "Base (Come In Normally)",
"entranceCondition": {
"comeInNormally": {}
},
"requires": []
},
{
"link": [
2,
2
],
"name": "Base (Unlock Door)",
"requires": [],
"unlocksDoors": [
{
"types": [
"ammo"
],
"requires": []
}
]
},
{
"link": [
2,
2
],
"name": "Base (Come In Normally)",
"entranceCondition": {
"comeInNormally": {}
},
"requires": []
},
{
"link": [
3,
3
],
"name": "Base (Unlock Door)",
"requires": [],
"unlocksDoors": [
{
"types": [
"ammo"
],
"requires": []
}
]
},
{
"link": [
3,
3
],
"name": "Base (Come In Normally)",
"entranceCondition": {
"comeInNormally": {}
},
"requires": []
}
]
}