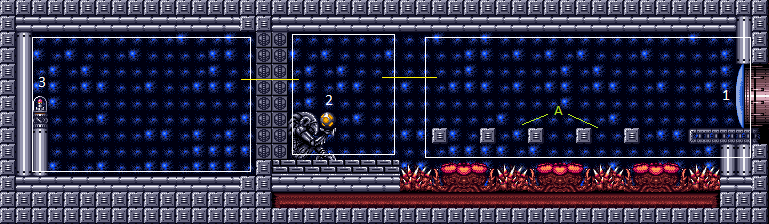
Alpha Power Bomb Room
Room ID: 76
|
Exit condition: {
"leaveWithRunway": {
"length": 4,
"openEnd": 1
}
}
|
|
From: 1
Right Door
To: 1
Right Door
Requires: "canSamusEaterStandUp"
{
"samusEaterFrames": 160
}
{
"canShineCharge": {
"usedTiles": 33,
"openEnd": 2
}
}
Exit condition: {
"leaveShinecharged": {
"framesRemaining": 100
}
}
|
|
Requires: "h_canCrystalFlash" |
|
Requires: {
"or": [
"canTrickyJump",
"Ice",
{
"obstaclesCleared": [
"A"
]
},
{
"and": [
"canCarefulJump",
"h_canUseSpringBall"
]
},
"can4HighMidAirMorph",
{
"and": [
"SpaceJump",
"canCarefulJump"
]
},
{
"and": [
"SpaceJump",
"ScrewAttack"
]
},
{
"and": [
"ScrewAttack",
"canCarefulJump"
]
}
]
}
|
|
Entrance condition: {
"comeInShinecharging": {
"length": 3,
"openEnd": 1
}
}
Requires: "canCarefulJump" |
|
Requires: {
"or": [
{
"enemyKill": {
"enemies": [
[
"Boyon",
"Boyon",
"Boyon",
"Boyon"
]
],
"excludedWeapons": [
"Bombs",
"PseudoScrew"
]
}
},
{
"and": [
"canBePatient",
"h_canUseMorphBombs"
]
},
{
"and": [
{
"enemyDamage": {
"enemy": "Boyon",
"type": "contact",
"hits": 16
}
},
"canPseudoScrew"
]
}
]
}
Clears obstacles: A |
|
Requires: {
"or": [
{
"enemyDamage": {
"enemy": "Boyon",
"type": "contact",
"hits": 2
}
},
{
"and": [
"canCarefulJump",
{
"enemyDamage": {
"enemy": "Boyon",
"type": "contact",
"hits": 1
}
}
]
},
{
"and": [
"canHorizontalDamageBoost",
{
"enemyDamage": {
"enemy": "Boyon",
"type": "contact",
"hits": 1
}
}
]
}
]
}
|
|
From: 1
Right Door
To: 2
Chozo Item
Traverse the room while avoiding or killing the Boyons. If the Chozo item is still there, it is best to exit G-Mode before the final Power Bomb goes off to ensure that PLMs aren't overloaded. If Samus falls into a Samus Eater, she will often be teleported into it when exiting G-Mode. Entrance condition: {
"comeInWithGMode": {
"mode": "any",
"morphed": true
}
}
Requires: "h_canArtificialMorphPowerBomb"
{
"or": [
"h_canArtificialMorphMovement",
{
"and": [
"h_canArtificialMorphBombs",
"canBePatient"
]
}
]
}
Clears obstacles: B |
|
From: 1
Right Door
To: 2
Chozo Item
Traverse the room with a small number of Power Bombs. If the Chozo item is still there, it is best to exit G-Mode before the final Power Bomb goes off to ensure that PLMs aren't overloaded. This strat can be done easily with 7 Power Bombs. Simply kill all of the Boyons before progressing. The final Power Bomb needs to be placed on the second to last floating platform or later to break the wall. Samus can use one Power Bomb and a Boyon hit to get from the door to the second platform, or from the second to fourth platform. Alternatively, when next to the Boyons, place a Power Bomb while the Boyon is low, slightly after the peak of the jump, hitbox through the Boyons. If the Boyons are killed, Samus can horizontally boost far enough to skip a platform. Samus can cross the room with any of the following: 7 PB; 6 PB and a horizontal boost; 5 PB and hitboxing the first Boyons; 5 PB and damage from the first Boyons; 4 PB and damage from the first Boyons and hitboxing the second; 3 PB and hitting both sets of Boyons. Note that if Samus falls into a Samus Eater, she will often be teleported into it when exiting G-Mode. Entrance condition: {
"comeInWithGMode": {
"mode": "any",
"morphed": true
}
}
Requires: "h_canArtificialMorphPowerBomb"
{
"or": [
{
"ammo": {
"type": "PowerBomb",
"count": 6
}
},
{
"and": [
{
"ammo": {
"type": "PowerBomb",
"count": 4
}
},
"h_canArtificialMorphBombHorizontally"
]
},
{
"and": [
{
"ammo": {
"type": "PowerBomb",
"count": 4
}
},
"canTrickyJump",
"canHitbox"
]
},
{
"and": [
{
"ammo": {
"type": "PowerBomb",
"count": 3
}
},
"h_canArtificialMorphBombHorizontally",
{
"enemyDamage": {
"enemy": "Boyon",
"type": "contact",
"hits": 1
}
}
]
},
{
"and": [
{
"ammo": {
"type": "PowerBomb",
"count": 2
}
},
"h_canArtificialMorphBombHorizontally",
{
"enemyDamage": {
"enemy": "Boyon",
"type": "contact",
"hits": 1
}
},
"canTrickyJump",
"canHitbox"
]
},
{
"and": [
{
"ammo": {
"type": "PowerBomb",
"count": 2
}
},
{
"enemyDamage": {
"enemy": "Boyon",
"type": "contact",
"hits": 2
}
}
]
}
]
}
Clears obstacles: A, B |
|
From: 1
Right Door
To: 2
Chozo Item
Traverse the room while rolling on the thorns and avoiding the Samus Eaters. Roll from the first platform onto the thorns under the first set of Boyons. When just past the first Boyons, turn right to damage boost up and hit the block and fall back on the thorns. While still facing right wait for the thorns to hit again; use the boost to get onto the next set of thorns and roll across them into the third Samus Eater before using a Power Bomb. Use the Power Bomb to boost up into the thorns. Hit the thorns again to get next to the Chozo statue. Place another Power Bomb and exit G-Mode before it goes off to break the wall. Note that if Samus is teleported into the Samus Eater when exiting G-Mode, then PLMs weren't properly overloaded before entering it. PLMs can be overloaded by waiting on their petals before entering them. Taking 2 thorn hits while under the first Boyons is important for this reason. Entrance condition: {
"comeInWithGMode": {
"mode": "any",
"morphed": true
}
}
Requires: "canIframeSpikeJump"
"canNeutralDamageBoost"
"canTrickyJump"
{
"thornHits": 5
}
"h_canArtificialMorphPowerBomb"
"h_additionalBomb"
Clears obstacles: B |
|
From: 1
Right Door
To: 2
Chozo Item
Traverse the room while rolling on the thorns and avoiding the Samus Eaters. Roll from the first platform onto the thorns under the first set of Boyons. When just past the first Boyons, turn right and wait on the safe spot for a second to overload PLMs. Move right to touch the thorns and use that to damage boost leftwards onto the next thorns and roll into the third Samus Eater. Place a Power Bomb and then quickly unmorph and jump onto the block above and exit G-Mode before the Power Bomb explodes to break the wall. Note that if Samus is teleported into the Samus Eater when exiting G-Mode, then PLMs weren't properly overloaded before entering it. PLMs can be overloaded by waiting on their petals before entering them. Also note that there are much easier strats with more Energy or more Power Bombs. Entrance condition: {
"comeInWithGMode": {
"mode": "any",
"morphed": true
}
}
Requires: "canIframeSpikeJump"
"canNeutralDamageBoost"
"canInsaneJump"
{
"thornHits": 2
}
"h_canArtificialMorphPowerBomb"
Clears obstacles: B |
|
Entrance condition: {
"comeInWithGrappleTeleport": {
"blockPositions": [
[
5,
3
],
[
7,
2
]
]
}
}
|
|
Requires: {
"or": [
"canTrickyJump",
"Ice",
{
"obstaclesCleared": [
"A"
]
},
{
"and": [
"canCarefulJump",
"h_canUseSpringBall"
]
},
"can4HighMidAirMorph",
{
"and": [
"SpaceJump",
"canCarefulJump"
]
},
{
"and": [
"SpaceJump",
"ScrewAttack"
]
},
{
"and": [
"ScrewAttack",
"canCarefulJump"
]
}
]
}
|
|
Requires: {
"or": [
{
"enemyKill": {
"enemies": [
[
"Boyon",
"Boyon",
"Boyon",
"Boyon"
]
],
"excludedWeapons": [
"Bombs",
"PseudoScrew"
]
}
},
{
"and": [
"canBePatient",
"h_canUseMorphBombs"
]
},
{
"and": [
{
"enemyDamage": {
"enemy": "Boyon",
"type": "contact",
"hits": 16
}
},
"canPseudoScrew"
]
}
]
}
Clears obstacles: A |
|
Requires: {
"or": [
{
"enemyDamage": {
"enemy": "Boyon",
"type": "contact",
"hits": 2
}
},
{
"and": [
"canCarefulJump",
{
"enemyDamage": {
"enemy": "Boyon",
"type": "contact",
"hits": 1
}
}
]
},
{
"and": [
"canHorizontalDamageBoost",
{
"enemyDamage": {
"enemy": "Boyon",
"type": "contact",
"hits": 1
}
}
]
}
]
}
|
|
Requires: "h_canUsePowerBombs" Clears obstacles: B |
|
Place the PB on the block next to the leftmost Boyon, in order to double hit all Boyons and break the PB blocks. Requires: {
"obstaclesNotCleared": [
"A"
]
}
{
"enemyKill": {
"enemies": [
[
"Boyon",
"Boyon",
"Boyon",
"Boyon"
]
],
"explicitWeapons": [
"PowerBomb"
]
}
}
Clears obstacles: A, B |
|
Requires: {
"or": [
{
"obstaclesCleared": [
"B"
]
},
"h_canUsePowerBombs"
]
}
Clears obstacles: B |
{
"$schema": "../../../schema/m3-room.schema.json",
"id": 76,
"name": "Alpha Power Bomb Room",
"area": "Brinstar",
"subarea": "Red",
"playable": true,
"roomAddress": "0x7A3AE",
"roomEnvironments": [
{
"heated": false
}
],
"nodes": [
{
"id": 1,
"name": "Right Door",
"nodeType": "door",
"nodeSubType": "blue",
"nodeAddress": "0x00190ea",
"doorEnvironments": [
{
"physics": "air"
}
]
},
{
"id": 2,
"name": "Chozo Item",
"nodeType": "item",
"nodeSubType": "chozo",
"nodeItem": "PowerBomb",
"nodeAddress": "0x7890E"
},
{
"id": 3,
"name": "Hidden Left Item",
"nodeType": "item",
"nodeSubType": "visible",
"nodeItem": "Missile",
"nodeAddress": "0x78914"
}
],
"enemies": [
{
"id": "e1",
"groupName": "Alpha Power Bomb Room Boyons",
"enemyName": "Boyon",
"quantity": 4,
"homeNodes": [
2
]
}
],
"obstacles": [
{
"id": "A",
"name": "Hopping Boyons",
"obstacleType": "enemies"
},
{
"id": "B",
"name": "Power Bomb Blocks",
"obstacleType": "inanimate"
}
],
"links": [
{
"from": 1,
"to": [
{
"id": 1
},
{
"id": 2
},
{
"id": 3
}
]
},
{
"from": 2,
"to": [
{
"id": 1
},
{
"id": 3
}
]
},
{
"from": 3,
"to": [
{
"id": 2
}
]
}
],
"strats": [
{
"link": [
1,
1
],
"name": "Leave With Runway",
"requires": [],
"exitCondition": {
"leaveWithRunway": {
"length": 4,
"openEnd": 1
}
}
},
{
"link": [
1,
1
],
"name": "Leave Shinecharged (Samus Eater)",
"requires": [
"canSamusEaterStandUp",
{
"samusEaterFrames": 160
},
{
"canShineCharge": {
"usedTiles": 33,
"openEnd": 2
}
}
],
"exitCondition": {
"leaveShinecharged": {
"framesRemaining": 100
}
}
},
{
"link": [
1,
1
],
"name": "Crystal Flash",
"requires": [
"h_canCrystalFlash"
]
},
{
"link": [
1,
2
],
"name": "Avoid Boyon Damage",
"requires": [
{
  "or": [
    "canTrickyJump",
    "Ice",
    {
      "obstaclesCleared": [
        "A"
      ]
    },
    {
      "and": [
        "canCarefulJump",
        "h_canUseSpringBall"
      ]
    },
    "can4HighMidAirMorph",
    {
      "and": [
        "SpaceJump",
        "canCarefulJump"
      ]
    },
    {
      "and": [
        "SpaceJump",
        "ScrewAttack"
      ]
    },
    {
      "and": [
        "ScrewAttack",
        "canCarefulJump"
      ]
    }
  ]
}
]
},
{
"link": [
1,
2
],
"name": "Avoid Boyon Damage (Blue Jump)",
"entranceCondition": {
"comeInShinecharging": {
"length": 3,
"openEnd": 1
}
},
"requires": [
"canCarefulJump"
]
},
{
"link": [
1,
2
],
"name": "Kill Boyons",
"requires": [
{
  "or": [
    {
      "enemyKill": {
        "enemies": [
          [
            "Boyon",
            "Boyon",
            "Boyon",
            "Boyon"
          ]
        ],
        "excludedWeapons": [
          "Bombs",
          "PseudoScrew"
        ]
      }
    },
    {
      "and": [
        "canBePatient",
        "h_canUseMorphBombs"
      ]
    },
    {
      "and": [
        {
          "enemyDamage": {
            "enemy": "Boyon",
            "type": "contact",
            "hits": 16
          }
        },
        "canPseudoScrew"
      ]
    }
  ]
}
],
"clearsObstacles": [
"A"
]
},
{
"link": [
1,
2
],
"name": "Take Damage",
"requires": [
{
  "or": [
    {
      "enemyDamage": {
        "enemy": "Boyon",
        "type": "contact",
        "hits": 2
      }
    },
    {
      "and": [
        "canCarefulJump",
        {
          "enemyDamage": {
            "enemy": "Boyon",
            "type": "contact",
            "hits": 1
          }
        }
      ]
    },
    {
      "and": [
        "canHorizontalDamageBoost",
        {
          "enemyDamage": {
            "enemy": "Boyon",
            "type": "contact",
            "hits": 1
          }
        }
      ]
    }
  ]
}
]
},
{
"link": [
1,
2
],
"name": "G-Mode Morph Power Bomb the Blocks",
"entranceCondition": {
"comeInWithGMode": {
"mode": "any",
"morphed": true
}
},
"requires": [
"h_canArtificialMorphPowerBomb",
{
"or": [
"h_canArtificialMorphMovement",
{
"and": [
"h_canArtificialMorphBombs",
"canBePatient"
]
}
]
}
],
"clearsObstacles": [
"B"
],
"note": [
"Traverse the room while avoiding or killing the Boyons.",
"If the Chozo item is still there, it is best to exit G-Mode before the final Power Bomb goes off to ensure that PLMs aren't overloaded.",
"If Samus falls into a Samus Eater, she will often be teleported into it when exiting G-Mode."
]
},
{
"link": [
1,
2
],
"name": "G-Mode Morph Power Bomb the Blocks (Power Bombs Only)",
"entranceCondition": {
"comeInWithGMode": {
"mode": "any",
"morphed": true
}
},
"requires": [
"h_canArtificialMorphPowerBomb",
{
"or": [
{
"ammo": {
"type": "PowerBomb",
"count": 6
}
},
{
"and": [
{
"ammo": {
"type": "PowerBomb",
"count": 4
}
},
"h_canArtificialMorphBombHorizontally"
]
},
{
"and": [
{
"ammo": {
"type": "PowerBomb",
"count": 4
}
},
"canTrickyJump",
"canHitbox"
]
},
{
"and": [
{
"ammo": {
"type": "PowerBomb",
"count": 3
}
},
"h_canArtificialMorphBombHorizontally",
{
"enemyDamage": {
"enemy": "Boyon",
"type": "contact",
"hits": 1
}
}
]
},
{
"and": [
{
"ammo": {
"type": "PowerBomb",
"count": 2
}
},
"h_canArtificialMorphBombHorizontally",
{
"enemyDamage": {
"enemy": "Boyon",
"type": "contact",
"hits": 1
}
},
"canTrickyJump",
"canHitbox"
]
},
{
"and": [
{
"ammo": {
"type": "PowerBomb",
"count": 2
}
},
{
"enemyDamage": {
"enemy": "Boyon",
"type": "contact",
"hits": 2
}
}
]
}
]
}
],
"clearsObstacles": [
"A",
"B"
],
"note": [
"Traverse the room with a small number of Power Bombs.",
"If the Chozo item is still there, it is best to exit G-Mode before the final Power Bomb goes off to ensure that PLMs aren't overloaded.",
"This strat can be done easily with 7 Power Bombs. Simply kill all of the Boyons before progressing.",
"The final Power Bomb needs to be placed on the second to last floating platform or later to break the wall.",
"Samus can use one Power Bomb and a Boyon hit to get from the door to the second platform, or from the second to fourth platform.",
"Alternatively, when next to the Boyons, place a Power Bomb while the Boyon is low, slightly after the peak of the jump, hitbox through the Boyons.",
"If the Boyons are killed, Samus can horizontally boost far enough to skip a platform.",
"Samus can cross the room with any of the following: 7 PB; 6 PB and a horizontal boost; 5 PB and hitboxing the first Boyons; 5 PB and damage from the first Boyons;",
"4 PB and damage from the first Boyons and hitboxing the second; 3 PB and hitting both sets of Boyons.",
"Note that if Samus falls into a Samus Eater, she will often be teleported into it when exiting G-Mode."
]
},
{
"link": [
1,
2
],
"name": "G-Mode Morph Power Bomb the Blocks (Thorn Damage Boost, Lenient)",
"entranceCondition": {
"comeInWithGMode": {
"mode": "any",
"morphed": true
}
},
"requires": [
"canIframeSpikeJump",
"canNeutralDamageBoost",
"canTrickyJump",
{
"thornHits": 5
},
"h_canArtificialMorphPowerBomb",
"h_additionalBomb"
],
"clearsObstacles": [
"B"
],
"note": [
"Traverse the room while rolling on the thorns and avoiding the Samus Eaters.",
"Roll from the first platform onto the thorns under the first set of Boyons.",
"When just past the first Boyons, turn right to damage boost up and hit the block and fall back on the thorns.",
"While still facing right wait for the thorns to hit again;",
"use the boost to get onto the next set of thorns and roll across them into the third Samus Eater before using a Power Bomb.",
"Use the Power Bomb to boost up into the thorns. Hit the thorns again to get next to the Chozo statue.",
"Place another Power Bomb and exit G-Mode before it goes off to break the wall.",
"Note that if Samus is teleported into the Samus Eater when exiting G-Mode, then PLMs weren't properly overloaded before entering it.",
"PLMs can be overloaded by waiting on their petals before entering them. Taking 2 thorn hits while under the first Boyons is important for this reason."
]
},
{
"link": [
1,
2
],
"name": "G-Mode Morph Power Bomb the Blocks (Thorn Damage Boost)",
"entranceCondition": {
"comeInWithGMode": {
"mode": "any",
"morphed": true
}
},
"requires": [
"canIframeSpikeJump",
"canNeutralDamageBoost",
"canInsaneJump",
{
"thornHits": 2
},
"h_canArtificialMorphPowerBomb"
],
"clearsObstacles": [
"B"
],
"note": [
"Traverse the room while rolling on the thorns and avoiding the Samus Eaters.",
"Roll from the first platform onto the thorns under the first set of Boyons.",
"When just past the first Boyons, turn right and wait on the safe spot for a second to overload PLMs.",
"Move right to touch the thorns and use that to damage boost leftwards onto the next thorns and roll into the third Samus Eater.",
"Place a Power Bomb and then quickly unmorph and jump onto the block above and exit G-Mode before the Power Bomb explodes to break the wall.",
"Note that if Samus is teleported into the Samus Eater when exiting G-Mode, then PLMs weren't properly overloaded before entering it.",
"PLMs can be overloaded by waiting on their petals before entering them.",
"Also note that there are much easier strats with more Energy or more Power Bombs."
]
},
{
"link": [
1,
3
],
"name": "Grapple Teleport",
"entranceCondition": {
"comeInWithGrappleTeleport": {
"blockPositions": [
[
5,
3
],
[
7,
2
]
]
}
},
"requires": []
},
{
"link": [
2,
1
],
"name": "Damageless",
"requires": [
{
  "or": [
    "canTrickyJump",
    "Ice",
    {
      "obstaclesCleared": [
        "A"
      ]
    },
    {
      "and": [
        "canCarefulJump",
        "h_canUseSpringBall"
      ]
    },
    "can4HighMidAirMorph",
    {
      "and": [
        "SpaceJump",
        "canCarefulJump"
      ]
    },
    {
      "and": [
        "SpaceJump",
        "ScrewAttack"
      ]
    },
    {
      "and": [
        "ScrewAttack",
        "canCarefulJump"
      ]
    }
  ]
}
]
},
{
"link": [
2,
1
],
"name": "Kill Boyons",
"requires": [
{
  "or": [
    {
      "enemyKill": {
        "enemies": [
          [
            "Boyon",
            "Boyon",
            "Boyon",
            "Boyon"
          ]
        ],
        "excludedWeapons": [
          "Bombs",
          "PseudoScrew"
        ]
      }
    },
    {
      "and": [
        "canBePatient",
        "h_canUseMorphBombs"
      ]
    },
    {
      "and": [
        {
          "enemyDamage": {
            "enemy": "Boyon",
            "type": "contact",
            "hits": 16
          }
        },
        "canPseudoScrew"
      ]
    }
  ]
}
],
"clearsObstacles": [
"A"
]
},
{
"link": [
2,
1
],
"name": "Take Damage",
"requires": [
{
  "or": [
    {
      "enemyDamage": {
        "enemy": "Boyon",
        "type": "contact",
        "hits": 2
      }
    },
    {
      "and": [
        "canCarefulJump",
        {
          "enemyDamage": {
            "enemy": "Boyon",
            "type": "contact",
            "hits": 1
          }
        }
      ]
    },
    {
      "and": [
        "canHorizontalDamageBoost",
        {
          "enemyDamage": {
            "enemy": "Boyon",
            "type": "contact",
            "hits": 1
          }
        }
      ]
    }
  ]
}
]
},
{
"link": [
2,
3
],
"name": "Base",
"requires": [
"h_canUsePowerBombs"
],
"clearsObstacles": [
"B"
]
},
{
"link": [
2,
3
],
"name": "Kill Boyons and PB Blocks",
"requires": [
{
"obstaclesNotCleared": [
"A"
]
},
{
"enemyKill": {
"enemies": [
[
"Boyon",
"Boyon",
"Boyon",
"Boyon"
]
],
"explicitWeapons": [
"PowerBomb"
]
}
}
],
"clearsObstacles": [
"A",
"B"
],
"note": "Place the PB on the block next to the leftmost Boyon, in order to double hit all Boyons and break the PB blocks."
},
{
"link": [
3,
2
],
"name": "Base",
"requires": [
{
  "or": [
    {
      "obstaclesCleared": [
        "B"
      ]
    },
    "h_canUsePowerBombs"
  ]
}
],
"clearsObstacles": [
"B"
]
}
]
}