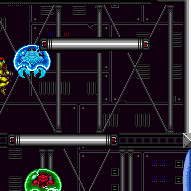
Metroid Room 2
Room ID: 227
|
Exit condition: {
"leaveWithRunway": {
"length": 3,
"openEnd": 1
}
} |
From: 1
Top Right Door
To: 1
Top Right Door


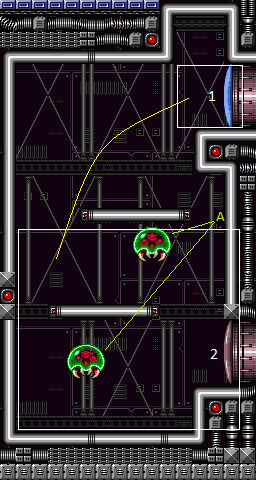
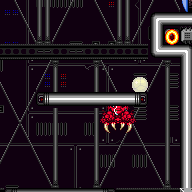
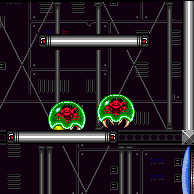
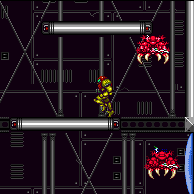
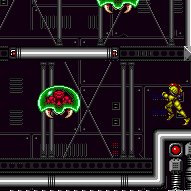
Kill or lure and freeze the Metroids at the bottom of the room. It may be easiest to stand on a frozen Rinka from the top left spawner to position a freeze of the other Rinka. Maintain a half-tile gap between the Rinka and the runway in order to extend it as far as possible. Requires: "h_trickyFrozenEnemyRunway" Exit condition: {
"leaveWithRunway": {
"length": 5,
"openEnd": 0
}
} |
|
Requires: {
"or": [
"canMetroidAvoid",
"Ice",
{
"or": [
"f_KilledMetroidRoom2",
{
"obstaclesCleared": [
"f_KilledMetroidRoom2"
]
}
]
}
]
}Exit condition: {
"leaveSpinning": {
"remoteRunway": {
"length": 4,
"openEnd": 1
}
}
} |
|
Requires: {
"or": [
"canMetroidAvoid",
"Ice",
{
"or": [
"f_KilledMetroidRoom2",
{
"obstaclesCleared": [
"f_KilledMetroidRoom2"
]
}
]
}
]
}Exit condition: {
"leaveWithMockball": {
"remoteRunway": {
"length": 4,
"openEnd": 1
},
"landingRunway": {
"length": 1,
"openEnd": 1
}
}
} |
From: 1
Top Right Door
To: 1
Top Right Door
Requires: {
"or": [
"canMetroidAvoid",
"Ice",
{
"or": [
"f_KilledMetroidRoom2",
{
"obstaclesCleared": [
"f_KilledMetroidRoom2"
]
}
]
}
]
}Exit condition: {
"leaveWithSpringBallBounce": {
"remoteRunway": {
"length": 4,
"openEnd": 0
},
"landingRunway": {
"length": 1,
"openEnd": 1
},
"movementType": "uncontrolled"
}
} |
From: 1
Top Right Door
To: 1
Top Right Door
Exit condition: {
"leaveWithGModeSetup": {}
} |
|
Requires: {
"enemyDamage": {
"enemy": "Rinka",
"type": "contact",
"hits": 1
}
} |
From: 1
Top Right Door
To: 1
Top Right Door
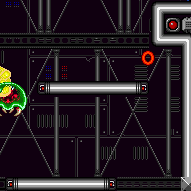
This is easiest by staying on the top floating platform with the two Metroids stuck below it. Note that it is necessary to exit G-Mode before exiting the room in order for the Metroids to remain killed. Entrance condition: {
"comeInWithGMode": {
"mode": "any",
"morphed": true
}
}Requires: "canMetroidAvoid" "h_artificialMorphPowerBomb" "h_artificialMorphPowerBomb" "h_artificialMorphPowerBomb" Clears obstacles: f_KilledMetroidRoom2 Sets flags: f_KilledMetroidRoom2 |
|

On entry, kill or dodge the first Rinkas then Crystal Flash directly above or below a Rinka Spawner. Entrance condition: {
"comeInWithRMode": {}
}Requires: "canRModeCrystalFlashInterrupt"
{
"ammo": {
"type": "Missile",
"count": 10
}
}
{
"ammo": {
"type": "Super",
"count": 10
}
}Dev note: Note that this and the top of Metroid Room 4 are the only of the Metroid rooms that currently allows the Metroids to be alive, as they can get stuck on the ledge. This is not possible in G-mode, because the Power Bomb will kill the Rinka and prevent more from spawning. |
From: 1
Top Right Door
To: 1
Top Right Door
On entry, kill or dodge the first Rinkas then Crystal Flash. While in the light orb, Samus will be almost immune and the Metroids will take damage. Entrance condition: {
"comeInWithRMode": {}
}Requires: "canComplexGMode" "h_CrystalFlash" Clears obstacles: f_KilledMetroidRoom2 Sets flags: f_KilledMetroidRoom2 |
|
Requires: {
"or": [
"f_KilledMetroidRoom2",
{
"obstaclesCleared": [
"f_KilledMetroidRoom2"
]
}
]
} |
|
Requires: "Ice"
{
"enemyKill": {
"enemies": [
[
"Metroid",
"Metroid"
]
],
"explicitWeapons": [
"Super",
"Missile"
]
}
}Clears obstacles: f_KilledMetroidRoom2 Sets flags: f_KilledMetroidRoom2 |
|
Requires: {
"enemyKill": {
"enemies": [
[
"Metroid",
"Metroid"
]
],
"explicitWeapons": [
"PowerBomb"
]
}
}
{
"metroidFrames": 96
}Clears obstacles: f_KilledMetroidRoom2 Sets flags: f_KilledMetroidRoom2 |
|
An easy way is once Samus is on the top platform, jump and aim down to lower the camera, then place 3 PBs. Requires: {
"enemyKill": {
"enemies": [
[
"Metroid",
"Metroid"
]
],
"explicitWeapons": [
"PowerBomb"
]
}
}
{
"or": [
"canMetroidAvoid",
"canCameraManip"
]
}Clears obstacles: f_KilledMetroidRoom2 Sets flags: f_KilledMetroidRoom2 |
|

Requires: "Ice" |
|

Use ScrewAttack or a PseudoScrew to prevent Metroids from attaching to Samus. Requires: "canDodgeWhileShooting"
{
"or": [
"ScrewAttack",
"canPseudoScrew"
]
} |
|
Requires: "canMetroidAvoid" |
|
Requires: {
"metroidFrames": 80
}Exit condition: {
"leaveNormally": {}
}Unlocks doors: {"types":["missiles"],"requires":[{"enemyDamage":{"enemy":"Rinka","type":"contact","hits":1}}]}
{"types":["super"],"requires":[{"metroidFrames":15}]}
{"types":["powerbomb"],"requires":[]} |
From: 1
Top Right Door
To: 2
Bottom Right Door
Entrance condition: {
"comeInShinecharging": {
"length": 2,
"openEnd": 1
}
}Requires: "canShinechargeMovementTricky"
{
"or": [
"canMoonfall",
"Morph"
]
}
{
"or": [
{
"or": [
"f_KilledMetroidRoom2",
{
"obstaclesCleared": [
"f_KilledMetroidRoom2"
]
}
]
},
{
"metroidFrames": 25
}
]
}
{
"shineChargeFrames": 130
}Exit condition: {
"leaveShinecharged": {}
}Unlocks doors: {"types":["powerbomb"],"requires":[]}
{"types":["missiles","super"],"requires":["never"]}Dev note: FIXME: refine this and add a canTwoTileSqueeze option. |
From: 1
Top Right Door
To: 2
Bottom Right Door
Entrance condition: {
"comeInShinecharging": {
"length": 2,
"openEnd": 1
}
}Requires: "canShinechargeMovementTricky"
{
"shinespark": {
"frames": 7,
"excessFrames": 0
}
}
{
"or": [
{
"or": [
"f_KilledMetroidRoom2",
{
"obstaclesCleared": [
"f_KilledMetroidRoom2"
]
}
]
},
"canMetroidAvoid"
]
}Exit condition: {
"leaveWithSpark": {}
}Unlocks doors: {"types":["super"],"requires":[]}
{"types":["missiles","powerbomb"],"requires":["never"]} |
|
If Metroids are alive, minimizing damage from them requires tricky movement to manipulate them: the moonfalling option must be done starting from almost a tile to the left of the opening; likewise, the morphing option should soft-morph about a tile to the left of the opening. Entrance condition: {
"comeInShinecharged": {}
}Requires: {
"shineChargeFrames": 140
}
"canShinechargeMovementTricky"
{
"or": [
"canMoonfall",
"Morph",
"canTwoTileSqueeze"
]
}
{
"or": [
{
"or": [
"f_KilledMetroidRoom2",
{
"obstaclesCleared": [
"f_KilledMetroidRoom2"
]
}
]
},
{
"metroidFrames": 100
},
{
"and": [
"canInsaneJump",
"canTrickyDodgeEnemies",
{
"metroidFrames": 10
}
]
}
]
}Exit condition: {
"leaveShinecharged": {}
}Unlocks doors: {"types":["powerbomb"],"requires":[]}
{"types":["missiles","super"],"requires":["never"]}Dev note: FIXME: Unmorphing and downbacking through the gap can leave with more frames remaining but is more difficult. |
From: 1
Top Right Door
To: 2
Bottom Right Door
Entrance condition: {
"comeInShinecharged": {}
}Requires: {
"shineChargeFrames": 102
}
"canShinechargeMovementTricky"
{
"shinespark": {
"frames": 22,
"excessFrames": 0
}
}
{
"or": [
{
"or": [
"f_KilledMetroidRoom2",
{
"obstaclesCleared": [
"f_KilledMetroidRoom2"
]
}
]
},
"canMetroidAvoid"
]
}Exit condition: {
"leaveWithSpark": {}
}Unlocks doors: {"types":["super"],"requires":[]}
{"types":["missiles","powerbomb"],"requires":["never"]} |
From: 1
Top Right Door
To: 2
Bottom Right Door
Use X-ray immediately after shinecharging, in order to be able to dodge the Rinkas. Entrance condition: {
"comeInShinecharging": {
"length": 2,
"openEnd": 0
}
}Requires: {
"or": [
"f_KilledMetroidRoom2",
{
"obstaclesCleared": [
"f_KilledMetroidRoom2"
]
}
]
}
"canXRayTurnaround"
"canLongChainTemporaryBlue"Exit condition: {
"leaveWithTemporaryBlue": {}
}Unlocks doors: {"types":["ammo"],"requires":[]}Dev note: Doing this with Metroids alive is technically possible but seems really bad. |
|
Requires: {
"or": [
"f_KilledMetroidRoom2",
{
"obstaclesCleared": [
"f_KilledMetroidRoom2"
]
}
]
} |
|
Requires: "Ice"
{
"enemyKill": {
"enemies": [
[
"Metroid",
"Metroid"
]
],
"explicitWeapons": [
"Super",
"Missile"
]
}
}Clears obstacles: f_KilledMetroidRoom2 Sets flags: f_KilledMetroidRoom2 |
|
Requires: {
"enemyKill": {
"enemies": [
[
"Metroid",
"Metroid"
]
],
"explicitWeapons": [
"PowerBomb"
]
}
}
{
"metroidFrames": 400
}Clears obstacles: f_KilledMetroidRoom2 Sets flags: f_KilledMetroidRoom2 |
From: 2
Bottom Right Door
To: 1
Top Right Door

Kill the two Metroids with Power Bombs while avoiding damage. Requires: {
"notable": "Power Bomb Dodge Kill (Bottom to Top)"
}
{
"enemyKill": {
"enemies": [
[
"Metroid",
"Metroid"
]
],
"explicitWeapons": [
"PowerBomb"
]
}
}
"canMetroidAvoid"Clears obstacles: f_KilledMetroidRoom2 Sets flags: f_KilledMetroidRoom2 |
|
Shoot the Metroids on entry, shooting one horizontally and the other diagonally. Requires: "Ice" "canDodgeWhileShooting" |
|

Use ScrewAttack or a PseudoScrew to prevent Metroids from attaching to Samus. Requires: {
"or": [
{
"and": [
"ScrewAttack",
"canDodgeWhileShooting"
]
},
{
"and": [
"canPseudoScrew",
"canPrepareForNextRoom",
"canDodgeWhileShooting"
]
}
]
} |
|
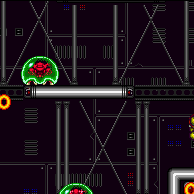
Buffer a spinjump towards the door to jump over the top metroid and land on the middle platform. Metroids can be knocked with Beam shots to clear a path. Requires: {
"notable": "Bottom Door Metroid Avoid"
}
"canMetroidAvoid" |
|
The Metroids bounce off of Samus as long as she keeps moving. Requires: {
"haveBlueSuit": {}
} |
|
Requires: {
"metroidFrames": 180
}Exit condition: {
"leaveNormally": {}
}Unlocks doors: {
"types": [
"missiles"
],
"requires": [
{
"enemyDamage": {
"enemy": "Rinka",
"type": "contact",
"hits": 1
}
},
{
"ammo": {
"type": "Missile",
"count": 2
}
}
]
}
{"types":["super"],"requires":[{"or":[{"ammo":{"type":"Super","count":1}},"canDodgeWhileShooting"]}]}
{"types":["powerbomb"],"requires":[{"metroidFrames":25}]} |
From: 2
Bottom Right Door
To: 1
Top Right Door
Enter immobile with G-mode direct, with the Metroids having been killed previously. Take a Rinka hit to regain mobility. Back up to between 1 and 6 pixels from the door transition, and activate X-ray to get very deep stuck in the door. Climb up 1 screen, moving quickly to minimize Rinka damage. Perform a turnaround buffered spin-jump away from the door to trigger the transition, bypassing any lock on the door. Entrance condition: {
"comeInWithGMode": {
"mode": "direct",
"morphed": false,
"mobility": "immobile"
}
}Requires: "canComplexGMode"
"canGModeXRayClimb"
{
"or": [
"f_KilledMetroidRoom2",
{
"obstaclesCleared": [
"f_KilledMetroidRoom2"
]
}
]
}
{
"enemyDamage": {
"enemy": "Rinka",
"type": "contact",
"hits": 1
}
}
"canXRayClimb"Bypasses door shell: true Dev note: The 'immobile' requirement in the entranceCondition is not necessary but is included for clarity. Without coming in immobile, it would not be possible to have enough energy to survive the Rinka hit. The enemyDamage in this strat is for a second Rinka hit while climbing. The first Rinka hit is included in the gModeImmobile requirement. |
From: 2
Bottom Right Door
To: 1
Top Right Door
Enter with G-mode direct, and quickly freeze the Metroids (if still alive) and Rinkas. Back up to between 1 and 6 pixels from the door transition, and activate X-ray to get very deep stuck in the door. Climb up 1 screen, moving quickly to avoid Rinka damage. Perform a turnaround buffered spin-jump away from the door to trigger the transition, bypassing any lock on the door. Entrance condition: {
"comeInWithGMode": {
"mode": "direct",
"morphed": false
}
}Requires: "canComplexGMode" "Ice" "canGModeXRayClimb" Bypasses door shell: true |
From: 2
Bottom Right Door
To: 1
Top Right Door

Enter with G-mode direct, using artificial morph to avoid the Metroids if they are still alive. Go to the top of the room and Crystal Flash, with the Metroids stuck below (if alive). The Crystal Flash will leave behind a light orb, which can be used to kill the Metroids. Use the Rinkas to damage down. For the final hit that will trigger auto-reserves, stand in the open doorway between 1 and 6 pixels from the transition. The auto reserve trigger will cancel G-mode and close the door on top of Samus. Climb up 1 screen, moving quickly to minimize Rinka damage. Perform a turnaround buffered spin-jump away from the door to trigger the transition, bypassing any lock on the door. Entrance condition: {
"comeInWithGMode": {
"mode": "direct",
"morphed": false
}
}Requires: "canComplexGMode"
"h_CrystalFlash"
{
"autoReserveTrigger": {}
}
"canGModeXRayClimb"
{
"enemyDamage": {
"enemy": "Rinka",
"type": "contact",
"hits": 1
}
}Bypasses door shell: true |
From: 2
Bottom Right Door
To: 1
Top Right Door
Not pressing dash will make the platforming easier, unless HiJump is also equipped. Entrance condition: {
"comeInShinecharging": {
"length": 2,
"openEnd": 0
}
}Requires: "canShinechargeMovementComplex"
{
"shinespark": {
"frames": 7,
"excessFrames": 0
}
}
{
"or": [
"f_KilledMetroidRoom2",
{
"obstaclesCleared": [
"f_KilledMetroidRoom2"
]
}
]
}Exit condition: {
"leaveWithSpark": {}
}Unlocks doors: {"types":["super"],"requires":[]}
{"types":["missiles","powerbomb"],"requires":["never"]}Dev note: FIXME: Add variations for tanking the Metroid damage (taking into account how they can block the shot to open the door) |
From: 2
Bottom Right Door
To: 1
Top Right Door
Spinjump into the opening below the top door. Entrance condition: {
"comeInShinecharging": {
"length": 2,
"openEnd": 0
}
}Requires: "canShinechargeMovementComplex"
"HiJump"
"canCarefulJump"
{
"or": [
{
"or": [
"f_KilledMetroidRoom2",
{
"obstaclesCleared": [
"f_KilledMetroidRoom2"
]
}
]
},
{
"and": [
"canMetroidAvoid",
"canShinechargeMovementTricky"
]
}
]
}
{
"shineChargeFrames": 130
}Exit condition: {
"leaveShinecharged": {}
}Unlocks doors: {"types":["super"],"requires":[]}
{"types":["missiles","powerbomb"],"requires":["never"]}Dev note: FIXME: Add variations for tanking the Metroid damage (taking into account how they can block the shot to open the door) |
From: 2
Bottom Right Door
To: 1
Top Right Door
Wall jump up the right wall and either mid-air morph to fit through the gap below the top door. Alternatively use a mid-air wiggle to reduce the height of Samus' hitbox after the walljump, to be able to fit through the gap without morphing. Entrance condition: {
"comeInShinecharging": {
"length": 2,
"openEnd": 0
}
}Requires: "canShinechargeMovementComplex"
"canWallJumpInstantMorph"
{
"or": [
"f_KilledMetroidRoom2",
{
"obstaclesCleared": [
"f_KilledMetroidRoom2"
]
}
]
}
{
"shineChargeFrames": 150
}Exit condition: {
"leaveShinecharged": {}
}Unlocks doors: {"types":["super"],"requires":[]}
{"types":["missiles","powerbomb"],"requires":["never"]}Dev note: FIXME: Add variations for tanking the Metroid damage (taking into account how they can block the shot to open the door) |
From: 2
Bottom Right Door
To: 1
Top Right Door
Use a mid-air wiggle to reduce the height of Samus' hitbox after the walljump, to be able to fit through the gap without morphing. Entrance condition: {
"comeInShinecharging": {
"length": 2,
"openEnd": 0
}
}Requires: "canWallJump"
"canMidairWiggle"
"canShinechargeMovementTricky"
{
"or": [
"f_KilledMetroidRoom2",
{
"obstaclesCleared": [
"f_KilledMetroidRoom2"
]
}
]
}
{
"shineChargeFrames": 130
}Exit condition: {
"leaveShinecharged": {}
}Unlocks doors: {"types":["super"],"requires":[]}
{"types":["missiles","powerbomb"],"requires":["never"]}Dev note: FIXME: Add variations for tanking the Metroid damage (taking into account how they can block the shot to open the door) |
From: 2
Bottom Right Door
To: 1
Top Right Door
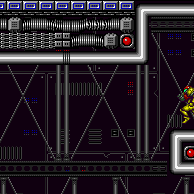
Go up the left side of the room to make it out the top door with a few shinecharge frames remaining. Avoid getting more than 2.75 tiles of run speed on the lower platform (or Speed Booster will shorten Samus' jump): either release run early, or do a big initial jump to land in the middle of the lower platform before starting to run. Entrance condition: {
"comeInShinecharging": {
"length": 0,
"openEnd": 1
}
}Requires: {
"shineChargeFrames": 170
}
"canTrickyDashJump"
"canShinechargeMovementTricky"
{
"or": [
{
"or": [
"f_KilledMetroidRoom2",
{
"obstaclesCleared": [
"f_KilledMetroidRoom2"
]
}
]
},
"ScrewAttack",
{
"metroidFrames": 160
}
]
}Exit condition: {
"leaveShinecharged": {}
}Unlocks doors: {
"types": [
"super"
],
"requires": [
{
"or": [
{
"or": [
"f_KilledMetroidRoom2",
{
"obstaclesCleared": [
"f_KilledMetroidRoom2"
]
}
]
},
"ScrewAttack"
]
}
]
}
{"types":["missiles","powerbomb"],"requires":["never"]} |
From: 2
Bottom Right Door
To: 1
Top Right Door
Spinjump into the opening below the top door. Entrance condition: {
"comeInShinecharged": {}
}Requires: {
"shineChargeFrames": 105
}
"HiJump"
"canCarefulJump"
"canShinechargeMovementComplex"
{
"or": [
{
"or": [
"f_KilledMetroidRoom2",
{
"obstaclesCleared": [
"f_KilledMetroidRoom2"
]
}
]
},
"canMetroidAvoid"
]
}Exit condition: {
"leaveShinecharged": {}
}Unlocks doors: {"types":["super"],"requires":[]}
{"types":["missiles","powerbomb"],"requires":["never"]} |
|
Wall jump up the right wall and either mid-air morph to fit through the gap below the top door. Alternatively use a mid-air wiggle to reduce the height of Samus' hitbox after the walljump, to be able to fit through the gap without morphing. Entrance condition: {
"comeInShinecharged": {}
}Requires: {
"shineChargeFrames": 140
}
"canWallJumpInstantMorph"
"canShinechargeMovementComplex"
{
"or": [
{
"or": [
"f_KilledMetroidRoom2",
{
"obstaclesCleared": [
"f_KilledMetroidRoom2"
]
}
]
},
"canMetroidAvoid"
]
}Exit condition: {
"leaveShinecharged": {}
}Unlocks doors: {"types":["super"],"requires":[]}
{"types":["missiles","powerbomb"],"requires":["never"]} |
|
Wall jump up the right wall and use a mid-air wiggle to reduce the height of Samus' hitbox after the walljump, to be able to fit through the gap without morphing. Entrance condition: {
"comeInShinecharged": {}
}Requires: {
"shineChargeFrames": 120
}
"canWallJump"
"canMidairWiggle"
"canShinechargeMovementTricky"
{
"or": [
{
"or": [
"f_KilledMetroidRoom2",
{
"obstaclesCleared": [
"f_KilledMetroidRoom2"
]
}
]
},
"canMetroidAvoid"
]
}Exit condition: {
"leaveShinecharged": {}
}Unlocks doors: {"types":["super"],"requires":[]}
{"types":["missiles","powerbomb"],"requires":["never"]} |
From: 2
Bottom Right Door
To: 1
Top Right Door
Spin jump into the opening below the top door. Entrance condition: {
"comeInShinecharged": {}
}Requires: {
"shineChargeFrames": 80
}
"HiJump"
"canShinechargeMovementComplex"
"canSpeedyJump"
{
"shinespark": {
"frames": 6,
"excessFrames": 0
}
}
{
"or": [
{
"or": [
"f_KilledMetroidRoom2",
{
"obstaclesCleared": [
"f_KilledMetroidRoom2"
]
}
]
},
"canMetroidAvoid"
]
}Exit condition: {
"leaveWithSpark": {}
}Unlocks doors: {"types":["super"],"requires":[]}
{"types":["missiles","powerbomb"],"requires":["never"]} |
From: 2
Bottom Right Door
To: 1
Top Right Door
Wall jump up the right wall and either mid-air morph to fit through the gap below the top door. Alternatively use a mid-air wiggle to reduce the height of Samus' hitbox after the wall jump, to be able to fit through the gap without morphing. Shoot the door open and spark out. Entrance condition: {
"comeInShinecharged": {}
}Requires: {
"shineChargeFrames": 110
}
"canWallJumpInstantMorph"
"canShinechargeMovementComplex"
{
"shinespark": {
"frames": 5,
"excessFrames": 0
}
}
{
"or": [
{
"or": [
"f_KilledMetroidRoom2",
{
"obstaclesCleared": [
"f_KilledMetroidRoom2"
]
}
]
},
"canMetroidAvoid"
]
}Exit condition: {
"leaveWithSpark": {}
}Unlocks doors: {"types":["super"],"requires":[]}
{"types":["missiles","powerbomb"],"requires":["never"]} |
From: 2
Bottom Right Door
To: 1
Top Right Door
Wall jump up the right wall and use a mid-air wiggle to reduce the height of Samus' hitbox after the wall jump, to be able to fit through the gap without morphing. Shoot the door open and spark out. Entrance condition: {
"comeInShinecharged": {}
}Requires: {
"shineChargeFrames": 105
}
"canWallJump"
"canMidairWiggle"
"canShinechargeMovementTricky"
{
"shinespark": {
"frames": 5,
"excessFrames": 0
}
}
{
"or": [
{
"or": [
"f_KilledMetroidRoom2",
{
"obstaclesCleared": [
"f_KilledMetroidRoom2"
]
}
]
},
"canMetroidAvoid"
]
}Exit condition: {
"leaveWithSpark": {}
}Unlocks doors: {"types":["super"],"requires":[]}
{"types":["missiles","powerbomb"],"requires":["never"]} |
From: 2
Bottom Right Door
To: 1
Top Right Door
Go up the left side of the room and spark out the top door. If tanking Metroid damage, then the Metroid can block the shot to open the door; to avoid this, either jump toward the door with dash speed or use Plasma, Wave, or a Missile. Do a big initial jump to land in the middle of the lower platform, and jump before running more than 2.75 tiles, to avoid a Speed Booster dropoff in jump height. Entrance condition: {
"comeInShinecharged": {}
}Requires: {
"shineChargeFrames": 130
}
"canTrickyDashJump"
"canShinechargeMovementTricky"
{
"or": [
{
"and": [
{
"or": [
{
"or": [
"f_KilledMetroidRoom2",
{
"obstaclesCleared": [
"f_KilledMetroidRoom2"
]
}
]
},
"ScrewAttack",
{
"and": [
{
"metroidFrames": 145
},
{
"or": [
"Plasma",
"Wave",
{
"ammo": {
"type": "Missile",
"count": 1
}
}
]
}
]
}
]
},
{
"shinespark": {
"frames": 13,
"excessFrames": 0
}
}
]
},
{
"and": [
{
"metroidFrames": 150
},
{
"shineChargeFrames": 10
},
{
"shinespark": {
"frames": 7,
"excessFrames": 0
}
}
]
}
]
}Exit condition: {
"leaveWithSpark": {}
}Unlocks doors: {
"types": [
"super"
],
"requires": [
{
"or": [
{
"or": [
"f_KilledMetroidRoom2",
{
"obstaclesCleared": [
"f_KilledMetroidRoom2"
]
}
]
},
"ScrewAttack"
]
}
]
}
{"types":["missiles","powerbomb"],"requires":["never"]} |
From: 2
Bottom Right Door
To: 1
Top Right Door
Use X-Ray immediately after shinecharging, in order to be able to dodge the Rinkas. Entrance condition: {
"comeInShinecharging": {
"length": 2,
"openEnd": 0
}
}Requires: {
"or": [
"f_KilledMetroidRoom2",
{
"obstaclesCleared": [
"f_KilledMetroidRoom2"
]
}
]
}
"canXRayTurnaround"
"canLongChainTemporaryBlue"Exit condition: {
"leaveWithTemporaryBlue": {}
}Unlocks doors: {"types":["ammo"],"requires":[]} |
|
Requires: {
"or": [
{
"or": [
"f_KilledMetroidRoom2",
{
"obstaclesCleared": [
"f_KilledMetroidRoom2"
]
}
]
},
"Ice",
{
"and": [
{
"enemyDamage": {
"enemy": "Rinka",
"type": "contact",
"hits": 1
}
},
{
"metroidFrames": 22
}
]
}
]
}Exit condition: {
"leaveWithRunway": {
"length": 3,
"openEnd": 1
}
}Dev note: FIXME: Is it worth adding a method with avoiding the Metroids? |
From: 2
Bottom Right Door
To: 2
Bottom Right Door


Kill or lure and freeze the Metroids at the top of the room. It may be easiest to stand on a frozen Rinka from the left spawner to position a freeze of the other Rinka. It is possible maintain a half-tile gap between the Rinka and the runway in order to extend it as far as possible. Requires: "h_trickyFrozenEnemyRunway" Exit condition: {
"leaveWithRunway": {
"length": 5,
"openEnd": 0
}
} |
|
Requires: "h_speedJump"
{
"or": [
"canMetroidAvoid",
{
"or": [
"f_KilledMetroidRoom2",
{
"obstaclesCleared": [
"f_KilledMetroidRoom2"
]
}
]
}
]
}
"canInsaneJump"
"canMomentumConservingMorph"Exit condition: {
"leaveWithSidePlatform": {
"height": 3,
"runway": {
"length": 11,
"openEnd": 0
},
"obstruction": [
3,
0
]
}
}Dev note: Max extra run speed $2.6 This strat is included for completeness, though it apparently doesn't have any applications. |
|
Requires: {
"or": [
"canMetroidAvoid",
"Ice",
{
"or": [
"f_KilledMetroidRoom2",
{
"obstaclesCleared": [
"f_KilledMetroidRoom2"
]
}
]
}
]
}Exit condition: {
"leaveSpinning": {
"remoteRunway": {
"length": 8,
"openEnd": 1
}
}
} |
|
Requires: {
"or": [
"canMetroidAvoid",
"Ice",
{
"or": [
"f_KilledMetroidRoom2",
{
"obstaclesCleared": [
"f_KilledMetroidRoom2"
]
}
]
}
]
}Exit condition: {
"leaveWithMockball": {
"remoteRunway": {
"length": 8,
"openEnd": 1
},
"landingRunway": {
"length": 2,
"openEnd": 1
}
}
}Dev note: There is 1 unusable landing tile here; at low speeds (earlier jump) it could be used but wouldn't serve a purpose. |
From: 2
Bottom Right Door
To: 2
Bottom Right Door
Requires: {
"or": [
"canMetroidAvoid",
"Ice",
{
"or": [
"f_KilledMetroidRoom2",
{
"obstaclesCleared": [
"f_KilledMetroidRoom2"
]
}
]
}
]
}Exit condition: {
"leaveWithSpringBallBounce": {
"remoteRunway": {
"length": 8,
"openEnd": 1
},
"landingRunway": {
"length": 1,
"openEnd": 1
},
"movementType": "uncontrolled"
}
} |
|
Requires: {
"or": [
"canMetroidAvoid",
"Ice",
{
"or": [
"f_KilledMetroidRoom2",
{
"obstaclesCleared": [
"f_KilledMetroidRoom2"
]
}
]
}
]
}Exit condition: {
"leaveSpaceJumping": {
"remoteRunway": {
"length": 5,
"openEnd": 1
}
}
} |
|
To avoid heavy Rinka damage, you must perform the Crystal Flash on a specific tile: on the third floor tile from the left wall. Lay the Power Bomb immediately after destroying both Rinkas. Requires: {
"or": [
"f_KilledMetroidRoom2",
{
"obstaclesCleared": [
"f_KilledMetroidRoom2"
]
}
]
}
"h_CrystalFlash"
{
"enemyDamage": {
"enemy": "Rinka",
"type": "contact",
"hits": 1
}
} |
From: 2
Bottom Right Door
To: 2
Bottom Right Door
If the Metroids are alive, lure them off screen. Requires: {
"or": [
"canMetroidAvoid",
"canUseFrozenEnemies",
"ScrewAttack",
{
"or": [
"f_KilledMetroidRoom2",
{
"obstaclesCleared": [
"f_KilledMetroidRoom2"
]
}
]
}
]
}Exit condition: {
"leaveWithGModeSetup": {}
}Dev note: There could be another strat for a Metroid or Rinka, that doesn't have canMetroidAvoid or canRiskPermanentLossOfAccess, but canMetroidAvoid isn't too difficult for this level. |
From: 2
Bottom Right Door
To: 2
Bottom Right Door
Requires: {
"not": "f_KilledMetroidRoom2"
}
"canRiskPermanentLossOfAccess"Exit condition: {
"leaveWithGModeSetup": {
"knockback": false
}
} |
|

If alive, the Metroids do 90 damage before the Rinka hits. Requires: {
"enemyDamage": {
"enemy": "Rinka",
"type": "contact",
"hits": 1
}
}
{
"or": [
{
"or": [
"f_KilledMetroidRoom2",
{
"obstaclesCleared": [
"f_KilledMetroidRoom2"
]
}
]
},
{
"metroidFrames": 120
}
]
} |
From: 2
Bottom Right Door
To: 2
Bottom Right Door

Quickly artificial morph and roll off to the bottom before being grabbed by the Metroids. This is much easier in indirect artificial morph. Note that it is necessary to exit G-Mode before exiting the room in order for the Metroids to remain killed. Entrance condition: {
"comeInWithGMode": {
"mode": "any",
"morphed": true,
"mobility": "mobile"
}
}Requires: "canMetroidAvoid" "canTrickyDodgeEnemies" "h_artificialMorphSpringBall" "h_artificialMorphPowerBomb" "h_artificialMorphPowerBomb" "h_artificialMorphPowerBomb" Clears obstacles: f_KilledMetroidRoom2 Sets flags: f_KilledMetroidRoom2 Dev note: FIXME: This can be done in immobile, but probably never matters, since it will require so much energy. |
From: 2
Bottom Right Door
To: 2
Bottom Right Door

On entry, kill or dodge the first Rinkas then Crystal Flash directly above or below a Rinka Spawner. Entrance condition: {
"comeInWithRMode": {}
}Requires: {
"or": [
"f_KilledMetroidRoom2",
{
"obstaclesCleared": [
"f_KilledMetroidRoom2"
]
}
]
}
"canRModeCrystalFlashInterrupt"
{
"ammo": {
"type": "Missile",
"count": 10
}
}
{
"ammo": {
"type": "Super",
"count": 10
}
}Dev note: There could be a variant with the Metroids alive, but they will all lure to Samus and the light orb will disappear, so she will take heavy damage. This is not possible in G-mode, because the Power Bomb will kill the Rinka and prevent more from spawning. |
From: 2
Bottom Right Door
To: 2
Bottom Right Door
On entry, wait until the Rinka starts to spawn then quickly roll off into the bottom right corner and Crystal Flash before the Metroids get there. Entrance condition: {
"comeInWithRMode": {}
}Requires: "canMetroidAvoid" "canTrickyGMode" "h_CrystalFlash" Clears obstacles: f_KilledMetroidRoom2 Sets flags: f_KilledMetroidRoom2 |
From: 2
Bottom Right Door
To: 2
Bottom Right Door


On entry, wait until the Rinka starts to spawn then quickly roll off into the bottom right corner and Crystal Flash before the Metroids get there. Note that it is necessary to exit G-Mode before exiting the room in order for the Metroids to remain killed. To do this, trigger Reserves on a Rinka above, or first damage down with some of the Metroids before killing them. To minimize damage taken, lure a Rinka away from its spawner before touching it to prevent multiple hits during the auto Reserve trigger. Entrance condition: {
"comeInWithGMode": {
"mode": "direct",
"morphed": true
}
}Requires: "canMetroidAvoid"
"canTrickyGMode"
"h_artificialMorphCrystalFlash"
{
"autoReserveTrigger": {}
}Clears obstacles: f_KilledMetroidRoom2 Sets flags: f_KilledMetroidRoom2 |
{
"$schema": "../../../schema/m3-room.schema.json",
"id": 227,
"name": "Metroid Room 2",
"area": "Tourian",
"subarea": "Main",
"roomAddress": "0x7DB31",
"roomEnvironments": [
{
"heated": false
}
],
"mapTileMask": [
[
1
],
[
1
]
],
"nodes": [
{
"id": 1,
"name": "Top Right Door",
"nodeType": "door",
"nodeSubType": "blue",
"nodeAddress": "0x001a9c0",
"doorOrientation": "right",
"doorEnvironments": [
{
"physics": "air"
}
],
"mapTileMask": [
[
2
],
[
1
]
]
},
{
"id": 2,
"name": "Bottom Right Door",
"nodeType": "door",
"nodeSubType": "gray",
"nodeAddress": "0x001a9cc",
"doorOrientation": "right",
"doorEnvironments": [
{
"physics": "air"
}
],
"locks": [
{
"name": "Metroid Room 2 Gray Lock (to Metroid Room 3)",
"lockType": "killEnemies",
"unlockStrats": [
{
"name": "Base",
"requires": [
{
"or": [
"f_KilledMetroidRoom2",
{
"obstaclesCleared": [
"f_KilledMetroidRoom2"
]
}
]
}
],
"flashSuitChecked": true,
"blueSuitChecked": true
}
],
"yields": [
"f_KilledMetroidRoom2"
]
}
],
"mapTileMask": [
[
1
],
[
2
]
]
}
],
"enemies": [
{
"id": "e1",
"groupName": "Metroid Room 2 Metroids",
"enemyName": "Metroid",
"quantity": 2,
"homeNodes": [
2
],
"stopSpawn": [
"f_KilledMetroidRoom2"
]
},
{
"id": "e2",
"groupName": "Metroid Room 2 Rinkas",
"enemyName": "Rinka",
"quantity": 4,
"homeNodes": [
1,
2
]
}
],
"strats": [
{
"link": [
1,
1
],
"name": "Base (Unlock Door)",
"requires": [],
"unlocksDoors": [
{
"types": [
"ammo"
],
"requires": []
}
],
"flashSuitChecked": true,
"blueSuitChecked": true
},
{
"link": [
1,
1
],
"name": "Base (Come In Normally)",
"entranceCondition": {
"comeInNormally": {}
},
"requires": [],
"flashSuitChecked": true,
"blueSuitChecked": true
},
{
"link": [
1,
1
],
"name": "Base (Come In With Mockball)",
"entranceCondition": {
"comeInWithMockball": {
"adjacentMinTiles": 0,
"remoteAndLandingMinTiles": [
[
0,
0
]
],
"speedBooster": "any"
}
},
"requires": [],
"flashSuitChecked": true,
"blueSuitChecked": true
},
{
"link": [
2,
2
],
"name": "Base (Unlock Door)",
"requires": [],
"unlocksDoors": [
{
"types": [
"ammo"
],
"requires": []
}
],
"flashSuitChecked": true,
"blueSuitChecked": true
},
{
"link": [
2,
2
],
"name": "Base (Come In Normally)",
"entranceCondition": {
"comeInNormally": {}
},
"requires": [],
"flashSuitChecked": true,
"blueSuitChecked": true
},
{
"link": [
2,
2
],
"name": "Base (Come In With Mockball)",
"entranceCondition": {
"comeInWithMockball": {
"adjacentMinTiles": 0,
"remoteAndLandingMinTiles": [
[
0,
0
]
],
"speedBooster": "any"
}
},
"requires": [],
"flashSuitChecked": true,
"blueSuitChecked": true
},
{
"name": "Base",
"requires": [
{
"or": [
"f_KilledMetroidRoom2",
{
"obstaclesCleared": [
"f_KilledMetroidRoom2"
]
}
]
}
],
"flashSuitChecked": true,
"blueSuitChecked": true,
"link": [
2,
2
],
"setsFlags": [
"f_KilledMetroidRoom2"
],
"clearsObstacles": [
"f_KilledMetroidRoom2"
]
},
{
"id": 1,
"link": [
1,
1
],
"name": "Leave with Runway",
"requires": [],
"exitCondition": {
"leaveWithRunway": {
"length": 3,
"openEnd": 1
}
},
"flashSuitChecked": true,
"blueSuitChecked": true
},
{
"id": 2,
"link": [
1,
1
],
"name": "Leave With Runway - Frozen Rinka",
"requires": [
"h_trickyFrozenEnemyRunway"
],
"exitCondition": {
"leaveWithRunway": {
"length": 5,
"openEnd": 0
}
},
"flashSuitChecked": true,
"blueSuitChecked": true,
"note": [
"Kill or lure and freeze the Metroids at the bottom of the room.",
"It may be easiest to stand on a frozen Rinka from the top left spawner to position a freeze of the other Rinka.",
"Maintain a half-tile gap between the Rinka and the runway in order to extend it as far as possible."
]
},
{
"id": 3,
"link": [
1,
1
],
"name": "Leave Spinning",
"requires": [
{
  "or": [
    "canMetroidAvoid",
    "Ice",
    {
      "or": [
        "f_KilledMetroidRoom2",
        {
          "obstaclesCleared": [
            "f_KilledMetroidRoom2"
          ]
        }
      ]
    }
  ]
}
],
"exitCondition": {
"leaveSpinning": {
"remoteRunway": {
"length": 4,
"openEnd": 1
}
}
},
"flashSuitChecked": true,
"blueSuitChecked": true
},
{
"id": 4,
"link": [
1,
1
],
"name": "Leave With Mockball",
"requires": [
{
  "or": [
    "canMetroidAvoid",
    "Ice",
    {
      "or": [
        "f_KilledMetroidRoom2",
        {
          "obstaclesCleared": [
            "f_KilledMetroidRoom2"
          ]
        }
      ]
    }
  ]
}
],
"exitCondition": {
"leaveWithMockball": {
"remoteRunway": {
"length": 4,
"openEnd": 1
},
"landingRunway": {
"length": 1,
"openEnd": 1
}
}
},
"flashSuitChecked": true,
"blueSuitChecked": true
},
{
"id": 5,
"link": [
1,
1
],
"name": "Leave With Spring Ball Bounce",
"requires": [
{
  "or": [
    "canMetroidAvoid",
    "Ice",
    {
      "or": [
        "f_KilledMetroidRoom2",
        {
          "obstaclesCleared": [
            "f_KilledMetroidRoom2"
          ]
        }
      ]
    }
  ]
}
],
"exitCondition": {
"leaveWithSpringBallBounce": {
"remoteRunway": {
"length": 4,
"openEnd": 0
},
"landingRunway": {
"length": 1,
"openEnd": 1
},
"movementType": "uncontrolled"
}
},
"flashSuitChecked": true,
"blueSuitChecked": true
},
{
"id": 6,
"link": [
1,
1
],
"name": "G-Mode Setup - Get Hit By Rinka",
"requires": [],
"exitCondition": {
"leaveWithGModeSetup": {}
},
"flashSuitChecked": true,
"blueSuitChecked": true
},
{
"id": 7,
"link": [
1,
1
],
"name": "G-Mode Regain Mobility",
"requires": [
{
  "enemyDamage": {
    "enemy": "Rinka",
    "type": "contact",
    "hits": 1
  }
}
],
"gModeRegainMobility": {},
"flashSuitChecked": true,
"blueSuitChecked": true
},
{
"id": 8,
"link": [
1,
1
],
"name": "G-Mode Morph Power Bomb Metroid Kill",
"entranceCondition": {
"comeInWithGMode": {
"mode": "any",
"morphed": true
}
},
"requires": [
"canMetroidAvoid",
"h_artificialMorphPowerBomb",
"h_artificialMorphPowerBomb",
"h_artificialMorphPowerBomb"
],
"setsFlags": [
"f_KilledMetroidRoom2"
],
"flashSuitChecked": true,
"blueSuitChecked": true,
"note": [
"This is easiest by staying on the top floating platform with the two Metroids stuck below it.",
"Note that it is necessary to exit G-Mode before exiting the room in order for the Metroids to remain killed."
],
"clearsObstacles": [
"f_KilledMetroidRoom2"
]
},
{
"id": 59,
"link": [
1,
1
],
"name": "R-Mode Crystal Flash Interrupt",
"entranceCondition": {
"comeInWithRMode": {}
},
"requires": [
"canRModeCrystalFlashInterrupt",
{
"ammo": {
"type": "Missile",
"count": 10
}
},
{
"ammo": {
"type": "Super",
"count": 10
}
}
],
"flashSuitChecked": true,
"blueSuitChecked": true,
"note": [
"On entry, kill or dodge the first Rinkas then Crystal Flash directly above or below a Rinka Spawner."
],
"devNote": [
"Note that this and the top of Metroid Room 4 are the only of the Metroid rooms that currently allows the Metroids to be alive, as they can get stuck on the ledge.",
"This is not possible in G-mode, because the Power Bomb will kill the Rinka and prevent more from spawning."
]
},
{
"id": 60,
"link": [
1,
1
],
"name": "R-Mode Crystal Flash Light Orb Metroid Kill",
"entranceCondition": {
"comeInWithRMode": {}
},
"requires": [
"canComplexGMode",
"h_CrystalFlash"
],
"setsFlags": [
"f_KilledMetroidRoom2"
],
"flashSuitChecked": true,
"blueSuitChecked": true,
"note": [
"On entry, kill or dodge the first Rinkas then Crystal Flash. While in the light orb, Samus will be almost immune and the Metroids will take damage."
],
"clearsObstacles": [
"f_KilledMetroidRoom2"
]
},
{
"id": 9,
"link": [
1,
2
],
"name": "Already Cleared",
"requires": [
{
  "or": [
    "f_KilledMetroidRoom2",
    {
      "obstaclesCleared": [
        "f_KilledMetroidRoom2"
      ]
    }
  ]
}
],
"flashSuitChecked": true,
"blueSuitChecked": true
},
{
"id": 10,
"link": [
1,
2
],
"name": "Ammo Kill",
"requires": [
"Ice",
{
"enemyKill": {
"enemies": [
[
"Metroid",
"Metroid"
]
],
"explicitWeapons": [
"Super",
"Missile"
]
}
}
],
"setsFlags": [
"f_KilledMetroidRoom2"
],
"flashSuitChecked": true,
"blueSuitChecked": true,
"clearsObstacles": [
"f_KilledMetroidRoom2"
]
},
{
"id": 11,
"link": [
1,
2
],
"name": "Tank and PB Kill",
"requires": [
{
"enemyKill": {
"enemies": [
[
"Metroid",
"Metroid"
]
],
"explicitWeapons": [
"PowerBomb"
]
}
},
{
"metroidFrames": 96
}
],
"setsFlags": [
"f_KilledMetroidRoom2"
],
"flashSuitChecked": true,
"blueSuitChecked": true,
"clearsObstacles": [
"f_KilledMetroidRoom2"
]
},
{
"id": 12,
"link": [
1,
2
],
"name": "Power Bomb Dodge Kill",
"requires": [
{
"enemyKill": {
"enemies": [
[
"Metroid",
"Metroid"
]
],
"explicitWeapons": [
"PowerBomb"
]
}
},
{
"or": [
"canMetroidAvoid",
"canCameraManip"
]
}
],
"setsFlags": [
"f_KilledMetroidRoom2"
],
"flashSuitChecked": true,
"blueSuitChecked": true,
"note": "An easy way is once Samus is on the top platform, jump and aim down to lower the camera, then place 3 PBs.",
"clearsObstacles": [
"f_KilledMetroidRoom2"
]
},
{
"id": 13,
"link": [
1,
2
],
"name": "Ice Evade",
"requires": [
"Ice"
],
"flashSuitChecked": true,
"blueSuitChecked": true
},
{
"id": 14,
"link": [
1,
2
],
"name": "Screw Evade",
"requires": [
"canDodgeWhileShooting",
{
"or": [
"ScrewAttack",
"canPseudoScrew"
]
}
],
"flashSuitChecked": true,
"blueSuitChecked": true,
"note": [
"Use ScrewAttack or a PseudoScrew to prevent Metroids from attaching to Samus."
]
},
{
"id": 15,
"link": [
1,
2
],
"name": "Harder Evade",
"requires": [
"canMetroidAvoid"
],
"flashSuitChecked": true,
"blueSuitChecked": true
},
{
"id": 16,
"link": [
1,
2
],
"name": "Tank the Damage",
"requires": [
{
  "metroidFrames": 80
}
],
"exitCondition": {
"leaveNormally": {}
},
"unlocksDoors": [
{
"types": [
"missiles"
],
"requires": [
{
"enemyDamage": {
"enemy": "Rinka",
"type": "contact",
"hits": 1
}
}
]
},
{
"types": [
"super"
],
"requires": [
{
"metroidFrames": 15
}
]
},
{
"types": [
"powerbomb"
],
"requires": []
}
],
"flashSuitChecked": true,
"blueSuitChecked": true
},
{
"id": 17,
"link": [
1,
2
],
"name": "Come In Shinecharging, Leave Shinecharged (Shortcut)",
"entranceCondition": {
"comeInShinecharging": {
"length": 2,
"openEnd": 1
}
},
"requires": [
"canShinechargeMovementTricky",
{
"or": [
"canMoonfall",
"Morph"
]
},
{
"or": [
{
  "or": [
    "f_KilledMetroidRoom2",
    {
      "obstaclesCleared": [
        "f_KilledMetroidRoom2"
      ]
    }
  ]
},
{
"metroidFrames": 25
}
]
},
{
"shineChargeFrames": 130
}
],
"exitCondition": {
"leaveShinecharged": {}
},
"unlocksDoors": [
{
"types": [
"powerbomb"
],
"requires": []
},
{
"types": [
"missiles",
"super"
],
"requires": [
"never"
]
}
],
"flashSuitChecked": true,
"blueSuitChecked": true,
"devNote": "FIXME: refine this and add a canTwoTileSqueeze option."
},
{
"id": 18,
"link": [
1,
2
],
"name": "Come In Shinecharging, Leave With Spark (Long Way Around)",
"entranceCondition": {
"comeInShinecharging": {
"length": 2,
"openEnd": 1
}
},
"requires": [
"canShinechargeMovementTricky",
{
"shinespark": {
"frames": 7,
"excessFrames": 0
}
},
{
"or": [
{
"or": [
"f_KilledMetroidRoom2",
{
"obstaclesCleared": [
"f_KilledMetroidRoom2"
]
}
]
},
"canMetroidAvoid"
]
}
],
"exitCondition": {
"leaveWithSpark": {}
},
"unlocksDoors": [
{
"types": [
"super"
],
"requires": []
},
{
"types": [
"missiles",
"powerbomb"
],
"requires": [
"never"
]
}
],
"flashSuitChecked": true,
"blueSuitChecked": true
},
{
"id": 19,
"link": [
1,
2
],
"name": "Carry Shinecharge (Shortcut)",
"entranceCondition": {
"comeInShinecharged": {}
},
"requires": [
{
"shineChargeFrames": 140
},
"canShinechargeMovementTricky",
{
"or": [
"canMoonfall",
"Morph",
"canTwoTileSqueeze"
]
},
{
"or": [
{
"or": [
"f_KilledMetroidRoom2",
{
"obstaclesCleared": [
"f_KilledMetroidRoom2"
]
}
]
},
{
"metroidFrames": 100
},
{
"and": [
"canInsaneJump",
"canTrickyDodgeEnemies",
{
"metroidFrames": 10
}
]
}
]
}
],
"exitCondition": {
"leaveShinecharged": {}
},
"unlocksDoors": [
{
"types": [
"powerbomb"
],
"requires": []
},
{
"types": [
"missiles",
"super"
],
"requires": [
"never"
]
}
],
"flashSuitChecked": true,
"blueSuitChecked": true,
"note": [
"If Metroids are alive, minimizing damage from them requires tricky movement to manipulate them:",
"the moonfalling option must be done starting from almost a tile to the left of the opening;",
"likewise, the morphing option should soft-morph about a tile to the left of the opening."
],
"devNote": [
"FIXME: Unmorphing and downbacking through the gap can leave with more frames remaining but is more difficult."
]
},
{
"id": 20,
"link": [
1,
2
],
"name": "Come In Shinecharged, Leave With Spark (Long Way Around)",
"entranceCondition": {
"comeInShinecharged": {}
},
"requires": [
{
"shineChargeFrames": 102
},
"canShinechargeMovementTricky",
{
"shinespark": {
"frames": 22,
"excessFrames": 0
}
},
{
"or": [
{
"or": [
"f_KilledMetroidRoom2",
{
"obstaclesCleared": [
"f_KilledMetroidRoom2"
]
}
]
},
"canMetroidAvoid"
]
}
],
"exitCondition": {
"leaveWithSpark": {}
},
"unlocksDoors": [
{
"types": [
"super"
],
"requires": []
},
{
"types": [
"missiles",
"powerbomb"
],
"requires": [
"never"
]
}
],
"flashSuitChecked": true,
"blueSuitChecked": true
},
{
"id": 21,
"link": [
1,
2
],
"name": "Come in Shinecharging, Leave With Temporary Blue",
"entranceCondition": {
"comeInShinecharging": {
"length": 2,
"openEnd": 0
}
},
"requires": [
{
"or": [
"f_KilledMetroidRoom2",
{
"obstaclesCleared": [
"f_KilledMetroidRoom2"
]
}
]
},
"canXRayTurnaround",
"canLongChainTemporaryBlue"
],
"exitCondition": {
"leaveWithTemporaryBlue": {}
},
"unlocksDoors": [
{
"types": [
"ammo"
],
"requires": []
}
],
"flashSuitChecked": true,
"blueSuitChecked": true,
"note": "Use X-ray immediately after shinecharging, in order to be able to dodge the Rinkas.",
"devNote": "Doing this with Metroids alive is technically possible but seems really bad."
},
{
"id": 22,
"link": [
2,
1
],
"name": "Already Cleared",
"requires": [
{
"or": [
"f_KilledMetroidRoom2",
{
"obstaclesCleared": [
"f_KilledMetroidRoom2"
]
}
]
}
],
"flashSuitChecked": true,
"blueSuitChecked": true
},
{
"id": 23,
"link": [
2,
1
],
"name": "Ammo Kill",
"requires": [
"Ice",
{
"enemyKill": {
"enemies": [
[
"Metroid",
"Metroid"
]
],
"explicitWeapons": [
"Super",
"Missile"
]
}
}
],
"setsFlags": [
"f_KilledMetroidRoom2"
],
"flashSuitChecked": true,
"blueSuitChecked": true,
"clearsObstacles": [
"f_KilledMetroidRoom2"
]
},
{
"id": 24,
"link": [
2,
1
],
"name": "Tank and PB Kill",
"requires": [
{
"enemyKill": {
"enemies": [
[
"Metroid",
"Metroid"
]
],
"explicitWeapons": [
"PowerBomb"
]
}
},
{
"metroidFrames": 400
}
],
"setsFlags": [
"f_KilledMetroidRoom2"
],
"flashSuitChecked": true,
"blueSuitChecked": true,
"clearsObstacles": [
"f_KilledMetroidRoom2"
]
},
{
"id": 25,
"link": [
2,
1
],
"name": "Power Bomb Dodge Kill (Bottom to Top)",
"requires": [
{
"notable": "Power Bomb Dodge Kill (Bottom to Top)"
},
{
"enemyKill": {
"enemies": [
[
"Metroid",
"Metroid"
]
],
"explicitWeapons": [
"PowerBomb"
]
}
},
"canMetroidAvoid"
],
"setsFlags": [
"f_KilledMetroidRoom2"
],
"flashSuitChecked": true,
"blueSuitChecked": true,
"note": "Kill the two Metroids with Power Bombs while avoiding damage.",
"clearsObstacles": [
"f_KilledMetroidRoom2"
]
},
{
"id": 26,
"link": [
2,
1
],
"name": "Ice Evade",
"requires": [
"Ice",
"canDodgeWhileShooting"
],
"flashSuitChecked": true,
"blueSuitChecked": true,
"note": "Shoot the Metroids on entry, shooting one horizontally and the other diagonally."
},
{
"id": 27,
"link": [
2,
1
],
"name": "Screw Evade",
"requires": [
{
  "or": [
    {
      "and": [
        "ScrewAttack",
        "canDodgeWhileShooting"
      ]
    },
    {
      "and": [
        "canPseudoScrew",
        "canPrepareForNextRoom",
        "canDodgeWhileShooting"
      ]
    }
  ]
}
],
"flashSuitChecked": true,
"blueSuitChecked": true,
"note": "Use ScrewAttack or a PseudoScrew to prevent Metroids from attaching to Samus."
},
{
"id": 28,
"link": [
2,
1
],
"name": "Bottom Door Metroid Avoid",
"requires": [
{
"notable": "Bottom Door Metroid Avoid"
},
"canMetroidAvoid"
],
"flashSuitChecked": true,
"blueSuitChecked": true,
"note": [
"Buffer a spinjump towards the door to jump over the top metroid and land on the middle platform.",
"Metroids can be knocked with Beam shots to clear a path."
]
},
{
"id": 63,
"link": [
2,
1
],
"name": "Blue Suit Metroid Avoid",
"requires": [
{
  "haveBlueSuit": {}
}
],
"flashSuitChecked": true,
"blueSuitChecked": true,
"note": "The Metroids bounce off of Samus as long as she keeps moving."
},
{
"id": 29,
"link": [
2,
1
],
"name": "Tank the Damage",
"requires": [
{
  "metroidFrames": 180
}
],
"exitCondition": {
"leaveNormally": {}
},
"unlocksDoors": [
{
"types": [
"missiles"
],
"requires": [
{
"enemyDamage": {
"enemy": "Rinka",
"type": "contact",
"hits": 1
}
},
{
"ammo": {
"type": "Missile",
"count": 2
}
}
]
},
{
"types": [
"super"
],
"requires": [
{
"or": [
{
"ammo": {
"type": "Super",
"count": 1
}
},
"canDodgeWhileShooting"
]
}
]
},
{
"types": [
"powerbomb"
],
"requires": [
{
"metroidFrames": 25
}
]
}
],
"flashSuitChecked": true,
"blueSuitChecked": true
},
{
"id": 30,
"link": [
2,
1
],
"name": "Very Deep Stuck X-Ray Climb With Immobile",
"entranceCondition": {
"comeInWithGMode": {
"mode": "direct",
"morphed": false,
"mobility": "immobile"
}
},
"requires": [
"canComplexGMode",
"canGModeXRayClimb",
{
"or": [
"f_KilledMetroidRoom2",
{
"obstaclesCleared": [
"f_KilledMetroidRoom2"
]
}
]
},
{
"enemyDamage": {
"enemy": "Rinka",
"type": "contact",
"hits": 1
}
},
"canXRayClimb"
],
"bypassesDoorShell": "yes",
"flashSuitChecked": true,
"blueSuitChecked": true,
"note": [
"Enter immobile with G-mode direct, with the Metroids having been killed previously.",
"Take a Rinka hit to regain mobility.",
"Back up to between 1 and 6 pixels from the door transition, and activate X-ray to get very deep stuck in the door.",
"Climb up 1 screen, moving quickly to minimize Rinka damage.",
"Perform a turnaround buffered spin-jump away from the door to trigger the transition, bypassing any lock on the door."
],
"devNote": [
"The 'immobile' requirement in the entranceCondition is not necessary but is included for clarity.",
"Without coming in immobile, it would not be possible to have enough energy to survive the Rinka hit.",
"The enemyDamage in this strat is for a second Rinka hit while climbing.",
"The first Rinka hit is included in the gModeImmobile requirement."
]
},
{
"id": 31,
"link": [
2,
1
],
"name": "Very Deep Stuck X-Ray Climb With Ice",
"entranceCondition": {
"comeInWithGMode": {
"mode": "direct",
"morphed": false
}
},
"requires": [
"canComplexGMode",
"Ice",
"canGModeXRayClimb"
],
"bypassesDoorShell": "yes",
"flashSuitChecked": true,
"blueSuitChecked": true,
"note": [
"Enter with G-mode direct, and quickly freeze the Metroids (if still alive) and Rinkas.",
"Back up to between 1 and 6 pixels from the door transition, and activate X-ray to get very deep stuck in the door.",
"Climb up 1 screen, moving quickly to avoid Rinka damage.",
"Perform a turnaround buffered spin-jump away from the door to trigger the transition, bypassing any lock on the door."
]
},
{
"id": 32,
"link": [
2,
1
],
"name": "Very Deep Stuck X-Ray Climb With Crystal Flash",
"entranceCondition": {
"comeInWithGMode": {
"mode": "direct",
"morphed": false
}
},
"requires": [
"canComplexGMode",
"h_CrystalFlash",
{
"autoReserveTrigger": {}
},
"canGModeXRayClimb",
{
"enemyDamage": {
"enemy": "Rinka",
"type": "contact",
"hits": 1
}
}
],
"bypassesDoorShell": "yes",
"flashSuitChecked": true,
"blueSuitChecked": true,
"note": [
"Enter with G-mode direct, using artificial morph to avoid the Metroids if they are still alive.",
"Go to the top of the room and Crystal Flash, with the Metroids stuck below (if alive).",
"The Crystal Flash will leave behind a light orb, which can be used to kill the Metroids.",
"Use the Rinkas to damage down.",
"For the final hit that will trigger auto-reserves, stand in the open doorway between 1 and 6 pixels from the transition.",
"The auto reserve trigger will cancel G-mode and close the door on top of Samus.",
"Climb up 1 screen, moving quickly to minimize Rinka damage.",
"Perform a turnaround buffered spin-jump away from the door to trigger the transition, bypassing any lock on the door."
]
},
{
"id": 33,
"link": [
2,
1
],
"name": "Come in Shinecharging, Leave With Spark (Left Side)",
"entranceCondition": {
"comeInShinecharging": {
"length": 2,
"openEnd": 0
}
},
"requires": [
"canShinechargeMovementComplex",
{
"shinespark": {
"frames": 7,
"excessFrames": 0
}
},
{
"or": [
"f_KilledMetroidRoom2",
{
"obstaclesCleared": [
"f_KilledMetroidRoom2"
]
}
]
}
],
"exitCondition": {
"leaveWithSpark": {}
},
"unlocksDoors": [
{
"types": [
"super"
],
"requires": []
},
{
"types": [
"missiles",
"powerbomb"
],
"requires": [
"never"
]
}
],
"flashSuitChecked": true,
"blueSuitChecked": true,
"note": [
"Not pressing dash will make the platforming easier, unless HiJump is also equipped."
],
"devNote": [
"FIXME: Add variations for tanking the Metroid damage (taking into account how they can block the shot to open the door)"
]
},
{
"id": 34,
"link": [
2,
1
],
"name": "Come in Shinecharging, Leave Shinecharged (HiJump)",
"entranceCondition": {
"comeInShinecharging": {
"length": 2,
"openEnd": 0
}
},
"requires": [
"canShinechargeMovementComplex",
"HiJump",
"canCarefulJump",
{
"or": [
{
"or": [
"f_KilledMetroidRoom2",
{
"obstaclesCleared": [
"f_KilledMetroidRoom2"
]
}
]
},
{
"and": [
"canMetroidAvoid",
"canShinechargeMovementTricky"
]
}
]
},
{
"shineChargeFrames": 130
}
],
"exitCondition": {
"leaveShinecharged": {}
},
"unlocksDoors": [
{
"types": [
"super"
],
"requires": []
},
{
"types": [
"missiles",
"powerbomb"
],
"requires": [
"never"
]
}
],
"flashSuitChecked": true,
"blueSuitChecked": true,
"note": [
"Spinjump into the opening below the top door."
],
"devNote": [
"FIXME: Add variations for tanking the Metroid damage (taking into account how they can block the shot to open the door)"
]
},
{
"id": 35,
"link": [
2,
1
],
"name": "Come in Shinecharging, Leave Shinecharged (Morph)",
"entranceCondition": {
"comeInShinecharging": {
"length": 2,
"openEnd": 0
}
},
"requires": [
"canShinechargeMovementComplex",
"canWallJumpInstantMorph",
{
"or": [
"f_KilledMetroidRoom2",
{
"obstaclesCleared": [
"f_KilledMetroidRoom2"
]
}
]
},
{
"shineChargeFrames": 150
}
],
"exitCondition": {
"leaveShinecharged": {}
},
"unlocksDoors": [
{
"types": [
"super"
],
"requires": []
},
{
"types": [
"missiles",
"powerbomb"
],
"requires": [
"never"
]
}
],
"flashSuitChecked": true,
"blueSuitChecked": true,
"note": [
"Wall jump up the right wall and either mid-air morph to fit through the gap below the top door.",
"Alternatively use a mid-air wiggle to reduce the height of Samus' hitbox after the walljump, to be able to fit through the gap without morphing."
],
"devNote": [
"FIXME: Add variations for tanking the Metroid damage (taking into account how they can block the shot to open the door)"
]
},
{
"id": 36,
"link": [
2,
1
],
"name": "Come in Shinecharging, Leave Shinecharged (Wiggle)",
"entranceCondition": {
"comeInShinecharging": {
"length": 2,
"openEnd": 0
}
},
"requires": [
"canWallJump",
"canMidairWiggle",
"canShinechargeMovementTricky",
{
"or": [
"f_KilledMetroidRoom2",
{
"obstaclesCleared": [
"f_KilledMetroidRoom2"
]
}
]
},
{
"shineChargeFrames": 130
}
],
"exitCondition": {
"leaveShinecharged": {}
},
"unlocksDoors": [
{
"types": [
"super"
],
"requires": []
},
{
"types": [
"missiles",
"powerbomb"
],
"requires": [
"never"
]
}
],
"flashSuitChecked": true,
"blueSuitChecked": true,
"note": [
"Use a mid-air wiggle to reduce the height of Samus' hitbox after the walljump, to be able to fit through the gap without morphing."
],
"devNote": [
"FIXME: Add variations for tanking the Metroid damage (taking into account how they can block the shot to open the door)"
]
},
{
"id": 56,
"link": [
2,
1
],
"name": "Come in Shinecharging, Leave Shinecharged (Left Side, Tricky Dash Jump)",
"entranceCondition": {
"comeInShinecharging": {
"length": 0,
"openEnd": 1
}
},
"requires": [
{
"shineChargeFrames": 170
},
"canTrickyDashJump",
"canShinechargeMovementTricky",
{
"or": [
{
"or": [
"f_KilledMetroidRoom2",
{
"obstaclesCleared": [
"f_KilledMetroidRoom2"
]
}
]
},
"ScrewAttack",
{
"metroidFrames": 160
}
]
}
],
"exitCondition": {
"leaveShinecharged": {}
},
"unlocksDoors": [
{
"types": [
"super"
],
"requires": [
{
"or": [
{
"or": [
"f_KilledMetroidRoom2",
{
"obstaclesCleared": [
"f_KilledMetroidRoom2"
]
}
]
},
"ScrewAttack"
]
}
]
},
{
"types": [
"missiles",
"powerbomb"
],
"requires": [
"never"
]
}
],
"flashSuitChecked": true,
"blueSuitChecked": true,
"note": [
"Go up the left side of the room to make it out the top door with a few shinecharge frames remaining."
],
"detailNote": [
"Avoid getting more than 2.75 tiles of run speed on the lower platform (or Speed Booster will shorten Samus' jump):",
"either release run early, or do a big initial jump to land in the middle of the lower platform before starting to run."
]
},
{
"id": 37,
"link": [
2,
1
],
"name": "Carry Shinecharge (HiJump)",
"entranceCondition": {
"comeInShinecharged": {}
},
"requires": [
{
"shineChargeFrames": 105
},
"HiJump",
"canCarefulJump",
"canShinechargeMovementComplex",
{
"or": [
{
"or": [
"f_KilledMetroidRoom2",
{
"obstaclesCleared": [
"f_KilledMetroidRoom2"
]
}
]
},
"canMetroidAvoid"
]
}
],
"exitCondition": {
"leaveShinecharged": {}
},
"unlocksDoors": [
{
"types": [
"super"
],
"requires": []
},
{
"types": [
"missiles",
"powerbomb"
],
"requires": [
"never"
]
}
],
"flashSuitChecked": true,
"blueSuitChecked": true,
"note": [
"Spinjump into the opening below the top door."
]
},
{
"id": 38,
"link": [
2,
1
],
"name": "Carry Shinecharge (Morph)",
"entranceCondition": {
"comeInShinecharged": {}
},
"requires": [
{
"shineChargeFrames": 140
},
"canWallJumpInstantMorph",
"canShinechargeMovementComplex",
{
"or": [
{
"or": [
"f_KilledMetroidRoom2",
{
"obstaclesCleared": [
"f_KilledMetroidRoom2"
]
}
]
},
"canMetroidAvoid"
]
}
],
"exitCondition": {
"leaveShinecharged": {}
},
"unlocksDoors": [
{
"types": [
"super"
],
"requires": []
},
{
"types": [
"missiles",
"powerbomb"
],
"requires": [
"never"
]
}
],
"flashSuitChecked": true,
"blueSuitChecked": true,
"note": [
"Wall jump up the right wall and either mid-air morph to fit through the gap below the top door.",
"Alternatively use a mid-air wiggle to reduce the height of Samus' hitbox after the walljump, to be able to fit through the gap without morphing."
]
},
{
"id": 39,
"link": [
2,
1
],
"name": "Carry Shinecharge (Wiggle)",
"entranceCondition": {
"comeInShinecharged": {}
},
"requires": [
{
"shineChargeFrames": 120
},
"canWallJump",
"canMidairWiggle",
"canShinechargeMovementTricky",
{
"or": [
{
"or": [
"f_KilledMetroidRoom2",
{
"obstaclesCleared": [
"f_KilledMetroidRoom2"
]
}
]
},
"canMetroidAvoid"
]
}
],
"exitCondition": {
"leaveShinecharged": {}
},
"unlocksDoors": [
{
"types": [
"super"
],
"requires": []
},
{
"types": [
"missiles",
"powerbomb"
],
"requires": [
"never"
]
}
],
"flashSuitChecked": true,
"blueSuitChecked": true,
"note": [
"Wall jump up the right wall and use a mid-air wiggle to reduce the height of Samus' hitbox after the walljump, to be able to fit through the gap without morphing."
]
},
{
"id": 40,
"link": [
2,
1
],
"name": "Come in Shinecharged, Leave With Spark (HiJump)",
"entranceCondition": {
"comeInShinecharged": {}
},
"requires": [
{
"shineChargeFrames": 80
},
"HiJump",
"canShinechargeMovementComplex",
"canSpeedyJump",
{
"shinespark": {
"frames": 6,
"excessFrames": 0
}
},
{
"or": [
{
"or": [
"f_KilledMetroidRoom2",
{
"obstaclesCleared": [
"f_KilledMetroidRoom2"
]
}
]
},
"canMetroidAvoid"
]
}
],
"exitCondition": {
"leaveWithSpark": {}
},
"unlocksDoors": [
{
"types": [
"super"
],
"requires": []
},
{
"types": [
"missiles",
"powerbomb"
],
"requires": [
"never"
]
}
],
"flashSuitChecked": true,
"blueSuitChecked": true,
"note": [
"Spin jump into the opening below the top door."
]
},
{
"id": 41,
"link": [
2,
1
],
"name": "Come in Shinecharged, Leave With Spark (Morph)",
"entranceCondition": {
"comeInShinecharged": {}
},
"requires": [
{
"shineChargeFrames": 110
},
"canWallJumpInstantMorph",
"canShinechargeMovementComplex",
{
"shinespark": {
"frames": 5,
"excessFrames": 0
}
},
{
"or": [
{
"or": [
"f_KilledMetroidRoom2",
{
"obstaclesCleared": [
"f_KilledMetroidRoom2"
]
}
]
},
"canMetroidAvoid"
]
}
],
"exitCondition": {
"leaveWithSpark": {}
},
"unlocksDoors": [
{
"types": [
"super"
],
"requires": []
},
{
"types": [
"missiles",
"powerbomb"
],
"requires": [
"never"
]
}
],
"flashSuitChecked": true,
"blueSuitChecked": true,
"note": [
"Wall jump up the right wall and either mid-air morph to fit through the gap below the top door.",
"Alternatively use a mid-air wiggle to reduce the height of Samus' hitbox after the wall jump, to be able to fit through the gap without morphing.",
"Shoot the door open and spark out."
]
},
{
"id": 42,
"link": [
2,
1
],
"name": "Come in Shinecharged, Leave With Spark (Wiggle)",
"entranceCondition": {
"comeInShinecharged": {}
},
"requires": [
{
"shineChargeFrames": 105
},
"canWallJump",
"canMidairWiggle",
"canShinechargeMovementTricky",
{
"shinespark": {
"frames": 5,
"excessFrames": 0
}
},
{
"or": [
{
"or": [
"f_KilledMetroidRoom2",
{
"obstaclesCleared": [
"f_KilledMetroidRoom2"
]
}
]
},
"canMetroidAvoid"
]
}
],
"exitCondition": {
"leaveWithSpark": {}
},
"unlocksDoors": [
{
"types": [
"super"
],
"requires": []
},
{
"types": [
"missiles",
"powerbomb"
],
"requires": [
"never"
]
}
],
"flashSuitChecked": true,
"blueSuitChecked": true,
"note": [
"Wall jump up the right wall and use a mid-air wiggle to reduce the height of Samus' hitbox after the wall jump, to be able to fit through the gap without morphing.",
"Shoot the door open and spark out."
]
},
{
"id": 57,
"link": [
2,
1
],
"name": "Come in Shinecharged, Leave With Spark (Left Side, Tricky Dash Jump)",
"entranceCondition": {
"comeInShinecharged": {}
},
"requires": [
{
"shineChargeFrames": 130
},
"canTrickyDashJump",
"canShinechargeMovementTricky",
{
"or": [
{
"and": [
{
"or": [
{
"or": [
"f_KilledMetroidRoom2",
{
"obstaclesCleared": [
"f_KilledMetroidRoom2"
]
}
]
},
"ScrewAttack",
{
"and": [
{
"metroidFrames": 145
},
{
"or": [
"Plasma",
"Wave",
{
"ammo": {
"type": "Missile",
"count": 1
}
}
]
}
]
}
]
},
{
"shinespark": {
"frames": 13,
"excessFrames": 0
}
}
]
},
{
"and": [
{
"metroidFrames": 150
},
{
"shineChargeFrames": 10
},
{
"shinespark": {
"frames": 7,
"excessFrames": 0
}
}
]
}
]
}
],
"exitCondition": {
"leaveWithSpark": {}
},
"unlocksDoors": [
{
"types": [
"super"
],
"requires": [
{
"or": [
{
"or": [
"f_KilledMetroidRoom2",
{
"obstaclesCleared": [
"f_KilledMetroidRoom2"
]
}
]
},
"ScrewAttack"
]
}
]
},
{
"types": [
"missiles",
"powerbomb"
],
"requires": [
"never"
]
}
],
"flashSuitChecked": true,
"blueSuitChecked": true,
"note": [
"Go up the left side of the room and spark out the top door.",
"If tanking Metroid damage, then the Metroid can block the shot to open the door;",
"to avoid this, either jump toward the door with dash speed or use Plasma, Wave, or a Missile."
],
"detailNote": [
"Do a big initial jump to land in the middle of the lower platform,",
"and jump before running more than 2.75 tiles, to avoid a Speed Booster dropoff in jump height."
]
},
{
"id": 43,
"link": [
2,
1
],
"name": "Come in Shinecharging, Leave With Temporary Blue",
"entranceCondition": {
"comeInShinecharging": {
"length": 2,
"openEnd": 0
}
},
"requires": [
{
"or": [
"f_KilledMetroidRoom2",
{
"obstaclesCleared": [
"f_KilledMetroidRoom2"
]
}
]
},
"canXRayTurnaround",
"canLongChainTemporaryBlue"
],
"exitCondition": {
"leaveWithTemporaryBlue": {}
},
"unlocksDoors": [
{
"types": [
"ammo"
],
"requires": []
}
],
"flashSuitChecked": true,
"blueSuitChecked": true,
"note": "Use X-Ray immediately after shinecharging, in order to be able to dodge the Rinkas."
},
{
"id": 44,
"link": [
2,
2
],
"name": "Leave with Runway",
"requires": [
{
  "or": [
    {
      "or": [
        "f_KilledMetroidRoom2",
        {
          "obstaclesCleared": [
            "f_KilledMetroidRoom2"
          ]
        }
      ]
    },
    "Ice",
    {
      "and": [
        {
          "enemyDamage": {
            "enemy": "Rinka",
            "type": "contact",
            "hits": 1
          }
        },
        {
          "metroidFrames": 22
        }
      ]
    }
  ]
}
],
"exitCondition": {
"leaveWithRunway": {
"length": 3,
"openEnd": 1
}
},
"flashSuitChecked": true,
"blueSuitChecked": true,
"devNote": "FIXME: Is it worth adding a method with avoiding the Metroids?"
},
{
"id": 45,
"link": [
2,
2
],
"name": "Leave With Runway - Frozen Rinka",
"requires": [
"h_trickyFrozenEnemyRunway"
],
"exitCondition": {
"leaveWithRunway": {
"length": 5,
"openEnd": 0
}
},
"flashSuitChecked": true,
"blueSuitChecked": true,
"note": [
"Kill or lure and freeze the Metroids at the top of the room.",
"It may be easiest to stand on a frozen Rinka from the left spawner to position a freeze of the other Rinka.",
"It is possible maintain a half-tile gap between the Rinka and the runway in order to extend it as far as possible."
]
},
{
"id": 55,
"link": [
2,
2
],
"name": "Leave With Side Platform",
"requires": [
"h_speedJump",
{
"or": [
"canMetroidAvoid",
{
"or": [
"f_KilledMetroidRoom2",
{
"obstaclesCleared": [
"f_KilledMetroidRoom2"
]
}
]
}
]
},
"canInsaneJump",
"canMomentumConservingMorph"
],
"exitCondition": {
"leaveWithSidePlatform": {
"height": 3,
"runway": {
"length": 11,
"openEnd": 0
},
"obstruction": [
3,
0
]
}
},
"flashSuitChecked": true,
"blueSuitChecked": true,
"devNote": [
"Max extra run speed $2.6",
"This strat is included for completeness, though it apparently doesn't have any applications."
]
},
{
"id": 46,
"link": [
2,
2
],
"name": "Leave Spinning",
"requires": [
{
  "or": [
    "canMetroidAvoid",
    "Ice",
    {
      "or": [
        "f_KilledMetroidRoom2",
        {
          "obstaclesCleared": [
            "f_KilledMetroidRoom2"
          ]
        }
      ]
    }
  ]
}
],
"exitCondition": {
"leaveSpinning": {
"remoteRunway": {
"length": 8,
"openEnd": 1
}
}
},
"flashSuitChecked": true,
"blueSuitChecked": true
},
{
"id": 47,
"link": [
2,
2
],
"name": "Leave With Mockball",
"requires": [
{
  "or": [
    "canMetroidAvoid",
    "Ice",
    {
      "or": [
        "f_KilledMetroidRoom2",
        {
          "obstaclesCleared": [
            "f_KilledMetroidRoom2"
          ]
        }
      ]
    }
  ]
}
],
"exitCondition": {
"leaveWithMockball": {
"remoteRunway": {
"length": 8,
"openEnd": 1
},
"landingRunway": {
"length": 2,
"openEnd": 1
}
}
},
"flashSuitChecked": true,
"blueSuitChecked": true,
"devNote": "There is 1 unusable landing tile here; at low speeds (earlier jump) it could be used but wouldn't serve a purpose."
},
{
"id": 48,
"link": [
2,
2
],
"name": "Leave With Spring Ball Bounce",
"requires": [
{
  "or": [
    "canMetroidAvoid",
    "Ice",
    {
      "or": [
        "f_KilledMetroidRoom2",
        {
          "obstaclesCleared": [
            "f_KilledMetroidRoom2"
          ]
        }
      ]
    }
  ]
}
],
"exitCondition": {
"leaveWithSpringBallBounce": {
"remoteRunway": {
"length": 8,
"openEnd": 1
},
"landingRunway": {
"length": 1,
"openEnd": 1
},
"movementType": "uncontrolled"
}
},
"flashSuitChecked": true,
"blueSuitChecked": true
},
{
"id": 49,
"link": [
2,
2
],
"name": "Leave Space Jumping",
"requires": [
{
  "or": [
    "canMetroidAvoid",
    "Ice",
    {
      "or": [
        "f_KilledMetroidRoom2",
        {
          "obstaclesCleared": [
            "f_KilledMetroidRoom2"
          ]
        }
      ]
    }
  ]
}
],
"exitCondition": {
"leaveSpaceJumping": {
"remoteRunway": {
"length": 5,
"openEnd": 1
}
}
},
"flashSuitChecked": true,
"blueSuitChecked": true
},
{
"id": 50,
"link": [
2,
2
],
"name": "Crystal Flash",
"requires": [
{
"or": [
"f_KilledMetroidRoom2",
{
"obstaclesCleared": [
"f_KilledMetroidRoom2"
]
}
]
},
"h_CrystalFlash",
{
"enemyDamage": {
"enemy": "Rinka",
"type": "contact",
"hits": 1
}
}
],
"flashSuitChecked": true,
"blueSuitChecked": true,
"note": [
"To avoid heavy Rinka damage, you must perform the Crystal Flash on a specific tile: on the third floor tile from the left wall.",
"Lay the Power Bomb immediately after destroying both Rinkas."
]
},
{
"id": 51,
"link": [
2,
2
],
"name": "G-Mode Setup - Get Hit By Rinka",
"requires": [
{
  "or": [
    "canMetroidAvoid",
    "canUseFrozenEnemies",
    "ScrewAttack",
    {
      "or": [
        "f_KilledMetroidRoom2",
        {
          "obstaclesCleared": [
            "f_KilledMetroidRoom2"
          ]
        }
      ]
    }
  ]
}
],
"exitCondition": {
"leaveWithGModeSetup": {}
},
"flashSuitChecked": true,
"blueSuitChecked": true,
"note": [
"If the Metroids are alive, lure them off screen."
],
"devNote": "There could be another strat for a Metroid or Rinka, that doesn't have canMetroidAvoid or canRiskPermanentLossOfAccess, but canMetroidAvoid isn't too difficult for this level."
},
{
"id": 52,
"link": [
2,
2
],
"name": "G-Mode Setup - Get Hit By Metroid",
"requires": [
{
"not": "f_KilledMetroidRoom2"
},
"canRiskPermanentLossOfAccess"
],
"exitCondition": {
"leaveWithGModeSetup": {
"knockback": false
}
},
"flashSuitChecked": true,
"blueSuitChecked": true
},
{
"id": 53,
"link": [
2,
2
],
"name": "G-Mode Regain Mobility",
"requires": [
{
"enemyDamage": {
"enemy": "Rinka",
"type": "contact",
"hits": 1
}
},
{
"or": [
{
"or": [
"f_KilledMetroidRoom2",
{
"obstaclesCleared": [
"f_KilledMetroidRoom2"
]
}
]
},
{
"metroidFrames": 120
}
]
}
],
"gModeRegainMobility": {},
"flashSuitChecked": true,
"blueSuitChecked": true,
"note": "If alive, the Metroids do 90 damage before the Rinka hits."
},
{
"id": 54,
"link": [
2,
2
],
"name": "G-Mode Morph Power Bomb Metroid Kill",
"entranceCondition": {
"comeInWithGMode": {
"mode": "any",
"morphed": true,
"mobility": "mobile"
}
},
"requires": [
"canMetroidAvoid",
"canTrickyDodgeEnemies",
"h_artificialMorphSpringBall",
"h_artificialMorphPowerBomb",
"h_artificialMorphPowerBomb",
"h_artificialMorphPowerBomb"
],
"setsFlags": [
"f_KilledMetroidRoom2"
],
"flashSuitChecked": true,
"blueSuitChecked": true,
"note": [
"Quickly artificial morph and roll off to the bottom before being grabbed by the Metroids.",
"This is much easier in indirect artificial morph.",
"Note that it is necessary to exit G-Mode before exiting the room in order for the Metroids to remain killed."
],
"devNote": "FIXME: This can be done in immobile, but probably never matters, since it will require so much energy.",
"clearsObstacles": [
"f_KilledMetroidRoom2"
]
},
{
"id": 61,
"link": [
2,
2
],
"name": "R-Mode Crystal Flash Interrupt",
"entranceCondition": {
"comeInWithRMode": {}
},
"requires": [
{
"or": [
"f_KilledMetroidRoom2",
{
"obstaclesCleared": [
"f_KilledMetroidRoom2"
]
}
]
},
"canRModeCrystalFlashInterrupt",
{
"ammo": {
"type": "Missile",
"count": 10
}
},
{
"ammo": {
"type": "Super",
"count": 10
}
}
],
"flashSuitChecked": true,
"blueSuitChecked": true,
"note": [
"On entry, kill or dodge the first Rinkas then Crystal Flash directly above or below a Rinka Spawner."
],
"devNote": [
"There could be a variant with the Metroids alive, but they will all lure to Samus and the light orb will disappear, so she will take heavy damage.",
"This is not possible in G-mode, because the Power Bomb will kill the Rinka and prevent more from spawning."
]
},
{
"id": 62,
"link": [
2,
2
],
"name": "R-Mode Crystal Flash Light Orb Metroid Kill",
"entranceCondition": {
"comeInWithRMode": {}
},
"requires": [
"canMetroidAvoid",
"canTrickyGMode",
"h_CrystalFlash"
],
"setsFlags": [
"f_KilledMetroidRoom2"
],
"flashSuitChecked": true,
"blueSuitChecked": true,
"note": [
"On entry, wait until the Rinka starts to spawn then quickly roll off into the bottom right corner and Crystal Flash before the Metroids get there."
],
"clearsObstacles": [
"f_KilledMetroidRoom2"
]
},
{
"id": 58,
"link": [
2,
2
],
"name": "Direct G-Mode Morph Crystal Flash Light Orb Metroid Kill",
"entranceCondition": {
"comeInWithGMode": {
"mode": "direct",
"morphed": true
}
},
"requires": [
"canMetroidAvoid",
"canTrickyGMode",
"h_artificialMorphCrystalFlash",
{
"autoReserveTrigger": {}
}
],
"setsFlags": [
"f_KilledMetroidRoom2"
],
"flashSuitChecked": true,
"blueSuitChecked": true,
"note": [
"On entry, wait until the Rinka starts to spawn then quickly roll off into the bottom right corner and Crystal Flash before the Metroids get there.",
"Note that it is necessary to exit G-Mode before exiting the room in order for the Metroids to remain killed.",
"To do this, trigger Reserves on a Rinka above, or first damage down with some of the Metroids before killing them.",
"To minimize damage taken, lure a Rinka away from its spawner before touching it to prevent multiple hits during the auto Reserve trigger."
],
"clearsObstacles": [
"f_KilledMetroidRoom2"
]
}
],
"notables": [
{
"id": 1,
"name": "Power Bomb Dodge Kill (Bottom to Top)",
"note": "Kill the two Metroids with Power Bombs while avoiding damage."
},
{
"id": 2,
"name": "Bottom Door Metroid Avoid",
"note": [
"Buffer a spin jump towards the door to jump over the top metroid and land on the middle platform.",
"Metroids can be knocked with Beam shots to clear a path."
]
}
],
"nextStratId": 64,
"nextNotableId": 3,
"obstacles": [
{
"id": "f_KilledMetroidRoom2",
"name": "f_KilledMetroidRoom2"
}
]
}