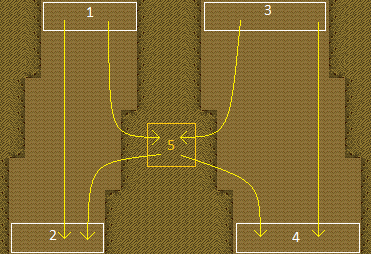
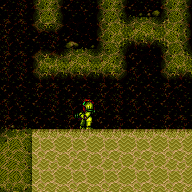
Botwoon Quicksand Room
Room ID: 204
From: 1
Top Left Sand Entrance
To: 1
Top Left Sand Entrance


Requires: {
"enemyDamage": {
"enemy": "Bull",
"type": "contact",
"hits": 1
}
} |
|
|
|
Samus falls so quickly that it is unlikely that the Bulls will cause any problem. Entrance condition: {
"comeInWithGMode": {
"mode": "any",
"morphed": false
},
"comesThroughToilet": "any"
}Exit condition: {
"leaveWithGMode": {
"morphed": false
}
} |
From: 1
Top Left Sand Entrance
To: 2
Bottom Left Sand Exit
Samus falls so quickly that it is unlikely that the Bulls will cause any problem. Entrance condition: {
"comeInWithGMode": {
"mode": "any",
"morphed": true
},
"comesThroughToilet": "any"
}Exit condition: {
"leaveWithGMode": {
"morphed": true
}
} |
From: 1
Top Left Sand Entrance
To: 4
Bottom Right Sand Exit
Enter the room on the right side and land on the ledge just below the hidden tunnel then Power Bomb boost to get into the tunnel and kil the Bulls. Alternatively, enter the room near the right with a bit of right momentum and land directly in the tunnel while taking a Bull hit. Entrance condition: {
"comeInWithGMode": {
"mode": "any",
"morphed": true
},
"comesThroughToilet": "any"
}Requires: "canComplexGMode"
"canInsaneJump"
{
"or": [
{
  "enemyDamage": {
    "enemy": "Bull",
    "type": "contact",
    "hits": 1
  }
},
{
"haveBlueSuit": {}
},
{
"and": [
"h_artificialMorphPowerBomb",
{
"or": [
"h_additionalBomb",
"h_artificialMorphMovement"
]
}
]
}
]
}Exit condition: {
"leaveWithGMode": {
"morphed": true
}
}Dev note: This room does not have water, so Samus can be boosted by bomb boosts without Gravity after PLMs are overloaded. It is possible to do this with 1 Power Bomb, but it is very precise and significantly depends on room entry. |
From: 1
Top Left Sand Entrance
To: 5
Hidden Morph Tunnel Junction
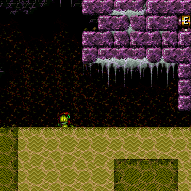
If the room above has a narrow sand exit, then spin jump through the transition pressing against the wall, continue holding right to reach the wall above the tunnel, then perform a tight mid-air morph and hold right to pass through the tunnel. If Samus falls below the tunnel, even to the ledge just below, it will no longer be possible to reach. Entrance condition: {
"comeInNormally": {},
"comesThroughToilet": "no"
}Requires: {
"notable": "Pass Through Hidden Tunnel"
}
"canPrepareForNextRoom"
"can4HighMidAirMorph"
{
  "enemyDamage": {
    "enemy": "Bull",
    "type": "contact",
    "hits": 1
  }
}
{
"or": [
{
"enemyDamage": {
"enemy": "Bull",
"type": "contact",
"hits": 1
}
},
"h_usePowerBomb"
]
}Dev note: FIXME: Depending on the room above, the 'can4HighMidAirMorph' requirement might be unnecessary. FIXME: Entering through the Toilet can be possible with a lateral mid-air and enough run speed from an air room above. |
From: 3
Top Right Sand Entrance
To: 2
Bottom Left Sand Exit


Enter the room on the left side and land on the ledge just below the hidden tunnel then Power Bomb boost to get into the tunnel and kil the Bulls. Alternatively, enter the room near the left with a bit of left momentum and land directly in the tunnel while taking a Bull hit. Entrance condition: {
"comeInWithGMode": {
"mode": "any",
"morphed": true
},
"comesThroughToilet": "any"
}Requires: "canComplexGMode"
"canInsaneJump"
{
"or": [
{
"enemyDamage": {
"enemy": "Bull",
"type": "contact",
"hits": 1
}
},
{
"haveBlueSuit": {}
},
{
"and": [
"h_artificialMorphPowerBomb",
{
"or": [
"h_additionalBomb",
"h_artificialMorphMovement"
]
}
]
}
]
}Exit condition: {
"leaveWithGMode": {
"morphed": true
}
}Dev note: This room does not have water, so Samus can be boosted by bomb boosts without Gravity after PLMs are overloaded. It is possible to do this with 1 Power Bomb, but it is very precise and significantly depends on room entry. |
From: 3
Top Right Sand Entrance
To: 3
Top Right Sand Entrance


Requires: {
"enemyDamage": {
"enemy": "Bull",
"type": "contact",
"hits": 1
}
} |
|
|
From: 3
Top Right Sand Entrance
To: 4
Bottom Right Sand Exit
Samus falls so quickly that it is unlikely that the Bulls will cause any problem. Entrance condition: {
"comeInWithGMode": {
"mode": "any",
"morphed": false
},
"comesThroughToilet": "any"
}Exit condition: {
"leaveWithGMode": {
"morphed": false
}
} |
From: 3
Top Right Sand Entrance
To: 4
Bottom Right Sand Exit
Samus falls so quickly that it is unlikely that the Bulls will cause any problem. Entrance condition: {
"comeInWithGMode": {
"mode": "any",
"morphed": true
},
"comesThroughToilet": "any"
}Exit condition: {
"leaveWithGMode": {
"morphed": true
}
} |
From: 3
Top Right Sand Entrance
To: 5
Hidden Morph Tunnel Junction

If the room above has a narrow sand exit, then spin jump through the transition pressing against the wall, continue holding left to reach the wall above the tunnel, then perform a tight mid-air morph and hold left to pass through the tunnel. If Samus falls below the tunnel, even to the ledge just below, it will no longer be possible to reach. Entrance condition: {
"comeInNormally": {},
"comesThroughToilet": "no"
}Requires: {
"notable": "Pass Through Hidden Tunnel"
}
"canPrepareForNextRoom"
"can4HighMidAirMorph"
{
"enemyDamage": {
"enemy": "Bull",
"type": "contact",
"hits": 1
}
}
{
"or": [
{
"enemyDamage": {
"enemy": "Bull",
"type": "contact",
"hits": 1
}
},
"h_usePowerBomb"
]
}Dev note: FIXME: Depending on the room above, the 'can4HighMidAirMorph' requirement might be unnecessary. FIXME: Entering through the Toilet can be possible with a lateral mid-air and enough run speed from an air room above. |
From: 5
Hidden Morph Tunnel Junction
To: 2
Bottom Left Sand Exit
Requires: "Morph" |
From: 5
Hidden Morph Tunnel Junction
To: 4
Bottom Right Sand Exit
Requires: "Morph" |
From: 5
Hidden Morph Tunnel Junction
To: 5
Hidden Morph Tunnel Junction
Requires: "h_CrystalFlash" |
{
  "$schema": "../../../schema/m3-room.schema.json",
  "id": 204,
  "name": "Botwoon Quicksand Room",
  "area": "Maridia",
  "subarea": "Inner",
  "subsubarea": "Pink",
  "roomAddress": "0x7D898",
  "roomEnvironments": [
    {
      "heated": false
    }
  ],
  "mapTileMask": [
    [
      1,
      1
    ]
  ],
  "nodes": [
    {
      "id": 1,
      "name": "Top Left Sand Entrance",
      "nodeType": "entrance",
      "nodeSubType": "sandpit",
      "doorOrientation": "up",
      "mapTileMask": [
        [
          2,
          1
        ]
      ]
    },
    {
      "id": 2,
      "name": "Bottom Left Sand Exit",
      "nodeType": "exit",
      "nodeSubType": "sandpit",
      "nodeAddress": "0x001a8ac",
      "doorOrientation": "down",
      "mapTileMask": [
        [
          2,
          1
        ]
      ]
    },
    {
      "id": 3,
      "name": "Top Right Sand Entrance",
      "nodeType": "entrance",
      "nodeSubType": "sandpit",
      "doorOrientation": "up",
      "mapTileMask": [
        [
          1,
          2
        ]
      ]
    },
    {
      "id": 4,
      "name": "Bottom Right Sand Exit",
      "nodeType": "exit",
      "nodeSubType": "sandpit",
      "nodeAddress": "0x001a8b8",
      "doorOrientation": "down",
      "mapTileMask": [
        [
          1,
          2
        ]
      ]
    },
    {
      "id": 5,
      "name": "Hidden Morph Tunnel Junction",
      "nodeType": "junction",
      "nodeSubType": "junction",
      "mapTileMask": [
        [
          2,
          2
        ]
      ]
    }
  ],
  "enemies": [
    {
      "id": "e1",
      "groupName": "Botwoon Quicksand Bulls",
      "enemyName": "Bull",
      "quantity": 9,
      "homeNodes": [
        2,
        4
      ]
    }
  ],
  "strats": [
    {
      "link": [
        1,
        1
      ],
      "name": "Base (Come In Normally)",
      "entranceCondition": {
        "comeInNormally": {}
      },
      "requires": [],
      "flashSuitChecked": true,
      "blueSuitChecked": true
    },
    {
      "link": [
        2,
        2
      ],
      "name": "Base (Unlock Door)",
      "requires": [],
      "unlocksDoors": [
        {
          "types": [
            "ammo"
          ],
          "requires": []
        }
      ],
      "flashSuitChecked": true,
      "blueSuitChecked": true
    },
    {
      "link": [
        3,
        3
      ],
      "name": "Base (Come In Normally)",
      "entranceCondition": {
        "comeInNormally": {}
      },
      "requires": [],
      "flashSuitChecked": true,
      "blueSuitChecked": true
    },
    {
      "link": [
        4,
        4
      ],
      "name": "Base (Unlock Door)",
      "requires": [],
      "unlocksDoors": [
        {
          "types": [
            "ammo"
          ],
          "requires": []
        }
      ],
      "flashSuitChecked": true,
      "blueSuitChecked": true
    },
    {
      "id": 1,
      "link": [
        1,
        1
      ],
      "name": "G-Mode Regain Mobility",
      "requires": [
        {
          "enemyDamage": {
            "enemy": "Bull",
            "type": "contact",
            "hits": 1
          }
        }
      ],
      "gModeRegainMobility": {},
      "flashSuitChecked": true,
      "blueSuitChecked": true
    },
    {
      "id": 2,
      "link": [
        1,
        2
      ],
      "name": "Base",
      "requires": [],
      "flashSuitChecked": true,
      "blueSuitChecked": true
    },
    {
      "id": 3,
      "link": [
        1,
        2
      ],
      "name": "G-Mode",
      "entranceCondition": {
        "comeInWithGMode": {
          "mode": "any",
          "morphed": false
        },
        "comesThroughToilet": "any"
      },
      "requires": [],
      "exitCondition": {
        "leaveWithGMode": {
          "morphed": false
        }
      },
      "flashSuitChecked": true,
      "blueSuitChecked": true,
      "note": "Samus falls so quickly that it is unlikely that the Bulls will cause any problem."
    },
    {
      "id": 4,
      "link": [
        1,
        2
      ],
      "name": "G-Mode Morph",
      "entranceCondition": {
        "comeInWithGMode": {
          "mode": "any",
          "morphed": true
        },
        "comesThroughToilet": "any"
      },
      "requires": [],
      "exitCondition": {
        "leaveWithGMode": {
          "morphed": true
        }
      },
      "flashSuitChecked": true,
      "blueSuitChecked": true,
      "note": "Samus falls so quickly that it is unlikely that the Bulls will cause any problem."
    },
    {
      "id": 5,
      "link": [
        1,
        4
      ],
      "name": "G-Mode Morph, Through the Hidden Tunnel",
      "entranceCondition": {
        "comeInWithGMode": {
          "mode": "any",
          "morphed": true
        },
        "comesThroughToilet": "any"
      },
      "requires": [
        "canComplexGMode",
        "canInsaneJump",
        {
          "or": [
            {
              "enemyDamage": {
                "enemy": "Bull",
                "type": "contact",
                "hits": 1
              }
            },
            {
              "haveBlueSuit": {}
            },
            {
              "and": [
                "h_artificialMorphPowerBomb",
                {
                  "or": [
                    "h_additionalBomb",
                    "h_artificialMorphMovement"
                  ]
                }
              ]
            }
          ]
        }
      ],
      "exitCondition": {
        "leaveWithGMode": {
          "morphed": true
        }
      },
      "flashSuitChecked": true,
      "blueSuitChecked": true,
      "note": [
        "Enter the room on the right side and land on the ledge just below the hidden tunnel then Power Bomb boost to get into the tunnel and kil the Bulls.",
        "Alternatively, enter the room near the right with a bit of right momentum and land directly in the tunnel while taking a Bull hit."
      ],
      "devNote": [
        "This room does not have water, so Samus can be boosted by bomb boosts without Gravity after PLMs are overloaded.",
        "It is possible to do this with 1 Power Bomb, but it is very precise and significantly depends on room entry."
      ]
    },
    {
      "id": 6,
      "link": [
        1,
        5
      ],
      "name": "Pass Through Hidden Tunnel",
      "entranceCondition": {
        "comeInNormally": {},
        "comesThroughToilet": "no"
      },
      "requires": [
        {
          "notable": "Pass Through Hidden Tunnel"
        },
        "canPrepareForNextRoom",
        "can4HighMidAirMorph",
        {
          "enemyDamage": {
            "enemy": "Bull",
            "type": "contact",
            "hits": 1
          }
        },
        {
          "or": [
            {
              "enemyDamage": {
                "enemy": "Bull",
                "type": "contact",
                "hits": 1
              }
            },
            "h_usePowerBomb"
          ]
        }
      ],
      "flashSuitChecked": true,
      "blueSuitChecked": true,
      "note": [
        "If the room above has a narrow sand exit, then spin jump through the transition pressing against the wall,",
        "continue holding right to reach the wall above the tunnel,",
        "then perform a tight mid-air morph and hold right to pass through the tunnel.",
        "If Samus falls below the tunnel, even to the ledge just below, it will no longer be possible to reach."
      ],
      "devNote": [
        "FIXME: Depending on the room above, the 'can4HighMidAirMorph' requirement might be unnecessary.",
        "FIXME: Entering through the Toilet can be possible with a lateral mid-air and enough run speed from an air room above."
      ]
    },
    {
      "id": 9,
      "link": [
        3,
        2
      ],
      "name": "G-Mode Morph, Through the Hidden Tunnel",
      "entranceCondition": {
        "comeInWithGMode": {
          "mode": "any",
          "morphed": true
        },
        "comesThroughToilet": "any"
      },
      "requires": [
        "canComplexGMode",
        "canInsaneJump",
        {
          "or": [
            {
              "enemyDamage": {
                "enemy": "Bull",
                "type": "contact",
                "hits": 1
              }
            },
            {
              "haveBlueSuit": {}
            },
            {
              "and": [
                "h_artificialMorphPowerBomb",
                {
                  "or": [
                    "h_additionalBomb",
                    "h_artificialMorphMovement"
                  ]
                }
              ]
            }
          ]
        }
      ],
      "exitCondition": {
        "leaveWithGMode": {
          "morphed": true
        }
      },
      "flashSuitChecked": true,
      "blueSuitChecked": true,
      "note": [
        "Enter the room on the left side and land on the ledge just below the hidden tunnel then Power Bomb boost to get into the tunnel and kil the Bulls.",
        "Alternatively, enter the room near the left with a bit of left momentum and land directly in the tunnel while taking a Bull hit."
      ],
      "devNote": [
        "This room does not have water, so Samus can be boosted by bomb boosts without Gravity after PLMs are overloaded.",
        "It is possible to do this with 1 Power Bomb, but it is very precise and significantly depends on room entry."
      ]
    },
    {
      "id": 10,
      "link": [
        3,
        3
      ],
      "name": "G-Mode Regain Mobility",
      "requires": [
        {
          "enemyDamage": {
            "enemy": "Bull",
            "type": "contact",
            "hits": 1
          }
        }
      ],
      "gModeRegainMobility": {},
      "flashSuitChecked": true,
      "blueSuitChecked": true
    },
    {
      "id": 11,
      "link": [
        3,
        4
      ],
      "name": "Base",
      "requires": [],
      "flashSuitChecked": true,
      "blueSuitChecked": true
    },
    {
      "id": 12,
      "link": [
        3,
        4
      ],
      "name": "G-Mode",
      "entranceCondition": {
        "comeInWithGMode": {
          "mode": "any",
          "morphed": false
        },
        "comesThroughToilet": "any"
      },
      "requires": [],
      "exitCondition": {
        "leaveWithGMode": {
          "morphed": false
        }
      },
      "flashSuitChecked": true,
      "blueSuitChecked": true,
      "note": "Samus falls so quickly that it is unlikely that the Bulls will cause any problem."
    },
    {
      "id": 13,
      "link": [
        3,
        4
      ],
      "name": "G-Mode Morph",
      "entranceCondition": {
        "comeInWithGMode": {
          "mode": "any",
          "morphed": true
        },
        "comesThroughToilet": "any"
      },
      "requires": [],
      "exitCondition": {
        "leaveWithGMode": {
          "morphed": true
        }
      },
      "flashSuitChecked": true,
      "blueSuitChecked": true,
      "note": "Samus falls so quickly that it is unlikely that the Bulls will cause any problem."
    },
    {
      "id": 14,
      "link": [
        3,
        5
      ],
      "name": "Pass Through Hidden Tunnel",
      "entranceCondition": {
        "comeInNormally": {},
        "comesThroughToilet": "no"
      },
      "requires": [
        {
          "notable": "Pass Through Hidden Tunnel"
        },
        "canPrepareForNextRoom",
        "can4HighMidAirMorph",
        {
          "enemyDamage": {
            "enemy": "Bull",
            "type": "contact",
            "hits": 1
          }
        },
        {
          "or": [
            {
              "enemyDamage": {
                "enemy": "Bull",
                "type": "contact",
                "hits": 1
              }
            },
            "h_usePowerBomb"
          ]
        }
      ],
      "flashSuitChecked": true,
      "blueSuitChecked": true,
      "note": [
        "If the room above has a narrow sand exit, then spin jump through the transition pressing against the wall,",
        "continue holding left to reach the wall above the tunnel,",
        "then perform a tight mid-air morph and hold left to pass through the tunnel.",
        "If Samus falls below the tunnel, even to the ledge just below, it will no longer be possible to reach."
      ],
      "devNote": [
        "FIXME: Depending on the room above, the 'can4HighMidAirMorph' requirement might be unnecessary.",
        "FIXME: Entering through the Toilet can be possible with a lateral mid-air and enough run speed from an air room above."
      ]
    },
    {
      "id": 17,
      "link": [
        5,
        2
      ],
      "name": "Base",
      "requires": [
        "Morph"
      ],
      "flashSuitChecked": true,
      "blueSuitChecked": true
    },
    {
      "id": 18,
      "link": [
        5,
        4
      ],
      "name": "Base",
      "requires": [
        "Morph"
      ],
      "flashSuitChecked": true,
      "blueSuitChecked": true
    },
    {
      "id": 19,
      "link": [
        5,
        5
      ],
      "name": "Crystal Flash",
      "requires": [
        "h_CrystalFlash"
      ],
      "flashSuitChecked": true,
      "blueSuitChecked": true
    }
  ],
  "notables": [
    {
      "id": 1,
      "name": "Pass Through Hidden Tunnel",
      "note": [
        "Enter the room in a prepared way to pass through the hidden tunnel, which may require tricky movement to reach.",
        "If Samus falls below the tunnel, even to the ledge just below, it will no longer be possible to reach."
      ]
    }
  ],
  "nextStratId": 20,
  "nextNotableId": 2
}