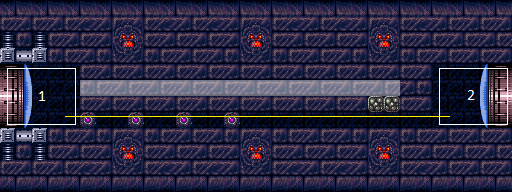
Final Missile Bombway
Room ID: 18
|
Exit condition: {
"leaveWithRunway": {
"length": 4,
"openEnd": 0
}
} |
|
Requires: "h_CrystalFlash" |
From: 1
Left Door
To: 1
Left Door
Entrance condition: {
"comeInShinecharging": {
"length": 3,
"openEnd": 0
},
"comesInHeated": "no"
}Requires: "h_CrystalSpark" |
|
Requires: {
"or": [
"canMidAirMorph",
"h_useSpringBall",
"h_bombThings"
]
} |
From: 1
Left Door
To: 2
Right Door


Tight movement is needed to enter with a shinecharge, carry it through the morph tunnel, and spark out the right door in time. Entrance condition: {
"comeInShinecharging": {
"length": 2,
"openEnd": 0
}
}Requires: "canMidAirMorph"
"canShinechargeMovementTricky"
{
"shineChargeFrames": 175
}
{
"shinespark": {
"frames": 7,
"excessFrames": 0
}
}Exit condition: {
"leaveWithSpark": {
"position": "bottom"
}
}Unlocks doors: {"types":["super"],"requires":[]}
{"types":["missiles","powerbomb"],"requires":["never"]}Dev note: There doesn't appear to be enough time to spark out in a 'top' position. |
From: 1
Left Door
To: 2
Right Door

Entrance condition: {
"comeInSpeedballing": {
"runway": {
"length": 3,
"openEnd": 0
},
"maxExtraRunSpeed": "$3.8"
}
}Requires: "canChainTemporaryBlue" Exit condition: {
"leaveWithTemporaryBlue": {}
}Unlocks doors: {"types":["ammo"],"requires":[]}Dev note: Higher speeds could work, up to at least about $4.4, but with greater difficulty. |
Come in Shinecharging, Leave With Temporary Blue (Spring Ball Bounce)
(Extreme)
Final Missile Bombway
From: 1
Left Door
To: 2
Right Door

Unmorph immediately after exiting the tunnel while still descending, to continue chaining temporary blue. The frame window for the unmorph depends on the alignment of Samus' bounces; in the worst case where Samus bounces upward while exiting, this method will unavoidably fail. Entrance condition: {
"comeInShinecharging": {
"length": 2,
"openEnd": 0
}
}Requires: "canChainTemporaryBlue" "canSpringBallBounce" "canInsaneJump" Exit condition: {
"leaveWithTemporaryBlue": {}
}Unlocks doors: {"types":["ammo"],"requires":[]}Dev note: FIXME: The canInsaneJump is for difficulty placement for the unmorph while exiting the tunnel; it may be better to introduce a specific tech for this? Doing a 'canPauseRemorphTemporaryBlue' is technically an alternative, but it seems to be significantly harder. |
|

Entrance condition: {
"comeInWithGMode": {
"mode": "any",
"morphed": true
}
}Requires: "h_blueSuitGMode" |
|
Requires: "h_bombThings" |
|

Entrance condition: {
"comeInSpeedballing": {
"runway": {
"length": 3,
"openEnd": 0
}
}
} |
From: 2
Right Door
To: 1
Left Door
Entrance condition: {
"comeInSpeedballing": {
"runway": {
"length": 3,
"openEnd": 0
},
"maxExtraRunSpeed": "$3.8"
}
}Requires: "canChainTemporaryBlue" Exit condition: {
"leaveWithTemporaryBlue": {}
}Unlocks doors: {"types":["ammo"],"requires":[]}Dev note: Higher speeds could work, up to at least about $4.4, but with greater difficulty. |
From: 2
Right Door
To: 1
Left Door
Entrance condition: {
"comeInShinecharging": {
"length": 2,
"openEnd": 0
}
}Requires: "canTemporaryBlue" "canSpringBallBounce" Dev note: There is 1 unusable tile in this runway. |
From: 2
Right Door
To: 1
Left Door


Entrance condition: {
"comeInWithBlueSpringBallBounce": {
"movementType": "controlled"
}
}Requires: "canInsaneJump" |
From: 2
Right Door
To: 1
Left Door
Entrance condition: {
"comeInWithTemporaryBlue": {}
}Requires: "canChainTemporaryBlue" "canSpringBallBounce" |
Come in Shinecharging, Leave With Temporary Blue (Spring Ball Bounce)
(Extreme)
Final Missile Bombway
From: 2
Right Door
To: 1
Left Door
Unmorph immediately after exiting the tunnel while still descending, to continue chaining temporary blue. The frame window for the unmorph depends on the alignment of Samus' bounces; in the worst case where Samus bounces upward while exiting, this method will unavoidably fail. Entrance condition: {
"comeInShinecharging": {
"length": 2,
"openEnd": 0
}
}Requires: "canChainTemporaryBlue" "canSpringBallBounce" "canInsaneJump" Exit condition: {
"leaveWithTemporaryBlue": {}
}Unlocks doors: {"types":["ammo"],"requires":[]}Dev note: FIXME: The canInsaneJump is for difficulty placement for the unmorph while exiting the tunnel; it may be better to introduce a specific tech for this? Doing a 'canPauseRemorphTemporaryBlue' is technically an alternative, but it seems to be significantly harder. |
|
Requires: {
"haveBlueSuit": {}
}
"Morph" |
|


Repeatedly bomb the crumble blocks until the PLMs are overloaded. Entrance condition: {
"comeInWithGMode": {
"mode": "any",
"morphed": true
}
}Requires: "h_artificialMorphBombs" |
|

Entrance condition: {
"comeInWithGMode": {
"mode": "any",
"morphed": true
}
}Requires: "h_blueSuitGMode" |
|
Entrance condition: {
"comeInWithGrappleTeleport": {
"blockPositions": [
[
5,
3
],
[
7,
2
]
]
}
} |
|
Entrance condition: {
"comeInWithGrappleTeleport": {
"blockPositions": [
[
3,
12
],
[
3,
13
]
]
}
}Requires: {
"or": [
"canGrappleTeleportWallEscape",
{
"doorUnlockedAtNode": 1
}
]
}Unlocks doors: {"types":["ammo"],"requires":[]} |
|
Entrance condition: {
"comeInWithGrappleTeleport": {
"blockPositions": [
[
3,
12
],
[
3,
13
]
]
}
}Bypasses door shell: true |
From: 2
Right Door
To: 1
Left Door
Entrance condition: {
"comeInWithGrappleTeleport": {
"blockPositions": [
[
3,
12
]
]
}
}Exit condition: {
"leaveWithGrappleTeleport": {
"blockPositions": [
[
3,
12
]
]
}
}Bypasses door shell: true |
From: 2
Right Door
To: 1
Left Door
Entrance condition: {
"comeInWithGrappleTeleport": {
"blockPositions": [
[
3,
13
]
]
}
}Exit condition: {
"leaveWithGrappleTeleport": {
"blockPositions": [
[
3,
13
]
]
}
}Bypasses door shell: true |
|
Exit condition: {
"leaveWithRunway": {
"length": 4,
"openEnd": 0
}
} |
|
Requires: "h_CrystalFlash" |
From: 2
Right Door
To: 2
Right Door
Entrance condition: {
"comeInShinecharging": {
"length": 3,
"openEnd": 0
},
"comesInHeated": "no"
}Requires: "h_CrystalSpark" |
{
"$schema": "../../../schema/m3-room.schema.json",
"id": 18,
"name": "Final Missile Bombway",
"area": "Crateria",
"subarea": "Central",
"roomAddress": "0x79A44",
"roomEnvironments": [
{
"heated": false
}
],
"mapTileMask": [
[
1,
1
]
],
"nodes": [
{
"id": 1,
"name": "Left Door",
"nodeType": "door",
"nodeSubType": "blue",
"nodeAddress": "0x0018c82",
"doorOrientation": "left",
"doorEnvironments": [
{
"physics": "air"
}
],
"mapTileMask": [
[
2,
1
]
]
},
{
"id": 2,
"name": "Right Door",
"nodeType": "door",
"nodeSubType": "blue",
"nodeAddress": "0x0018c8e",
"doorOrientation": "right",
"doorEnvironments": [
{
"physics": "air"
}
],
"mapTileMask": [
[
1,
2
]
]
}
],
"enemies": [],
"strats": [
{
"link": [
1,
1
],
"name": "Base (Unlock Door)",
"requires": [],
"unlocksDoors": [
{
"types": [
"ammo"
],
"requires": []
}
],
"flashSuitChecked": true,
"blueSuitChecked": true
},
{
"link": [
1,
1
],
"name": "Base (Come In Normally)",
"entranceCondition": {
"comeInNormally": {}
},
"requires": [],
"flashSuitChecked": true,
"blueSuitChecked": true
},
{
"link": [
1,
1
],
"name": "Base (Come In With Mockball)",
"entranceCondition": {
"comeInWithMockball": {
"adjacentMinTiles": 0,
"remoteAndLandingMinTiles": [
[
0,
0
]
],
"speedBooster": "any"
}
},
"requires": [],
"flashSuitChecked": true,
"blueSuitChecked": true
},
{
"link": [
2,
2
],
"name": "Base (Unlock Door)",
"requires": [],
"unlocksDoors": [
{
"types": [
"ammo"
],
"requires": []
}
],
"flashSuitChecked": true,
"blueSuitChecked": true
},
{
"link": [
2,
2
],
"name": "Base (Come In Normally)",
"entranceCondition": {
"comeInNormally": {}
},
"requires": [],
"flashSuitChecked": true,
"blueSuitChecked": true
},
{
"link": [
2,
2
],
"name": "Base (Come In With Mockball)",
"entranceCondition": {
"comeInWithMockball": {
"adjacentMinTiles": 0,
"remoteAndLandingMinTiles": [
[
0,
0
]
],
"speedBooster": "any"
}
},
"requires": [],
"flashSuitChecked": true,
"blueSuitChecked": true
},
{
"id": 1,
"link": [
1,
1
],
"name": "Leave with Runway",
"requires": [],
"exitCondition": {
"leaveWithRunway": {
"length": 4,
"openEnd": 0
}
},
"flashSuitChecked": true,
"blueSuitChecked": true
},
{
"id": 2,
"link": [
1,
1
],
"name": "Crystal Flash",
"requires": [
"h_CrystalFlash"
],
"flashSuitChecked": true,
"blueSuitChecked": true
},
{
"id": 22,
"link": [
1,
1
],
"name": "Come in Shinecharging, Crystal Spark",
"entranceCondition": {
"comeInShinecharging": {
"length": 3,
"openEnd": 0
},
"comesInHeated": "no"
},
"requires": [
"h_CrystalSpark"
],
"flashSuitChecked": true,
"blueSuitChecked": true
},
{
"id": 3,
"link": [
1,
2
],
"name": "Base",
"requires": [
{
  "or": [
    "canMidAirMorph",
    "h_useSpringBall",
    "h_bombThings"
  ]
}
],
"flashSuitChecked": true,
"blueSuitChecked": true
},
{
"id": 4,
"link": [
1,
2
],
"name": "Come in Shinecharging, Leave With Spark",
"entranceCondition": {
"comeInShinecharging": {
"length": 2,
"openEnd": 0
}
},
"requires": [
"canMidAirMorph",
"canShinechargeMovementTricky",
{
"shineChargeFrames": 175
},
{
"shinespark": {
"frames": 7,
"excessFrames": 0
}
}
],
"exitCondition": {
"leaveWithSpark": {
"position": "bottom"
}
},
"unlocksDoors": [
{
"types": [
"super"
],
"requires": []
},
{
"types": [
"missiles",
"powerbomb"
],
"requires": [
"never"
]
}
],
"flashSuitChecked": true,
"blueSuitChecked": true,
"note": "Tight movement is needed to enter with a shinecharge, carry it through the morph tunnel, and spark out the right door in time.",
"devNote": "There doesn't appear to be enough time to spark out in a 'top' position."
},
{
"id": 17,
"link": [
1,
2
],
"name": "Come in Speedballing, Leave With Temporary Blue",
"entranceCondition": {
"comeInSpeedballing": {
"runway": {
"length": 3,
"openEnd": 0
},
"maxExtraRunSpeed": "$3.8"
}
},
"requires": [
"canChainTemporaryBlue"
],
"exitCondition": {
"leaveWithTemporaryBlue": {}
},
"unlocksDoors": [
{
"types": [
"ammo"
],
"requires": []
}
],
"flashSuitChecked": true,
"blueSuitChecked": true,
"devNote": [
"Higher speeds could work, up to at least about $4.4, but with greater difficulty."
]
},
{
"id": 18,
"link": [
1,
2
],
"name": "Come in Shinecharging, Leave With Temporary Blue (Spring Ball Bounce)",
"entranceCondition": {
"comeInShinecharging": {
"length": 2,
"openEnd": 0
}
},
"requires": [
"canChainTemporaryBlue",
"canSpringBallBounce",
"canInsaneJump"
],
"exitCondition": {
"leaveWithTemporaryBlue": {}
},
"unlocksDoors": [
{
"types": [
"ammo"
],
"requires": []
}
],
"flashSuitChecked": true,
"blueSuitChecked": true,
"note": [
"Unmorph immediately after exiting the tunnel while still descending, to continue chaining temporary blue.",
"The frame window for the unmorph depends on the alignment of Samus' bounces;",
"in the worst case where Samus bounces upward while exiting, this method will unavoidably fail."
],
"devNote": [
"FIXME: The canInsaneJump is for difficulty placement for the unmorph while exiting the tunnel;",
"it may be better to introduce a specific tech for this?",
"Doing a 'canPauseRemorphTemporaryBlue' is technically an alternative, but it seems to be significantly harder."
]
},
{
"id": 23,
"link": [
1,
2
],
"name": "G-Mode Morph with Blue Suit",
"entranceCondition": {
"comeInWithGMode": {
"mode": "any",
"morphed": true
}
},
"requires": [
"h_blueSuitGMode"
],
"flashSuitChecked": true,
"blueSuitChecked": true
},
{
"id": 5,
"link": [
2,
1
],
"name": "Base",
"requires": [
"h_bombThings"
],
"flashSuitChecked": true,
"blueSuitChecked": true
},
{
"id": 6,
"link": [
2,
1
],
"name": "Speedball",
"entranceCondition": {
"comeInSpeedballing": {
"runway": {
"length": 3,
"openEnd": 0
}
}
},
"requires": [],
"flashSuitChecked": true,
"blueSuitChecked": true
},
{
"id": 19,
"link": [
2,
1
],
"name": "Come in Speedballing, Leave With Temporary Blue",
"entranceCondition": {
"comeInSpeedballing": {
"runway": {
"length": 3,
"openEnd": 0
},
"maxExtraRunSpeed": "$3.8"
}
},
"requires": [
"canChainTemporaryBlue"
],
"exitCondition": {
"leaveWithTemporaryBlue": {}
},
"unlocksDoors": [
{
"types": [
"ammo"
],
"requires": []
}
],
"flashSuitChecked": true,
"blueSuitChecked": true,
"devNote": [
"Higher speeds could work, up to at least about $4.4, but with greater difficulty."
]
},
{
"id": 7,
"link": [
2,
1
],
"name": "Temporary Blue Bounce (Come in Shinecharging)",
"entranceCondition": {
"comeInShinecharging": {
"length": 2,
"openEnd": 0
}
},
"requires": [
"canTemporaryBlue",
"canSpringBallBounce"
],
"flashSuitChecked": true,
"blueSuitChecked": true,
"devNote": "There is 1 unusable tile in this runway."
},
{
"id": 8,
"link": [
2,
1
],
"name": "Temporary Blue Bounce (Come in With Blue Spring Ball Bounce)",
"entranceCondition": {
"comeInWithBlueSpringBallBounce": {
"movementType": "controlled"
}
},
"requires": [
"canInsaneJump"
],
"flashSuitChecked": true,
"blueSuitChecked": true
},
{
"id": 9,
"link": [
2,
1
],
"name": "Temporary Blue Bounce (Come in With Temporary Blue)",
"entranceCondition": {
"comeInWithTemporaryBlue": {}
},
"requires": [
"canChainTemporaryBlue",
"canSpringBallBounce"
],
"flashSuitChecked": true,
"blueSuitChecked": true
},
{
"id": 20,
"link": [
2,
1
],
"name": "Come in Shinecharging, Leave With Temporary Blue (Spring Ball Bounce)",
"entranceCondition": {
"comeInShinecharging": {
"length": 2,
"openEnd": 0
}
},
"requires": [
"canChainTemporaryBlue",
"canSpringBallBounce",
"canInsaneJump"
],
"exitCondition": {
"leaveWithTemporaryBlue": {}
},
"unlocksDoors": [
{
"types": [
"ammo"
],
"requires": []
}
],
"flashSuitChecked": true,
"blueSuitChecked": true,
"note": [
"Unmorph immediately after exiting the tunnel while still descending, to continue chaining temporary blue.",
"The frame window for the unmorph depends on the alignment of Samus' bounces;",
"in the worst case where Samus bounces upward while exiting, this method will unavoidably fail."
],
"devNote": [
"FIXME: The canInsaneJump is for difficulty placement for the unmorph while exiting the tunnel;",
"it may be better to introduce a specific tech for this?",
"Doing a 'canPauseRemorphTemporaryBlue' is technically an alternative, but it seems to be significantly harder."
]
},
{
"id": 24,
"link": [
2,
1
],
"name": "Blue Suit",
"requires": [
{
"haveBlueSuit": {}
},
"Morph"
],
"flashSuitChecked": true,
"blueSuitChecked": true
},
{
"id": 10,
"link": [
2,
1
],
"name": "G-Mode Morph with Bombs",
"entranceCondition": {
"comeInWithGMode": {
"mode": "any",
"morphed": true
}
},
"requires": [
"h_artificialMorphBombs"
],
"flashSuitChecked": true,
"blueSuitChecked": true,
"note": "Repeatedly bomb the crumble blocks until the PLMs are overloaded."
},
{
"id": 25,
"link": [
2,
1
],
"name": "G-Mode Morph with Blue Suit",
"entranceCondition": {
"comeInWithGMode": {
"mode": "any",
"morphed": true
}
},
"requires": [
"h_blueSuitGMode"
],
"flashSuitChecked": true,
"blueSuitChecked": true
},
{
"id": 11,
"link": [
2,
1
],
"name": "Grapple Teleport",
"entranceCondition": {
"comeInWithGrappleTeleport": {
"blockPositions": [
[
5,
3
],
[
7,
2
]
]
}
},
"requires": [],
"flashSuitChecked": true,
"blueSuitChecked": true
},
{
"id": 21,
"link": [
2,
1
],
"name": "Grapple Teleport Door Escape",
"entranceCondition": {
"comeInWithGrappleTeleport": {
"blockPositions": [
[
3,
12
],
[
3,
13
]
]
}
},
"requires": [
{
  "or": [
    "canGrappleTeleportWallEscape",
    {
      "doorUnlockedAtNode": 1
    }
  ]
}
],
"unlocksDoors": [
{
"types": [
"ammo"
],
"requires": []
}
],
"flashSuitChecked": true,
"blueSuitChecked": true
},
{
"id": 12,
"link": [
2,
1
],
"name": "Grapple Teleport Door Lock Skip",
"entranceCondition": {
"comeInWithGrappleTeleport": {
"blockPositions": [
[
3,
12
],
[
3,
13
]
]
}
},
"requires": [],
"bypassesDoorShell": "yes",
"flashSuitChecked": true,
"blueSuitChecked": true
},
{
"id": 13,
"link": [
2,
1
],
"name": "Carry Grapple Teleport (Top Position)",
"entranceCondition": {
"comeInWithGrappleTeleport": {
"blockPositions": [
[
3,
12
]
]
}
},
"requires": [],
"exitCondition": {
"leaveWithGrappleTeleport": {
"blockPositions": [
[
3,
12
]
]
}
},
"bypassesDoorShell": "yes",
"flashSuitChecked": true,
"blueSuitChecked": true
},
{
"id": 14,
"link": [
2,
1
],
"name": "Carry Grapple Teleport (Bottom Position)",
"entranceCondition": {
"comeInWithGrappleTeleport": {
"blockPositions": [
[
3,
13
]
]
}
},
"requires": [],
"exitCondition": {
"leaveWithGrappleTeleport": {
"blockPositions": [
[
3,
13
]
]
}
},
"bypassesDoorShell": "yes",
"flashSuitChecked": true,
"blueSuitChecked": true
},
{
"id": 15,
"link": [
2,
2
],
"name": "Leave with Runway",
"requires": [],
"exitCondition": {
"leaveWithRunway": {
"length": 4,
"openEnd": 0
}
},
"flashSuitChecked": true,
"blueSuitChecked": true
},
{
"id": 16,
"link": [
2,
2
],
"name": "Crystal Flash",
"requires": [
"h_CrystalFlash"
],
"flashSuitChecked": true,
"blueSuitChecked": true
},
{
"id": 26,
"link": [
2,
2
],
"name": "Come in Shinecharging, Crystal Spark",
"entranceCondition": {
"comeInShinecharging": {
"length": 3,
"openEnd": 0
},
"comesInHeated": "no"
},
"requires": [
"h_CrystalSpark"
],
"flashSuitChecked": true,
"blueSuitChecked": true
}
],
"notables": [],
"nextStratId": 27,
"nextNotableId": 2
}