Fish Tank: Side Platform Cross Room Jump
Room ID: 173
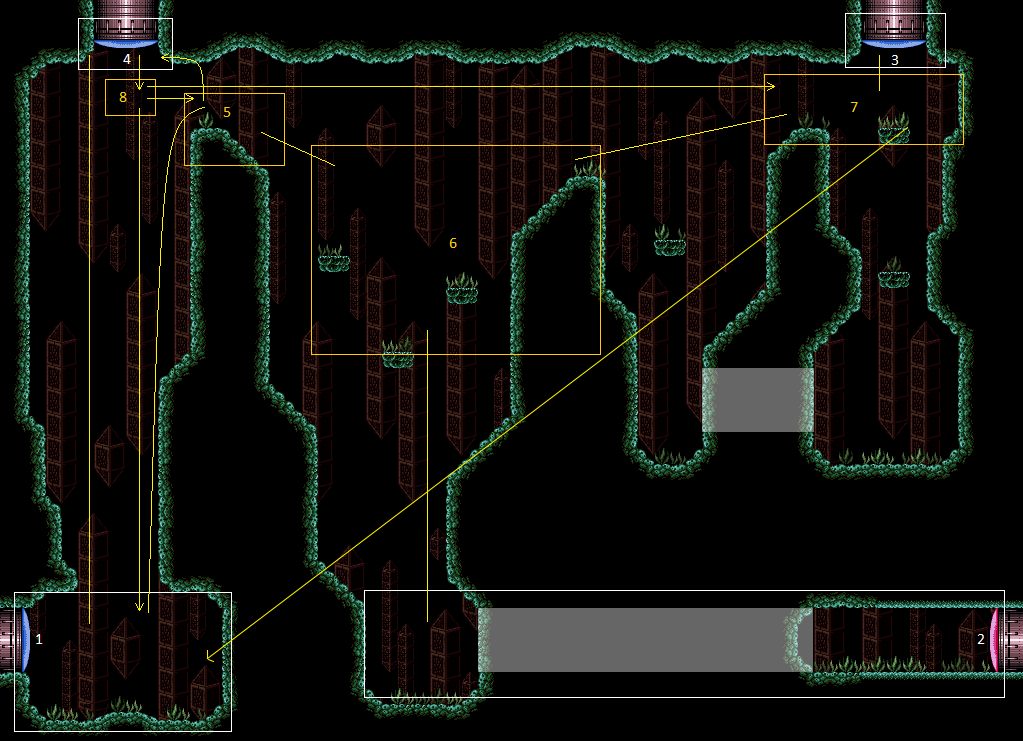
From: 1
Bottom Left Door
To: 5
Platform Junction Near Top Left Door
Entrance condition: {
"comeInWithSidePlatform": {
"platforms": [
{
"minHeight": 1,
"maxHeight": 1,
"minTiles": 8.4375,
"speedBooster": "yes",
"obstructions": [
[
1,
0
]
],
"requires": [
"HiJump",
"canMomentumConservingTurnaround"
],
"note": [
"This applies to Warehouse Entrance."
]
},
{
"minHeight": 2,
"maxHeight": 2,
"minTiles": 8,
"speedBooster": "yes",
"obstructions": [
[
1,
0
]
],
"requires": [
"HiJump",
"canMomentumConservingTurnaround"
],
"note": [
"This applies to Ridley Tank Room and Dust Torizo Room."
]
},
{
"minHeight": 3,
"maxHeight": 3,
"minTiles": 9,
"speedBooster": "yes",
"obstructions": [
[
1,
0
]
],
"requires": [
"HiJump",
"canMomentumConservingTurnaround"
],
"note": [
"This applies to Big Boy Room and Mickey Mouse Room."
]
},
{
"minHeight": 2,
"maxHeight": 2,
"minTiles": 27.4375,
"speedBooster": "yes",
"obstructions": [
[
1,
0
]
],
"requires": [
"canMomentumConservingTurnaround"
],
"note": [
"This applies to Dust Torizo Room."
],
"devNote": [
"The jump could also be done with a shorter runway, with a tricky dash jump using run speed $4.0 or $4.1.",
"But it wouldn't apply to any more rooms in the game."
]
},
{
"minHeight": 3,
"maxHeight": 3,
"minTiles": 39.4375,
"speedBooster": "yes",
"obstructions": [
[
3,
2
]
],
"requires": [
"canTrickyJump"
],
"note": [
"This applies to Metal Pirates Room."
]
},
{
"minHeight": 2,
"maxHeight": 2,
"minTiles": 23,
"speedBooster": "yes",
"obstructions": [
[
3,
0
]
],
"requires": [
"HiJump",
"canMomentumConservingMorph",
"canInsaneJump",
"canInsaneMidAirMorph"
],
"note": [
"This applies to Metroid Room 1.",
"In the previous room, perform a last-frame jump,",
"then morph on the last possible frame before bonking the ceiling.",
"After the transition, unmorph within the first 2 frames, to conserve upward momentum."
]
},
{
"minHeight": 2,
"maxHeight": 2,
"minTiles": 45,
"speedBooster": "yes",
"obstructions": [
[
3,
0
]
],
"requires": [
"canInsaneJump",
{
"or": [
"canMomentumConservingMorph",
{
"and": [
"canMomentumConservingTurnaround",
"canBeVeryPatient"
]
}
]
}
],
"note": [
"This applies to Statues Hallway.",
"This can be done in two ways:",
"1) If Morph is available, perform a momentum-conserving morph through the transition,",
"then unmorph as soon as possible after the transition.",
"2) Alternatively, do an extremely precise momentum-conserving turnaround through the transition."
],
"devNote": [
"The momentum-conserving turnaround is double frame-perfect,",
"requiring a last-frame jump and frame-perfect turnaround just before Samus would bonk the ceiling."
]
},
{
"minHeight": 3,
"maxHeight": 3,
"minTiles": 37.4375,
"speedBooster": "yes",
"obstructions": [
[
3,
0
]
],
"requires": [
"canMomentumConservingMorph"
],
"note": [
"This applies to Flyway."
]
},
{
"minHeight": 2,
"maxHeight": 2,
"minTiles": 45,
"speedBooster": "yes",
"obstructions": [
[
4,
0
]
],
"requires": [
"canMomentumConservingMorph",
"canInsaneJump",
"canInsaneMidAirMorph"
],
"note": [
"This applies to Baby Kraid Room.",
"In the previous room, there is a 2-frame window for the jump, just before Samus would hit the door ledge,",
"then a 1-frame or 2-frame window (depending on the jump) for the morph, just before Samus would bonk the ceiling.",
"After the transition, unmorph within the first 2 frames, to conserve upward momentum;",
"if Samus got the later frame for the morph (where the animation does not show as fully morphed in the previous room),",
"then there will only be 1 frame to unmorph."
]
}
]
}
}Requires: "canCrossRoomJumpIntoWater" |