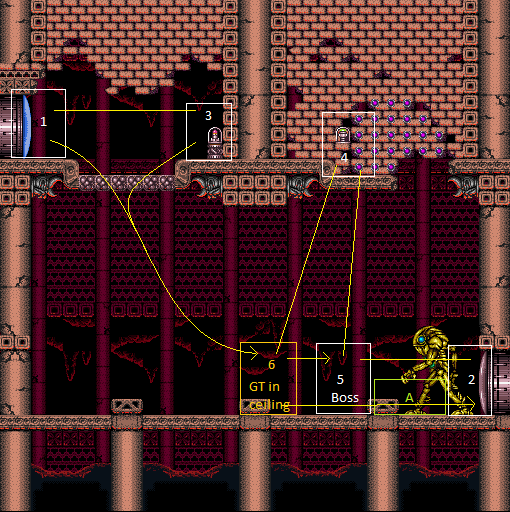
Golden Torizo's Room: G-Mode, Through the Crumble Blocks
Room ID: 150
From: 7
G-Mode Junction (Bottom of Room)
To: 4
Hidden Right Item
Use the camera scroll blocks below the crumble blocks to overload PLMs and go through the bomb blocks near the right item. A good jumping through them a single time is enough to overload PLMs. This can be done while dodging GT. With a speedy jump, it is possible to overload PLMs and run back to GT before it stands up, get into the safe spot location to get him to jump back, and use the runway again. With shinesparks, diagonally spark into the crumble blocks and hold forward three times, to overload PLMs as much as possible. Note that when GT attacks, it will place stationary invisible projectiles, so it is much more difficult if not getting up quickly. Place a Power Bomb then quickly exit G-mode to quickly clear all of the bomb blocks, otherwise it is possible to get out with a few Bombs or Screw Attack. Requires: "h_heatedGMode"
{
"or": [
{
"or": [
"f_DefeatedGoldenTorizo",
{
"obstaclesCleared": [
"f_DefeatedGoldenTorizo"
]
}
]
},
"canTrickyDodgeEnemies"
]
}
{
"or": [
"SpaceJump",
{
"and": [
"HiJump",
{
"or": [
"canWallJump",
"canSpringBallJumpMidAir",
"canSpeedyJump"
]
}
]
},
{
"and": [
"canSpringBallJumpMidAir",
"canSpeedyJump",
{
"or": [
{
"or": [
"f_DefeatedGoldenTorizo",
{
"obstaclesCleared": [
"f_DefeatedGoldenTorizo"
]
}
]
},
"canInsaneJump"
]
}
]
},
{
"and": [
{
"or": [
"f_DefeatedGoldenTorizo",
{
"obstaclesCleared": [
"f_DefeatedGoldenTorizo"
]
}
]
},
"canTrickyDashJump",
"canWallJump"
]
},
{
"and": [
{
"or": [
"f_DefeatedGoldenTorizo",
{
"obstaclesCleared": [
"f_DefeatedGoldenTorizo"
]
}
]
},
"canPreciseWallJump"
]
},
{
"and": [
{
"or": [
"f_DefeatedGoldenTorizo",
{
"obstaclesCleared": [
"f_DefeatedGoldenTorizo"
]
}
]
},
{
"canShineCharge": {
"usedTiles": 28,
"openEnd": 0
}
},
{
"or": [
{
"and": [
"canSpeedyJump",
{
"shinespark": {
"frames": 7,
"excessFrames": 4
}
}
]
},
{
"shinespark": {
"frames": 30,
"excessFrames": 4
}
}
]
}
]
}
]
}
{
"or": [
{
"and": [
"h_usePowerBomb",
{
"heatFrames": 70
}
]
},
{
"and": [
"h_useMorphBombs",
{
"heatFrames": 250
}
]
},
{
"and": [
"ScrewAttack",
{
"heatFrames": 50
}
]
}
]
} |