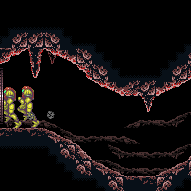
Cosine Room
Room ID: 126

|

Exit condition: {
"leaveWithRunway": {
"length": 34,
"openEnd": 0,
"gentleUpTiles": 8,
"gentleDownTiles": 8,
"steepUpTiles": 2,
"steepDownTiles": 2
}
} |
|
Requires: "h_shinechargeMaxRunway"
{
"or": [
{
"and": [
"h_enemyDrops",
"h_CrystalSparkWithoutLenience"
]
},
"h_CrystalSpark"
]
}Dev note: No lenience, because Power Bombs can be farmed from the Gamets. |
|


Lure the Gamets while preventing them from going off camera. Spawn them when the acid is high and rising to avoid running through it. Requires: "Morph"
{
"or": [
{
"noBlueSuit": {}
},
"Ice",
"canTrickyGMode"
]
}Exit condition: {
"leaveWithGModeSetup": {}
} |
|


Requires: {
"canShineCharge": {
"usedTiles": 33,
"gentleUpTiles": 8,
"gentleDownTiles": 8,
"steepUpTiles": 2,
"steepDownTiles": 2,
"openEnd": 0
}
}
{
"spikeHits": 1
}
"canSpikeSuit"
{
"shinespark": {
"frames": 3,
"excessFrames": 3
}
}Dev note: Leniency is not included, because a farm is available. |
|
Requires: {
"resetRoom": {
"nodes": [
1
]
}
}
{
"noBlueSuit": {}
}
"ScrewAttack"
{
"cycleFrames": 255
}Farm cycle drops: 2 Metaree |
|

Wait for the acid to lower then quickly roll part way forward to trigger the Metarees and return. Then go again without any difficulty. Killing any of the Gamets will prevent them from respawning. With Bombs, horizontally boost then IBJ above the acid while waiting for it. It is possible with Spring Ball alone, but it is easy to take damage; perform small jumps but hold jump before landing to prevent a small bounce in which Samus can't jump. On the return route, jump over the Gamets to let them pass instead of racing to get them off screen. Entrance condition: {
"comeInWithGMode": {
"mode": "direct",
"morphed": true
}
}Requires: "canComplexGMode"
"canRemoteAcquire"
{
"or": [
{
"and": [
"h_artificialMorphIBJ",
{
"or": [
"canInsaneJump",
{
"acidFrames": 106
}
]
}
]
},
{
"and": [
"h_artificialMorphSpringBall",
{
"or": [
"h_artificialMorphBombThings",
"canTrickyJump"
]
}
]
}
]
}Collects items: 2 Dev note: The requirements here are to get the item and return, as the item cannot be used during the return. |
From: 1
Left Door
To: 1
Left Door

Wait for the acid to lower then quickly roll part way forward to trigger the Metarees and return. Then go again without any difficulty. With Power Bombs alone is particularly challenging. Use a Power Bomb to kill the Gamets to prevent them from respawning. Place a bomb at the edge of the runway then hold forward with precise timing to get a boost to skip the first and land on the next safe platform. As quickly as possible place another and let it boost horizontally to the next platform, then another to get to the item. With high movement precision, it is recommended to start a bit away from the edge (fully on the runway), giving a 3-frame window, or to start on the last pixel of the runway, giving a 4 frame window plus an extra non-consecutive frame. With slightly less precision, it may be worth starting as close to the edge as possible without falling off, as there are typically 4 non-consecutive frames that work (consisting of approximately alternating frames in a 6-frame window). Rolling into the bomb with momentum is not recommended and gives only a 2-frame window. Entrance condition: {
"comeInWithGMode": {
"mode": "direct",
"morphed": true
}
}Requires: "canRemoteAcquire"
"canTrickyGMode"
"h_artificialMorphBombHorizontally"
{
"ammo": {
"type": "PowerBomb",
"count": 6
}
}Collects items: 2 Dev note: The requirements here are to get the item and return, as the item cannot be used during the return. It appears that there is virtually no risk in overloading PLMs - the left runway isn't close enough, and even placing two on each pillar will not overload PLMs. FIXME: Getting extra horizontal distance from the bomb needs a tech. |
|
Requires: "Morph" |
|

Wait for the acid to lower then quickly roll part way forward to trigger the Metarees and return. Then go again without any difficulty. Entrance condition: {
"comeInWithGMode": {
"mode": "any",
"morphed": true
}
}Dev note: This is only useful if the item is Morph. |
|


Fill up on Gamets. Wait for the acid low tide to shinecharge, then morph through and use a Gamet to interrupt. Entrance condition: {
"comeInWithRMode": {}
}Requires: {
"refill": [
"Energy"
]
}
"Morph"
{
"canShineCharge": {
"usedTiles": 33,
"gentleUpTiles": 8,
"gentleDownTiles": 8,
"steepUpTiles": 2,
"steepDownTiles": 2,
"openEnd": 0
}
}
{
"autoReserveTrigger": {}
}
"canRModeSparkInterrupt" |
|
Requires: "Morph" |
|
Requires: {
"or": [
{
"and": [
{
"simpleCycleFrames": 140
},
{
"cycleFrames": 20
}
]
},
{
"and": [
"canFarmWhileShooting",
"canUseGrapple",
{
"simpleCycleFrames": 100
},
{
"cycleFrames": 35
}
]
}
]
}Farm cycle drops: 5 Gamet |
{
"$schema": "../../../schema/m3-room.schema.json",
"id": 126,
"name": "Cosine Room",
"area": "Norfair",
"subarea": "Upper",
"subsubarea": "Crocomire",
"roomAddress": "0x7AB3B",
"roomEnvironments": [
{
"heated": false
}
],
"mapTileMask": [
[
1,
1,
1,
1
]
],
"nodes": [
{
"id": 1,
"name": "Left Door",
"nodeType": "door",
"nodeSubType": "blue",
"nodeAddress": "0x00194aa",
"doorOrientation": "left",
"doorEnvironments": [
{
"physics": "air"
}
],
"mapTileMask": [
[
2,
2,
1,
1
]
]
},
{
"id": 2,
"name": "Item",
"nodeType": "item",
"nodeSubType": "visible",
"nodeItem": "Missile",
"nodeAddress": "0x78C14",
"mapTileMask": [
[
1,
1,
2,
2
]
],
"locks": [
{
"name": "Dummy Item Lock",
"lockType": "gameFlag",
"unlockStrats": [
{
"name": "Base (Collect Item)",
"notable": false,
"requires": [],
"flashSuitChecked": true,
"blueSuitChecked": true
}
]
}
]
}
],
"obstacles": [],
"enemies": [
{
"id": "e1",
"groupName": "Cosine Room Metarees",
"enemyName": "Metaree",
"quantity": 2,
"homeNodes": [
1
]
},
{
"id": "e2",
"groupName": "Cosine Room Gamets",
"enemyName": "Gamet",
"quantity": 5,
"homeNodes": [
2
]
}
],
"strats": [
{
"link": [
1,
1
],
"name": "Base (Unlock Door)",
"requires": [],
"unlocksDoors": [
{
"types": [
"ammo"
],
"requires": []
}
],
"flashSuitChecked": true,
"blueSuitChecked": true
},
{
"link": [
1,
1
],
"name": "Base (Come In Normally)",
"entranceCondition": {
"comeInNormally": {}
},
"requires": [],
"flashSuitChecked": true,
"blueSuitChecked": true
},
{
"link": [
1,
1
],
"name": "Base (Come In With Mockball)",
"entranceCondition": {
"comeInWithMockball": {
"adjacentMinTiles": 0,
"remoteAndLandingMinTiles": [
[
0,
0
]
],
"speedBooster": "any"
}
},
"requires": [],
"flashSuitChecked": true,
"blueSuitChecked": true
},
{
"name": "Base (Collect Item)",
"notable": false,
"requires": [],
"flashSuitChecked": true,
"blueSuitChecked": true,
"link": [
2,
2
],
"collectsItems": [
2
]
},
{
"id": 1,
"link": [
1,
1
],
"name": "Leave with Runway",
"requires": [],
"exitCondition": {
"leaveWithRunway": {
"length": 34,
"openEnd": 0,
"gentleUpTiles": 8,
"gentleDownTiles": 8,
"steepUpTiles": 2,
"steepDownTiles": 2
}
},
"flashSuitChecked": true,
"blueSuitChecked": true
},
{
"id": 13,
"link": [
1,
1
],
"name": "Crystal Spark",
"requires": [
"h_shinechargeMaxRunway",
{
"or": [
{
"and": [
"h_enemyDrops",
"h_CrystalSparkWithoutLenience"
]
},
"h_CrystalSpark"
]
}
],
"flashSuitChecked": true,
"blueSuitChecked": true,
"devNote": [
"No lenience, because Power Bombs can be farmed from the Gamets."
]
},
{
"id": 2,
"link": [
1,
1
],
"name": "G-Mode Setup - Get Hit By Gamet",
"requires": [
"Morph",
{
"or": [
{
"noBlueSuit": {}
},
"Ice",
"canTrickyGMode"
]
}
],
"exitCondition": {
"leaveWithGModeSetup": {}
},
"flashSuitChecked": true,
"blueSuitChecked": true,
"note": [
"Lure the Gamets while preventing them from going off camera.",
"Spawn them when the acid is high and rising to avoid running through it."
]
},
{
"id": 9,
"link": [
1,
1
],
"name": "Gain Flash Suit (Spikesuit)",
"requires": [
{
"canShineCharge": {
"usedTiles": 33,
"gentleUpTiles": 8,
"gentleDownTiles": 8,
"steepUpTiles": 2,
"steepDownTiles": 2,
"openEnd": 0
}
},
{
"spikeHits": 1
},
"canSpikeSuit",
{
"shinespark": {
"frames": 3,
"excessFrames": 3
}
}
],
"flashSuitChecked": true,
"blueSuitChecked": true,
"devNote": [
"Leniency is not included, because a farm is available."
]
},
{
"id": 11,
"link": [
1,
1
],
"name": "Metaree Farm",
"requires": [
{
"resetRoom": {
"nodes": [
1
]
}
},
{
"noBlueSuit": {}
},
"ScrewAttack",
{
"cycleFrames": 255
}
],
"farmCycleDrops": [
{
"enemy": "Metaree",
"count": 2
}
],
"flashSuitChecked": true,
"blueSuitChecked": true
},
{
"id": 5,
"link": [
1,
1
],
"name": "G-Mode Morph Remote Acquire",
"entranceCondition": {
"comeInWithGMode": {
"mode": "direct",
"morphed": true
}
},
"requires": [
"canComplexGMode",
"canRemoteAcquire",
{
"or": [
{
"and": [
"h_artificialMorphIBJ",
{
"or": [
"canInsaneJump",
{
"acidFrames": 106
}
]
}
]
},
{
"and": [
"h_artificialMorphSpringBall",
{
"or": [
"h_artificialMorphBombThings",
"canTrickyJump"
]
}
]
}
]
}
],
"collectsItems": [
2
],
"flashSuitChecked": true,
"blueSuitChecked": true,
"note": [
"Wait for the acid to lower then quickly roll part way forward to trigger the Metarees and return. Then go again without any difficulty.",
"Killing any of the Gamets will prevent them from respawning.",
"With Bombs, horizontally boost then IBJ above the acid while waiting for it.",
"It is possible with Spring Ball alone, but it is easy to take damage; perform small jumps but hold jump before landing to prevent a small bounce in which Samus can't jump.",
"On the return route, jump over the Gamets to let them pass instead of racing to get them off screen."
],
"devNote": "The requirements here are to get the item and return, as the item cannot be used during the return."
},
{
"id": 10,
"link": [
1,
1
],
"name": "G-Mode Morph Remote Acquire, Power Bomb Boosts",
"entranceCondition": {
"comeInWithGMode": {
"mode": "direct",
"morphed": true
}
},
"requires": [
"canRemoteAcquire",
"canTrickyGMode",
"h_artificialMorphBombHorizontally",
{
"ammo": {
"type": "PowerBomb",
"count": 6
}
}
],
"collectsItems": [
2
],
"flashSuitChecked": true,
"blueSuitChecked": true,
"note": [
"Wait for the acid to lower then quickly roll part way forward to trigger the Metarees and return. Then go again without any difficulty.",
"With Power Bombs alone is particularly challenging. Use a Power Bomb to kill the Gamets to prevent them from respawning.",
"Place a bomb at the edge of the runway then hold forward with precise timing to get a boost to skip the first and land on the next safe platform.",
"As quickly as possible place another and let it boost horizontally to the next platform, then another to get to the item."
],
"detailNote": [
"With high movement precision, it is recommended to start a bit away from the edge (fully on the runway), giving a 3-frame window, or to start on the last pixel of the runway, giving a 4 frame window plus an extra non-consecutive frame.",
"With slightly less precision, it may be worth starting as close to the edge as possible without falling off, as there are typically 4 non-consecutive frames that work (consisting of approximately alternating frames in a 6-frame window).",
"Rolling into the bomb with momentum is not recommended and gives only a 2-frame window."
],
"devNote": [
"The requirements here are to get the item and return, as the item cannot be used during the return.",
"It appears that there is virtually no risk in overloading PLMs - the left runway isn't close enough, and even placing two on each pillar will not overload PLMs.",
"FIXME: Getting extra horizontal distance from the bomb needs a tech."
]
},
{
"id": 3,
"link": [
1,
2
],
"name": "Base",
"requires": [
"Morph"
],
"flashSuitChecked": true,
"blueSuitChecked": true
},
{
"id": 4,
"link": [
1,
2
],
"name": "G-Mode Morph",
"entranceCondition": {
"comeInWithGMode": {
"mode": "any",
"morphed": true
}
},
"requires": [],
"flashSuitChecked": true,
"blueSuitChecked": true,
"note": "Wait for the acid to lower then quickly roll part way forward to trigger the Metarees and return. Then go again without any difficulty.",
"devNote": "This is only useful if the item is Morph."
},
{
"id": 12,
"link": [
1,
2
],
"name": "R-Mode Spark Interrupt",
"entranceCondition": {
"comeInWithRMode": {}
},
"requires": [
{
"refill": [
"Energy"
]
},
"Morph",
{
"canShineCharge": {
"usedTiles": 33,
"gentleUpTiles": 8,
"gentleDownTiles": 8,
"steepUpTiles": 2,
"steepDownTiles": 2,
"openEnd": 0
}
},
{
"autoReserveTrigger": {}
},
"canRModeSparkInterrupt"
],
"flashSuitChecked": true,
"blueSuitChecked": true,
"note": [
"Fill up on Gamets. Wait for the acid low tide to shinecharge, then morph through and use a Gamet to interrupt."
]
},
{
"id": 6,
"link": [
2,
1
],
"name": "Base",
"requires": [
"Morph"
],
"flashSuitChecked": true,
"blueSuitChecked": true
},
{
"id": 8,
"link": [
2,
2
],
"name": "Gamet Farm",
"requires": [
{
  "or": [
    {
      "and": [
        {
          "simpleCycleFrames": 140
        },
        {
          "cycleFrames": 20
        }
      ]
    },
    {
      "and": [
        "canFarmWhileShooting",
        "canUseGrapple",
        {
          "simpleCycleFrames": 100
        },
        {
          "cycleFrames": 35
        }
      ]
    }
  ]
}
],
"farmCycleDrops": [
{
"enemy": "Gamet",
"count": 5
}
],
"flashSuitChecked": true,
"blueSuitChecked": true
}
],
"notables": [],
"nextStratId": 14,
"nextNotableId": 1
}