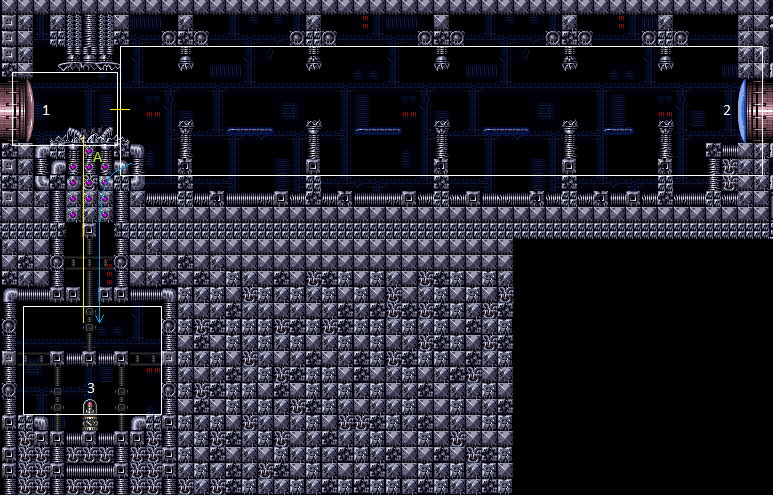
Pit Room
Room ID: 12
|
Requires: {
"obstaclesNotCleared": [
"A"
]
}Exit condition: {
"leaveWithRunway": {
"length": 8,
"openEnd": 1
}
} |
|
Exit condition: {
"leaveWithRunway": {
"length": 4,
"openEnd": 1
}
} |
|
Requires: "h_CrystalFlash" Clears obstacles: A |
|
Entrance condition: {
"comeInShinecharging": {
"length": 7,
"openEnd": 0
},
"comesInHeated": "no"
}Requires: "h_CrystalSpark" |
|
|
From: 1
Left Door
To: 2
Right Door


Entrance condition: {
"comeInShinecharging": {
"length": 7,
"openEnd": 0
}
}Requires: "canLongChainTemporaryBlue" "canInsaneJump" Exit condition: {
"leaveWithTemporaryBlue": {}
}Unlocks doors: {"types":["ammo"],"requires":[]} |
|
Requires: {
"or": [
"h_destroyBombWalls",
{
"obstaclesCleared": [
"A"
]
}
]
}Clears obstacles: A |
|
Requires: {
"haveBlueSuit": {}
}Clears obstacles: A |
|
Breaking the side blocks can be done with a shinespark, or by moving into them once past the solid blocks. Entrance condition: {
"comeInShinecharging": {
"length": 3,
"openEnd": 1
}
}Requires: "canTemporaryBlue" Clears obstacles: A |
|
Breaking the side blocks can be done by moving into them once past the solid blocks. Entrance condition: {
"comeInShinecharging": {
"length": 7,
"openEnd": 0
}
}Requires: "canChainTemporaryBlue" "canXRayTurnaround" Clears obstacles: A |
|

Entrance condition: {
"comeInWithTemporaryBlue": {}
}Requires: "canChainTemporaryBlue" Clears obstacles: A |
|


Overload PLMs using the scroll block directly above the bomb block leading down to the item. Carefully land on the solid block and avoid falling further. Use a Bomb to boost Samus, then on the descent place one in the air, one on the ground, and quickly use X-Ray before they explode to exit G-mode and break the blocks. Entrance condition: {
"comeInWithGMode": {
"mode": "any",
"morphed": true
}
}Requires: "canComplexGMode" "h_artificialMorphBombs" "canTrickyJump" Clears obstacles: A |
|
Lay a Power Bomb to break the bomb blocks leading down to the item, then use X-ray to cancel G-mode, to clear the blocks. Entrance condition: {
"comeInWithGMode": {
"mode": "any",
"morphed": true
}
}Requires: "h_artificialMorphPowerBomb" Clears obstacles: A |
|
Overload PLMs using the scroll block directly above the bomb block leading down to the item. Using X-Ray to cancel G-mode will lead to a soft lock if the item there can't be used to get Samus out. Entrance condition: {
"comeInWithGMode": {
"mode": "any",
"morphed": false
}
} |
|
|
From: 2
Right Door
To: 1
Left Door

Entrance condition: {
"comeInShinecharging": {
"length": 2,
"openEnd": 0
}
}Requires: "canLongChainTemporaryBlue" "canInsaneJump" Exit condition: {
"leaveWithTemporaryBlue": {}
}Unlocks doors: {"types":["ammo"],"requires":[]} |
|


Entrance condition: {
"comeInWithGrappleTeleport": {
"blockPositions": [
[
3,
12
],
[
3,
13
]
]
}
}Bypasses door shell: true |
|
Entrance condition: {
"comeInWithGrappleTeleport": {
"blockPositions": [
[
3,
12
]
]
}
}Exit condition: {
"leaveWithGrappleTeleport": {
"blockPositions": [
[
3,
12
]
]
}
}Bypasses door shell: true |
|
Entrance condition: {
"comeInWithGrappleTeleport": {
"blockPositions": [
[
3,
13
]
]
}
}Exit condition: {
"leaveWithGrappleTeleport": {
"blockPositions": [
[
3,
13
]
]
}
}Bypasses door shell: true |
|
Exit condition: {
"leaveWithRunway": {
"length": 3,
"openEnd": 1
}
} |
|
Requires: "Morph"
"Missile"
{
"resetRoom": {
"nodes": [
1
]
}
}
{
"resetRoom": {
"nodes": [
2
]
}
}
{
"cycleFrames": 930
}
{
"or": [
"canDash",
{
"cycleFrames": 270
}
]
}Resets obstacles: A Farm cycle drops: 8 Grey Space Pirate (standing), 2 Grey Space Pirate (wall) |
|
This strat is slower but only requires one of the two doors to be unlocked. Requires: "Morph"
"Missile"
{
"or": [
{
"resetRoom": {
"nodes": [
1
]
}
},
{
"resetRoom": {
"nodes": [
2
]
}
}
]
}
{
"cycleFrames": 930
}
{
"or": [
"canDash",
{
"cycleFrames": 160
}
]
}Resets obstacles: A Farm cycle drops: 4 Grey Space Pirate (standing), 1 Grey Space Pirate (wall) |
|
The enemies do not spawn in this room unless Missiles and Morph are collected (even if Zebes is awake). Requires: {
"enemyDamage": {
"enemy": "Grey Space Pirate (wall)",
"type": "contact",
"hits": 1
}
}
"Missile"
"Morph" |
|
Bring temporary blue from the right side door all the way to the missile location using Springball, SpaceJump, or Morph-UnMorphs. Entrance condition: {
"comeInShinecharging": {
"length": 1,
"openEnd": 1
}
}Requires: "canTemporaryBlue"
"canInsaneJump"
{
"or": [
"canLongChainTemporaryBlue",
{
"and": [
"canSpeedball",
"canSpringBallBounce",
"canSlowShortCharge"
]
},
{
"and": [
"canBlueSpaceJump",
"canMockball",
"canSlowShortCharge"
]
}
]
}Clears obstacles: A Dev note: There is 1 unusable tile in this runway. |
From: 2
Right Door
To: 3
Item
Entrance condition: {
"comeInWithTemporaryBlue": {}
}Requires: "canLongChainTemporaryBlue" "canInsaneJump" Clears obstacles: A |
|
Be careful not to touch any of the pirates spawned lasers. Overload PLMs using the scroll block directly above the bomb block leading down to the item. Using X-Ray to cancel G-mode will lead to a soft lock if the item there can't be used to get Samus out. Entrance condition: {
"comeInWithGMode": {
"mode": "any",
"morphed": false
}
} |
|
Without Morph, the pirates will not spawn. Overload PLMs using the scroll block directly above the bomb block leading down to the item. Carefully land on the solid block and avoid falling further. Use a Bomb to boost Samus, then on the descent place one in the air, one on the ground, and quickly use X-Ray before they explode to exit G-mode and break the blocks. Entrance condition: {
"comeInWithGMode": {
"mode": "any",
"morphed": true
}
}Requires: "canComplexGMode" "h_artificialMorphIBJ" "canTrickyJump" Clears obstacles: A |
|

Without Morph, the pirates will not spawn. Use Power Bomb horizontal boosts to move toward the left side of the room in artificial morph. Roll off the third blue platform from the right door and lay a Power Bomb against the left wall to get into range of the bomb blocks. Unmorph and use X-ray to cancel G-mode. It may be best to do this before the PB explodes, in case PLMs are already overloaded. Entrance condition: {
"comeInWithGMode": {
"mode": "any",
"morphed": true
}
}Requires: "h_artificialMorphBombHorizontally"
"h_artificialMorphPowerBomb"
"h_artificialMorphPowerBomb"
"h_artificialMorphPowerBomb"
{
"or": [
"h_artificialMorphPowerBomb",
"canTrickyJump"
]
}Clears obstacles: A |
From: 2
Right Door
To: 3
Item

Without Morph, the pirates will not spawn. While near the bomb blocks, use a Power Bomb and then use X-ray to cancel G-mode, which will clear the blocks. Entrance condition: {
"comeInWithGMode": {
"mode": "any",
"morphed": true
}
}Requires: "h_artificialMorphSpringBall" "h_artificialMorphPowerBomb" Clears obstacles: A |
|
Entrance condition: {
"comeInWithGrappleTeleport": {
"blockPositions": [
[
2,
18
],
[
2,
19
],
[
2,
28
],
[
2,
29
]
]
}
} |
|
Requires: {
"or": [
{
"obstaclesCleared": [
"A"
]
},
"h_destroyBombWalls"
]
} |
|
Requires: {
"haveBlueSuit": {}
}Clears obstacles: A |
{
"$schema": "../../../schema/m3-room.schema.json",
"id": 12,
"name": "Pit Room",
"area": "Crateria",
"subarea": "Central",
"roomAddress": "0x7975C",
"roomEnvironments": [
{
"heated": false
}
],
"mapTileMask": [
[
1,
1,
1
],
[
1,
0,
0
]
],
"nodes": [
{
"id": 1,
"name": "Left Door",
"nodeType": "door",
"nodeSubType": "gray",
"nodeAddress": "0x0018b7a",
"doorOrientation": "left",
"doorEnvironments": [
{
"physics": "air"
}
],
"locks": [
{
"name": "Pit Room Left Gray Lock (to Climb)",
"lockType": "killEnemies",
"unlockStrats": [
{
"name": "Base",
"requires": [
"Missile",
"Morph"
],
"flashSuitChecked": true,
"blueSuitChecked": true,
"note": [
"Entering this room with Morph and any missile capacity (0 current missiles is fine) spawns the enemies in this room and makes both doors gray and unlockable by killing the enemies.",
"Once the enemies actually spawn, they can be killed with just Power Beam.",
"Killing the enemies, which makes the doors start flashing is what causes the flag to be set."
]
}
],
"yields": [
"f_ZebesAwake",
"f_ClearedPitRoom"
],
"note": "Unlike the right door, this is locked from game start. Not just when enterring with Morph and missiles."
}
],
"mapTileMask": [
[
2,
1,
1
],
[
1,
0,
0
]
]
},
{
"id": 2,
"name": "Right Door",
"nodeType": "door",
"nodeSubType": "gray",
"nodeAddress": "0x0018b86",
"doorOrientation": "right",
"doorEnvironments": [
{
"physics": "air"
}
],
"locks": [
{
"name": "Pit Room Right Gray Lock (to Elevator)",
"lockType": "killEnemies",
"lock": [
"Missile",
"Morph"
],
"unlockStrats": [
{
"name": "Base",
"requires": [],
"flashSuitChecked": true,
"blueSuitChecked": true,
"note": "This door is unlocked until having morph and missiles, and then free to open after with just power beam."
}
],
"yields": [
"f_ZebesAwake",
"f_ClearedPitRoom"
]
}
],
"mapTileMask": [
[
1,
2,
2
],
[
1,
0,
0
]
]
},
{
"id": 3,
"name": "Item",
"nodeType": "item",
"nodeSubType": "visible",
"nodeItem": "Missile",
"nodeAddress": "0x783EE",
"locks": [
{
"name": "Mother Brain Missiles Spawn Lock",
"lockType": "gameFlag",
"unlockStrats": [
{
"name": "Base",
"requires": [
{
"or": [
{
"and": [
"Missile",
"Morph",
"canAwakenZebes"
]
},
"h_allItemsSpawned"
]
}
],
"flashSuitChecked": true,
"blueSuitChecked": true,
"note": "Item doesn't spawn unless Samus has Morph and Missiles, even if Zebes is awake.",
"devNote": "canAwakenZebes is included to indicate the knowledge for how to spawn the item, the tech's description discusses this item as well."
}
]
}
],
"mapTileMask": [
[
1,
1,
1
],
[
2,
0,
0
]
]
}
],
"obstacles": [
{
"id": "A",
"name": "Bomb Blocks",
"obstacleType": "inanimate"
}
],
"enemies": [
{
"id": "e1",
"groupName": "Pit Room Left Standing Pirate",
"enemyName": "Grey Space Pirate (standing)",
"quantity": 1,
"homeNodes": [
1
],
"spawn": [
"Missile",
"Morph"
]
},
{
"id": "e2",
"groupName": "Pit Room Right Standing Pirates",
"enemyName": "Grey Space Pirate (standing)",
"quantity": 3,
"homeNodes": [
2
],
"spawn": [
"Missile",
"Morph"
]
},
{
"id": "e3",
"groupName": "Pit Room Wall Pirate",
"enemyName": "Grey Space Pirate (wall)",
"quantity": 1,
"homeNodes": [
2
],
"spawn": [
"Missile",
"Morph"
]
}
],
"strats": [
{
"link": [
1,
1
],
"name": "Base (Unlock Door)",
"requires": [],
"unlocksDoors": [
{
"types": [
"ammo"
],
"requires": []
}
],
"flashSuitChecked": true,
"blueSuitChecked": true
},
{
"link": [
1,
1
],
"name": "Base (Come In Normally)",
"entranceCondition": {
"comeInNormally": {}
},
"requires": [],
"flashSuitChecked": true,
"blueSuitChecked": true
},
{
"link": [
1,
1
],
"name": "Base (Come In With Mockball)",
"entranceCondition": {
"comeInWithMockball": {
"adjacentMinTiles": 0,
"remoteAndLandingMinTiles": [
[
0,
0
]
],
"speedBooster": "any"
}
},
"requires": [],
"flashSuitChecked": true,
"blueSuitChecked": true
},
{
"name": "Base",
"requires": [
"Missile",
"Morph"
],
"flashSuitChecked": true,
"blueSuitChecked": true,
"note": [
"Entering this room with Morph and any missile capacity (0 current missiles is fine) spawns the enemies in this room and makes both doors gray and unlockable by killing the enemies.",
"Once the enemies actually spawn, they can be killed with just Power Beam.",
"Killing the enemies, which makes the doors start flashing is what causes the flag to be set."
],
"link": [
1,
1
],
"setsFlags": [
"f_ZebesAwake",
"f_ClearedPitRoom"
]
},
{
"link": [
2,
2
],
"name": "Base (Unlock Door)",
"requires": [],
"unlocksDoors": [
{
"types": [
"ammo"
],
"requires": []
}
],
"flashSuitChecked": true,
"blueSuitChecked": true
},
{
"link": [
2,
2
],
"name": "Base (Come In Normally)",
"entranceCondition": {
"comeInNormally": {}
},
"requires": [],
"flashSuitChecked": true,
"blueSuitChecked": true
},
{
"link": [
2,
2
],
"name": "Base (Come In With Mockball)",
"entranceCondition": {
"comeInWithMockball": {
"adjacentMinTiles": 0,
"remoteAndLandingMinTiles": [
[
0,
0
]
],
"speedBooster": "any"
}
},
"requires": [],
"flashSuitChecked": true,
"blueSuitChecked": true
},
{
"name": "Base",
"requires": [
{
"or": [
{
"and": [
"Missile",
"Morph",
"canAwakenZebes"
]
},
"h_allItemsSpawned"
]
}
],
"flashSuitChecked": true,
"blueSuitChecked": true,
"note": "Item doesn't spawn unless Samus has Morph and Missiles, even if Zebes is awake.",
"devNote": "canAwakenZebes is included to indicate the knowledge for how to spawn the item, the tech's description discusses this item as well.",
"link": [
3,
3
],
"collectsItems": [
3
]
},
{
"id": 1,
"link": [
1,
1
],
"name": "Leave with Runway",
"requires": [
{
  "obstaclesNotCleared": [
    "A"
  ]
}
],
"exitCondition": {
"leaveWithRunway": {
"length": 8,
"openEnd": 1
}
},
"flashSuitChecked": true,
"blueSuitChecked": true
},
{
"id": 2,
"link": [
1,
1
],
"name": "Leave with Runway, Broken Floor",
"requires": [],
"exitCondition": {
"leaveWithRunway": {
"length": 4,
"openEnd": 1
}
},
"flashSuitChecked": true,
"blueSuitChecked": true
},
{
"id": 3,
"link": [
1,
1
],
"name": "Crystal Flash",
"requires": [
"h_CrystalFlash"
],
"clearsObstacles": [
"A"
],
"flashSuitChecked": true,
"blueSuitChecked": true
},
{
"id": 30,
"link": [
1,
1
],
"name": "Come in Shinecharging, Crystal Spark",
"entranceCondition": {
"comeInShinecharging": {
"length": 7,
"openEnd": 0
},
"comesInHeated": "no"
},
"requires": [
"h_CrystalSpark"
],
"flashSuitChecked": true,
"blueSuitChecked": true
},
{
"id": 4,
"link": [
1,
2
],
"name": "Base",
"requires": [],
"flashSuitChecked": true,
"blueSuitChecked": true
},
{
"id": 5,
"link": [
1,
2
],
"name": "Come in Shinecharging, Leave With Temporary Blue",
"entranceCondition": {
"comeInShinecharging": {
"length": 7,
"openEnd": 0
}
},
"requires": [
"canLongChainTemporaryBlue",
"canInsaneJump"
],
"exitCondition": {
"leaveWithTemporaryBlue": {}
},
"unlocksDoors": [
{
"types": [
"ammo"
],
"requires": []
}
],
"flashSuitChecked": true,
"blueSuitChecked": true
},
{
"id": 6,
"link": [
1,
3
],
"name": "Base",
"requires": [
{
  "or": [
    "h_destroyBombWalls",
    {
      "obstaclesCleared": [
        "A"
      ]
    }
  ]
}
],
"clearsObstacles": [
"A"
],
"flashSuitChecked": true,
"blueSuitChecked": true
},
{
"id": 31,
"link": [
1,
3
],
"name": "Blue Suit",
"requires": [
{
  "haveBlueSuit": {}
}
],
"clearsObstacles": [
"A"
],
"flashSuitChecked": true,
"blueSuitChecked": true
},
{
"id": 7,
"link": [
1,
3
],
"name": "Temporary Blue (Come In Shinecharging)",
"entranceCondition": {
"comeInShinecharging": {
"length": 3,
"openEnd": 1
}
},
"requires": [
"canTemporaryBlue"
],
"clearsObstacles": [
"A"
],
"flashSuitChecked": true,
"blueSuitChecked": true,
"note": "Breaking the side blocks can be done with a shinespark, or by moving into them once past the solid blocks."
},
{
"id": 8,
"link": [
1,
3
],
"name": "Temporary Blue With X-Ray (Come In Shinecharging)",
"entranceCondition": {
"comeInShinecharging": {
"length": 7,
"openEnd": 0
}
},
"requires": [
"canChainTemporaryBlue",
"canXRayTurnaround"
],
"clearsObstacles": [
"A"
],
"flashSuitChecked": true,
"blueSuitChecked": true,
"note": "Breaking the side blocks can be done by moving into them once past the solid blocks."
},
{
"id": 9,
"link": [
1,
3
],
"name": "Temporary Blue (Come In With Temporary Blue)",
"entranceCondition": {
"comeInWithTemporaryBlue": {}
},
"requires": [
"canChainTemporaryBlue"
],
"clearsObstacles": [
"A"
],
"flashSuitChecked": true,
"blueSuitChecked": true
},
{
"id": 10,
"link": [
1,
3
],
"name": "G-Mode Morph to Bomb the Bomb Blocks",
"entranceCondition": {
"comeInWithGMode": {
"mode": "any",
"morphed": true
}
},
"requires": [
"canComplexGMode",
"h_artificialMorphBombs",
"canTrickyJump"
],
"clearsObstacles": [
"A"
],
"flashSuitChecked": true,
"blueSuitChecked": true,
"note": [
"Overload PLMs using the scroll block directly above the bomb block leading down to the item.",
"Carefully land on the solid block and avoid falling further.",
"Use a Bomb to boost Samus, then on the descent place one in the air, one on the ground, and quickly use X-Ray before they explode to exit G-mode and break the blocks."
]
},
{
"id": 11,
"link": [
1,
3
],
"name": "G-Mode Morph to Power Bomb the Bomb Blocks",
"entranceCondition": {
"comeInWithGMode": {
"mode": "any",
"morphed": true
}
},
"requires": [
"h_artificialMorphPowerBomb"
],
"clearsObstacles": [
"A"
],
"flashSuitChecked": true,
"blueSuitChecked": true,
"note": "Lay a Power Bomb to break the bomb blocks leading down to the item, then use X-ray to cancel G-mode, to clear the blocks."
},
{
"id": 12,
"link": [
1,
3
],
"name": "G-Mode Through the Bomb Blocks",
"entranceCondition": {
"comeInWithGMode": {
"mode": "any",
"morphed": false
}
},
"requires": [],
"flashSuitChecked": true,
"blueSuitChecked": true,
"note": [
"Overload PLMs using the scroll block directly above the bomb block leading down to the item.",
"Using X-Ray to cancel G-mode will lead to a soft lock if the item there can't be used to get Samus out."
]
},
{
"id": 13,
"link": [
2,
1
],
"name": "Base",
"requires": [],
"flashSuitChecked": true,
"blueSuitChecked": true
},
{
"id": 14,
"link": [
2,
1
],
"name": "Come in Shinecharging, Leave With Temporary Blue",
"entranceCondition": {
"comeInShinecharging": {
"length": 2,
"openEnd": 0
}
},
"requires": [
"canLongChainTemporaryBlue",
"canInsaneJump"
],
"exitCondition": {
"leaveWithTemporaryBlue": {}
},
"unlocksDoors": [
{
"types": [
"ammo"
],
"requires": []
}
],
"flashSuitChecked": true,
"blueSuitChecked": true
},
{
"id": 15,
"link": [
2,
1
],
"name": "Grapple Teleport Door Lock Skip",
"entranceCondition": {
"comeInWithGrappleTeleport": {
"blockPositions": [
[
3,
12
],
[
3,
13
]
]
}
},
"requires": [],
"bypassesDoorShell": "yes",
"flashSuitChecked": true,
"blueSuitChecked": true
},
{
"id": 16,
"link": [
2,
1
],
"name": "Carry Grapple Teleport (Top Position)",
"entranceCondition": {
"comeInWithGrappleTeleport": {
"blockPositions": [
[
3,
12
]
]
}
},
"requires": [],
"exitCondition": {
"leaveWithGrappleTeleport": {
"blockPositions": [
[
3,
12
]
]
}
},
"bypassesDoorShell": "yes",
"flashSuitChecked": true,
"blueSuitChecked": true
},
{
"id": 17,
"link": [
2,
1
],
"name": "Carry Grapple Teleport (Bottom Position)",
"entranceCondition": {
"comeInWithGrappleTeleport": {
"blockPositions": [
[
3,
13
]
]
}
},
"requires": [],
"exitCondition": {
"leaveWithGrappleTeleport": {
"blockPositions": [
[
3,
13
]
]
}
},
"bypassesDoorShell": "yes",
"flashSuitChecked": true,
"blueSuitChecked": true
},
{
"id": 18,
"link": [
2,
2
],
"name": "Leave with Runway",
"requires": [],
"exitCondition": {
"leaveWithRunway": {
"length": 3,
"openEnd": 1
}
},
"flashSuitChecked": true,
"blueSuitChecked": true
},
{
"id": 19,
"link": [
2,
2
],
"name": "Space Pirate Farm (Both Doors)",
"requires": [
"Morph",
"Missile",
{
"resetRoom": {
"nodes": [
1
]
}
},
{
"resetRoom": {
"nodes": [
2
]
}
},
{
"cycleFrames": 930
},
{
"or": [
"canDash",
{
"cycleFrames": 270
}
]
}
],
"resetsObstacles": [
"A"
],
"farmCycleDrops": [
{
"enemy": "Grey Space Pirate (standing)",
"count": 8
},
{
"enemy": "Grey Space Pirate (wall)",
"count": 2
}
],
"flashSuitChecked": true,
"blueSuitChecked": true
},
{
"id": 29,
"link": [
2,
2
],
"name": "Space Pirate Farm (Single Door)",
"requires": [
"Morph",
"Missile",
{
"or": [
{
"resetRoom": {
"nodes": [
1
]
}
},
{
"resetRoom": {
"nodes": [
2
]
}
}
]
},
{
"cycleFrames": 930
},
{
"or": [
"canDash",
{
"cycleFrames": 160
}
]
}
],
"resetsObstacles": [
"A"
],
"farmCycleDrops": [
{
"enemy": "Grey Space Pirate (standing)",
"count": 4
},
{
"enemy": "Grey Space Pirate (wall)",
"count": 1
}
],
"flashSuitChecked": true,
"blueSuitChecked": true,
"note": "This strat is slower but only requires one of the two doors to be unlocked."
},
{
"id": 20,
"link": [
2,
2
],
"name": "G-Mode Regain Mobility",
"requires": [
{
"enemyDamage": {
"enemy": "Grey Space Pirate (wall)",
"type": "contact",
"hits": 1
}
},
"Missile",
"Morph"
],
"gModeRegainMobility": {},
"flashSuitChecked": true,
"blueSuitChecked": true,
"note": "The enemies do not spawn in this room unless Missiles and Morph are collected (even if Zebes is awake)."
},
{
"id": 21,
"link": [
2,
3
],
"name": "Full Room Temporary Blue (Come in Shinecharging)",
"entranceCondition": {
"comeInShinecharging": {
"length": 1,
"openEnd": 1
}
},
"requires": [
"canTemporaryBlue",
"canInsaneJump",
{
"or": [
"canLongChainTemporaryBlue",
{
"and": [
"canSpeedball",
"canSpringBallBounce",
"canSlowShortCharge"
]
},
{
"and": [
"canBlueSpaceJump",
"canMockball",
"canSlowShortCharge"
]
}
]
}
],
"clearsObstacles": [
"A"
],
"flashSuitChecked": true,
"blueSuitChecked": true,
"note": "Bring temporary blue from the right side door all the way to the missile location using Springball, SpaceJump, or Morph-UnMorphs.",
"devNote": "There is 1 unusable tile in this runway."
},
{
"id": 22,
"link": [
2,
3
],
"name": "Full Room Temporary Blue (Come in With Temporary Blue)",
"entranceCondition": {
"comeInWithTemporaryBlue": {}
},
"requires": [
"canLongChainTemporaryBlue",
"canInsaneJump"
],
"clearsObstacles": [
"A"
],
"flashSuitChecked": true,
"blueSuitChecked": true
},
{
"id": 23,
"link": [
2,
3
],
"name": "G-Mode Through the Bomb Blocks",
"entranceCondition": {
"comeInWithGMode": {
"mode": "any",
"morphed": false
}
},
"requires": [],
"flashSuitChecked": true,
"blueSuitChecked": true,
"note": [
"Be careful not to touch any of the pirates spawned lasers.",
"Overload PLMs using the scroll block directly above the bomb block leading down to the item.",
"Using X-Ray to cancel G-mode will lead to a soft lock if the item there can't be used to get Samus out."
]
},
{
"id": 24,
"link": [
2,
3
],
"name": "G-Mode Morph to Bomb the Bomb Blocks",
"entranceCondition": {
"comeInWithGMode": {
"mode": "any",
"morphed": true
}
},
"requires": [
"canComplexGMode",
"h_artificialMorphIBJ",
"canTrickyJump"
],
"clearsObstacles": [
"A"
],
"flashSuitChecked": true,
"blueSuitChecked": true,
"note": [
"Without Morph, the pirates will not spawn.",
"Overload PLMs using the scroll block directly above the bomb block leading down to the item.",
"Carefully land on the solid block and avoid falling further.",
"Use a Bomb to boost Samus, then on the descent place one in the air, one on the ground, and quickly use X-Ray before they explode to exit G-mode and break the blocks."
]
},
{
"id": 25,
"link": [
2,
3
],
"name": "G-Mode Morph to Power Bomb the Bomb Blocks",
"entranceCondition": {
"comeInWithGMode": {
"mode": "any",
"morphed": true
}
},
"requires": [
"h_artificialMorphBombHorizontally",
"h_artificialMorphPowerBomb",
"h_artificialMorphPowerBomb",
"h_artificialMorphPowerBomb",
{
"or": [
"h_artificialMorphPowerBomb",
"canTrickyJump"
]
}
],
"clearsObstacles": [
"A"
],
"flashSuitChecked": true,
"blueSuitChecked": true,
"note": [
"Without Morph, the pirates will not spawn.",
"Use Power Bomb horizontal boosts to move toward the left side of the room in artificial morph.",
"Roll off the third blue platform from the right door and lay a Power Bomb against the left wall to get into range of the bomb blocks.",
"Unmorph and use X-ray to cancel G-mode. It may be best to do this before the PB explodes, in case PLMs are already overloaded."
]
},
{
"id": 26,
"link": [
2,
3
],
"name": "G-Mode Morph Spring Ball to Power Bomb the Bomb Blocks",
"entranceCondition": {
"comeInWithGMode": {
"mode": "any",
"morphed": true
}
},
"requires": [
"h_artificialMorphSpringBall",
"h_artificialMorphPowerBomb"
],
"clearsObstacles": [
"A"
],
"flashSuitChecked": true,
"blueSuitChecked": true,
"note": [
"Without Morph, the pirates will not spawn.",
"While near the bomb blocks, use a Power Bomb and then use X-ray to cancel G-mode, which will clear the blocks."
]
},
{
"id": 27,
"link": [
2,
3
],
"name": "Grapple Teleport",
"entranceCondition": {
"comeInWithGrappleTeleport": {
"blockPositions": [
[
2,
18
],
[
2,
19
],
[
2,
28
],
[
2,
29
]
]
}
},
"requires": [],
"flashSuitChecked": true,
"blueSuitChecked": true
},
{
"id": 28,
"link": [
3,
1
],
"name": "Base",
"requires": [
{
  "or": [
    {
      "obstaclesCleared": [
        "A"
      ]
    },
    "h_destroyBombWalls"
  ]
}
],
"flashSuitChecked": true,
"blueSuitChecked": true
},
{
"id": 33,
"link": [
3,
1
],
"name": "Blue Suit",
"requires": [
{
  "haveBlueSuit": {}
}
],
"clearsObstacles": [
"A"
],
"flashSuitChecked": true,
"blueSuitChecked": true
}
],
"notables": [],
"nextStratId": 34,
"nextNotableId": 1
}