Landing Site: Big Jump with Blue Speed (Expert)
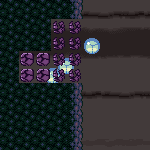
Use the runway near the top right door to jump towards the top left bomb blocks and break them using the blue speed from SpeedBooster. This can be done using the full runway, with a one-tap shortcharge, where the tap is at the top of the lowest slope, and the jump is at the top of the last slope. Alternatively, a controlled release of the jump button works in place of the shortcharge, where the bottom of the thick dark line in the background at the top of the room works as a visual cue. Aiming down or morphing before hitting the wall can help make the jump slightly less precise.
Strats ()
|


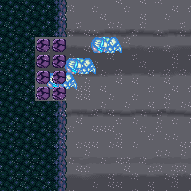
Use the runway near the Power Bomb room door to jump to the left, morphing as Samus begins descending, to bounce through the Bomb blocks. Any time while bouncing, hold an angle button and unmorph to gain temporary blue; then chain it to reach the door with temporary blue. The jump can be set up by using the full runway with a one-tap shortcharge, with the tap being at the top of the lowest slope. Requires: {
"notable": "Big Jump with Blue Speed"
}
{
"notable": "Big Jump Leave With Temporary Blue"
}
"canTrickyJump"
"Morph"
"canLateralMidAirMorph"
{
"getBlueSpeed": {
"usedTiles": 30,
"openEnd": 2
}
}
"h_blueJump"
"canLongChainTemporaryBlue"Exit condition: {
"leaveWithTemporaryBlue": {}
}Unlocks doors: {"types":["ammo"],"requires":[]} |
|
Use the runway near the top right door to jump towards the top left bomb blocks and break them using the blue speed from SpeedBooster. This can be done using the full runway, with a one-tap shortcharge, where the tap is at the top of the lowest slope, and the jump is at the top of the last slope. Alternatively, a controlled release of the jump button works in place of the shortcharge, where the bottom of the thick dark line in the background at the top of the room works as a visual cue. Aiming down or morphing before hitting the wall can help make the jump slightly less precise. Note that it is possible to jump all the way to the ledge above the bomb blocks, place a Power Bomb, then drop down, but it isn't typically easier. Requires: {
"notable": "Big Jump with Blue Speed"
}
"canTrickyJump"
{
"or": [
{
"obstaclesCleared": [
"A"
]
},
"h_bombThings"
]
}
{
"getBlueSpeed": {
"usedTiles": 30,
"openEnd": 2
}
}
"h_blueJump"Clears obstacles: A |
|
Use the runway near the top right door to jump towards the top left bomb blocks and break them using the blue speed from SpeedBooster. This can be done using the full runway, with a one-tap shortcharge, where the tap is at the top of the lowest slope, and the jump is at the top of the last slope. Alternatively, a controlled release of the jump button works in place of the shortcharge, where the bottom of the thick dark line in the background at the top of the room works as a visual cue. While midair, morph once Samus begins descending to bounce through all of the Bomb blocks. Requires: {
"notable": "Big Jump with Blue Speed"
}
"canTrickyJump"
"Morph"
"canLateralMidAirMorph"
{
"getBlueSpeed": {
"usedTiles": 30,
"openEnd": 2
}
}
"h_blueJump"Clears obstacles: A |
|
Use the runway near the top right door to jump towards the top left bomb blocks and break them using the blue speed from SpeedBooster. This can be done using the full runway, with a one-tap shortcharge, where the tap is at the top of the lowest slope, and the jump is at the top of the last slope. Alternatively, a controlled release of the jump button works in place of the shortcharge, where the bottom of the thick dark line in the background at the top of the room works as a visual cue. Aiming down before hitting the wall can help make the jump slightly less precise. Use a flash suit to get through the remaining blocks. Requires: {
"notable": "Big Jump with Blue Speed"
}
{
"getBlueSpeed": {
"usedTiles": 30,
"openEnd": 2
}
}
"h_blueJump"
{
"useFlashSuit": {}
}
{
"shinespark": {
"frames": 52,
"excessFrames": 45
}
}Clears obstacles: A |