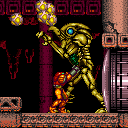
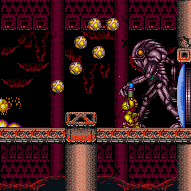
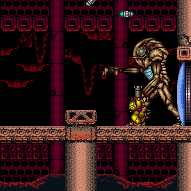
Golden Torizo's Room: Safe Spot Kill (Very Hard)

The ability to get into the safe spot in the Golden Torizo fight, where Samus can attack while being safe from GT's standard attacks. To get into the safe spot near the door: Stand on the left side of the floor pillar for GT to jump back. Then stand to the right of the nearby background pillar. Shoot Golden Torizo by facing right and firing up. Farm drops by turning around to face left and firing up with no wide beams equipped.
Strats ()
From: 1
Left Door
To: 2
Right Door


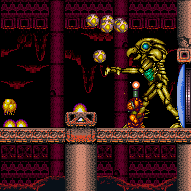
Manipulate into the GT Safe Spot and farm for energy. Keep your Missiles below 30 to force the attack pattern that has drops. Taking damage to get ready for the interrupt may require leaving the safe spot. Leave enough to survive one hit from GT. Push GT back into the corner, run into and through to get your shinecharge. Come back and interrupt using whatever attack pattern is happening. After you gain blue suit, you'll need to use any standard kill strategy. Blue suit will not help with defeating GT except for invulnerability. Entrance condition: {
"comeInWithRMode": {}
}Requires: {
"not": "f_DefeatedGoldenTorizo"
}
"canRiskPermanentLossOfAccess"
{
"heatFrames": 700
}
{
"notable": "Safe Spot Kill"
}
{
"or": [
"h_heatProof",
{
"and": [
"Plasma",
{
"resourceMaxCapacity": [
{
"type": "Missile",
"count": 30
}
]
},
{
"resourceMaxCapacity": [
{
"type": "RegularEnergy",
"count": 99
}
]
}
]
}
]
}
{
"refill": [
"ReserveEnergy"
]
}
{
"enemyDamage": {
"enemy": "Golden Torizo",
"type": "contact",
"hits": 1
}
}
"canUseIFrames"
{
"canShineCharge": {
"usedTiles": 28,
"openEnd": 0
}
}
{
"autoReserveTrigger": {
"maxReserveEnergy": 95
}
}
"canRModeSparkInterrupt" |
From: 2
Right Door
To: 2
Right Door
Start the fight with 31 Missiles or fewer in order to prevent GT from using its laser attack, which will enable Samus to stand next to it. With more than 31 Missiles, Samus will have a 2 pixel window in which she must quickly get into to prevent touching GT or his lasers. Wait long enough for the flag to be set, then Samus can then leave the room without exiting G-mode. Entrance condition: {
"comeInWithGMode": {
"mode": "direct",
"morphed": false
}
}Requires: "h_heatedGMode"
{
  "notable": "Safe Spot Kill"
}
{
  "or": [
    {
      "resourceAtMost": [
        {
          "type": "Missile",
          "count": 31
        }
      ]
    },
    "canComplexGMode"
  ]
}
{
  "or": [
    {
      "ammo": {
        "type": "Super",
        "count": 30
      }
    },
    {
      "and": [
        "Charge",
        {
          "or": [
            "canBeVeryPatient",
            {
              "and": [
                "canBePatient",
                "Wave"
              ]
            },
            {
              "and": [
                "canBePatient",
                "Spazer"
              ]
            },
            "Plasma",
            {
              "and": [
                "canBePatient",
                {
                  "ammo": {
                    "type": "Super",
                    "count": 15
                  }
                }
              ]
            }
          ]
        }
      ]
    }
  ]
}
{
  "heatFrames": 0
}Exit condition: {
"leaveWithGMode": {
"morphed": false
}
}Clears obstacles: f_DefeatedGoldenTorizo, door_2 Sets flags: f_DefeatedGoldenTorizo |
From: 2
Right Door
To: 2
Right Door
Manipulate into the GT Safe Spot and farm for energy. Keep your Missiles below 30 to force the attack pattern that has drops. Taking damage to get ready for the interrupt may require leaving the safe spot. Leave enough to survive one hit from GT. Push GT back into the corner, run into and through to get your shinecharge. Come back and interrupt using whatever attack pattern is happening. After you gain blue suit, you'll need to use any standard kill strategy. Blue suit will not help with defeating GT except for invulnerability. Entrance condition: {
"comeInWithRMode": {}
}Requires: {
"not": "f_DefeatedGoldenTorizo"
}
"canRiskPermanentLossOfAccess"
{
"heatFrames": 540
}
{
"notable": "Safe Spot Kill"
}
{
"or": [
"h_heatProof",
{
"resourceMaxCapacity": [
{
"type": "Missile",
"count": 30
}
]
}
]
}
{
"refill": [
"Energy"
]
}
{
"enemyDamage": {
"enemy": "Golden Torizo",
"type": "contact",
"hits": 1
}
}
"canUseIFrames"
{
"canShineCharge": {
"usedTiles": 28,
"openEnd": 0
}
}
{
"autoReserveTrigger": {
"maxReserveEnergy": 95
}
}
"canRModeSparkInterrupt"Clears obstacles: door_2 |
From: 2
Right Door
To: 2
Right Door
Start the fight with 31 Missiles or fewer in order to prevent GT from using its laser attack, which will enable Samus to stand next to it. Having GT start with his Chozo Ball attack also will make it so there are drops which can be collected at the end of the fight, otherwise they will have been overloaded. Pause abuse and jump to collect the drops on G-mode exit. Entrance condition: {
"comeInWithGMode": {
"mode": "indirect",
"morphed": false
}
}Requires: {
"notable": "Safe Spot Kill"
}
{
"resourceAtMost": [
{
"type": "Missile",
"count": 31
}
]
}
{
"or": [
{
"ammo": {
"type": "Super",
"count": 30
}
},
{
"and": [
"Charge",
{
"or": [
"canBeVeryPatient",
{
"and": [
"canBePatient",
"Wave"
]
},
{
"and": [
"canBePatient",
"Spazer"
]
},
"Plasma",
{
"and": [
"canBePatient",
{
"ammo": {
"type": "Super",
"count": 15
}
}
]
}
]
}
]
}
]
}
{
"or": [
"h_heatedIndirectGModeOpenSameDoor",
"h_heatedGModePauseAbuse"
]
}Clears obstacles: f_DefeatedGoldenTorizo, door_2 Sets flags: f_DefeatedGoldenTorizo |
From: 2
Right Door
To: 2
Right Door
With more than 31 Missiles, Samus will have a 2 pixel window in which she must quickly get into to prevent touching GT or his lasers. Having GT start with his laser attack will also make it so there are no drops which can be collected at the end of the fight. Entrance condition: {
"comeInWithGMode": {
"mode": "indirect",
"morphed": false
}
}Requires: {
"notable": "Safe Spot Kill"
}
"canComplexGMode"
{
"or": [
{
"ammo": {
"type": "Super",
"count": 30
}
},
{
"and": [
"Charge",
{
"or": [
"canBeVeryPatient",
{
"and": [
"canBePatient",
"Wave"
]
},
{
"and": [
"canBePatient",
"Spazer"
]
},
"Plasma",
{
"and": [
"canBePatient",
{
"ammo": {
"type": "Super",
"count": 15
}
}
]
}
]
}
]
}
]
}
"h_heatedIndirectGModeOpenSameDoor"Clears obstacles: f_DefeatedGoldenTorizo, door_2 Sets flags: f_DefeatedGoldenTorizo |
|
Stand a specific distance away from Golden Torizo so that it takes a step before jumping backwards. When it uses the eye lazer attack, it will not be able to avoid missiles. Farm drops following every jump backwards. At low health Golden Torizo will do a bird attack and that must be interuppted preemptively because it is difficult to dodge. Requires: {
"notable": "Safe Spot Kill"
}
{
"notable": "Missiles Only Kill"
}
"h_heatProof"
{
"resourceCapacity": [
{
"type": "Missile",
"count": 5
}
]
}
"canBeExtremelyPatient"Clears obstacles: f_DefeatedGoldenTorizo Sets flags: f_DefeatedGoldenTorizo |
|
Killing Golden Torizo only with missiles using enemy state manipulation to get missiles to connect. This can be done by rolling under GT, triggering the sit attack, and then shooting missiles during the stand up animation. By pushing GT to the door and rolling into the door during a jump back, the sit can reliably be manipulated. But this setup is subpixel dependant and harder to setup again if GT moves unexpectidly. Use of the safe spot is expected. Keep missiles below 31 to control the fight. This fight takes multiple minutes. Requires: {
"notable": "Safe Spot Kill"
}
{
"notable": "Missiles Only Kill"
}
"h_heatProof"
"Morph"
{
"resourceCapacity": [
{
"type": "Missile",
"count": 15
}
]
}
{
"or": [
{
"resourceCapacity": [
{
"type": "RegularEnergy",
"count": 199
}
]
},
{
"resourceCapacity": [
{
"type": "ReserveEnergy",
"count": 100
}
]
}
]
}
"canBeVeryPatient"Clears obstacles: f_DefeatedGoldenTorizo Sets flags: f_DefeatedGoldenTorizo Dev note: It is easy to make mistakes with this strat, so some capacity is given for leniency. You can farm up resources readily enough. |
|
Stand in the safe spot and fire Charge shots into GT. Requires: {
"or": [
{
"notable": "Safe Spot Kill"
},
{
"and": [
{
"notable": "Safe Spot Kill (Lenient)"
},
{
"resourceAtMost": [
{
"type": "Missile",
"count": 31
}
]
},
{
"enemyDamage": {
"enemy": "Golden Torizo",
"type": "contact",
"hits": 1
}
}
]
}
]
}
"Charge"
"Wave"
"Plasma"
{
"heatFrames": 1400
}Clears obstacles: f_DefeatedGoldenTorizo Sets flags: f_DefeatedGoldenTorizo |
|
Stand in the safe spot and fire Charge shots into GT. Requires: {
"or": [
{
"notable": "Safe Spot Kill"
},
{
"and": [
{
"notable": "Safe Spot Kill (Lenient)"
},
{
"resourceAtMost": [
{
"type": "Missile",
"count": 31
}
]
},
{
"enemyDamage": {
"enemy": "Golden Torizo",
"type": "contact",
"hits": 1
}
}
]
}
]
}
"Charge"
"Plasma"
{
"heatFrames": 2000
}Clears obstacles: f_DefeatedGoldenTorizo Sets flags: f_DefeatedGoldenTorizo |
|
Stand in the safe spot and fire Charge shots into GT. Requires: {
"or": [
{
"notable": "Safe Spot Kill"
},
{
"and": [
{
"notable": "Safe Spot Kill (Lenient)"
},
{
"resourceAtMost": [
{
"type": "Missile",
"count": 31
}
]
},
{
"enemyDamage": {
"enemy": "Golden Torizo",
"type": "contact",
"hits": 1
}
}
]
}
]
}
"Charge"
"Ice"
"Wave"
"Plasma"
{
"heatFrames": 1250
}Clears obstacles: f_DefeatedGoldenTorizo Sets flags: f_DefeatedGoldenTorizo |
|
Stand in the safe spot and fire Charge shots into GT. Requires: {
"or": [
{
"notable": "Safe Spot Kill"
},
{
"and": [
{
"notable": "Safe Spot Kill (Lenient)"
},
{
"resourceAtMost": [
{
"type": "Missile",
"count": 31
}
]
},
{
"enemyDamage": {
"enemy": "Golden Torizo",
"type": "contact",
"hits": 1
}
}
]
}
]
}
"Charge"
"Ice"
"Wave"
"Spazer"
{
"heatFrames": 4000
}Clears obstacles: f_DefeatedGoldenTorizo Sets flags: f_DefeatedGoldenTorizo |
|
Stand in the safe spot and fire Charge shots into GT. Requires: {
"or": [
{
"notable": "Safe Spot Kill"
},
{
"and": [
{
"notable": "Safe Spot Kill (Lenient)"
},
{
"resourceAtMost": [
{
"type": "Missile",
"count": 31
}
]
},
{
"enemyDamage": {
"enemy": "Golden Torizo",
"type": "contact",
"hits": 1
}
}
]
}
]
}
"h_heatProof"
"Charge"
"canBeVeryPatient"Clears obstacles: f_DefeatedGoldenTorizo Sets flags: f_DefeatedGoldenTorizo |
|


Farm supers to use throughout the fight. Requires: {
"notable": "Safe Spot Kill"
}
"h_heatProof"
"Super"Clears obstacles: f_DefeatedGoldenTorizo Sets flags: f_DefeatedGoldenTorizo Dev note: Supers are farmable here, so no ammo requirement. |
|
This strat is assuming no farming. It requires 30 supers, but can be done with 29. This requires a very steady fire rate so that for every Super Missile caught by GT, the next 4 Supers do damage. Requires: {
"notable": "Safe Spot Kill"
}
"h_navigateHeatRooms"
{
"heatFrames": 1200
}
{
"ammo": {
"type": "Super",
"count": 30
}
}Clears obstacles: f_DefeatedGoldenTorizo Sets flags: f_DefeatedGoldenTorizo Dev note: No farming expected because that would change the heat frames. Supers count hard-coded because of GT's inherent 'dodging' ability. We could use an enemyKill if this were integrated into the enemy definition. It actually takes 29 supers but giving 1 extra in leniency since it's easy to miss. |
|


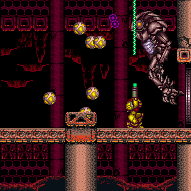
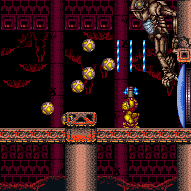
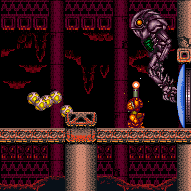
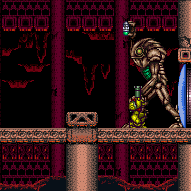
This strat requires some farming. It assumes starting with 15 supers for one session of farming. A safe farming method is to face left while standing in the safe spot. Then fire straight up to shoot the orbs as they appear. Jump up while GT's beak is not open to collect the drops. Plasma allows all of the orbs to be broken at once. Grapple allows for more drops to be collected by shooting diagonally, and collecting the items using Grapple. Keep the number of current Missiles below 31 so that GT will be guaranteed to use the attack which creates drops. Firing Supers requires a very steady fire rate so that for every Super Missile caught by GT, the next 4 Supers do damage. Requires: {
"notable": "Safe Spot Kill"
}
"h_navigateHeatRooms"
"canTrickyJump"
{
"ammo": {
"type": "Super",
"count": 15
}
}
{
"or": [
{
"and": [
"Plasma",
{
"heatFrames": 2700
}
]
},
{
"and": [
"canPreciseGrapple",
{
"heatFrames": 2700
}
]
},
{
"heatFrames": 3200
}
]
}Clears obstacles: f_DefeatedGoldenTorizo Sets flags: f_DefeatedGoldenTorizo Dev note: Listed Heat frames have been reduced by accounting for health drops. |
From: 2
Right Door
To: 2
Right Door
This strat requires much farming. It assumes a capacity of and starting with only 5 supers for five sessions of farming. A safe farming method is to face left while standing in the safe spot. Then fire straight up to shoot the orbs as they appear. Jump up while GT's beak is not open to collect the drops. Plasma allows all of the orbs to be broken at once. Grapple allows for more drops to be collected by shooting diagonally, and collecting the items using Grapple. Keep the number of current Missiles below 31 so that GT will be guaranteed to use the attack which creates drops. Firing Supers requires a very steady fire rate so that for every Super Missile caught by GT, the next 4 Supers do damage. Requires: {
"notable": "Safe Spot Kill"
}
"h_navigateHeatRooms"
"canTrickyJump"
"canBePatient"
{
"ammo": {
"type": "Super",
"count": 5
}
}
{
"or": [
{
"and": [
"Plasma",
{
"heatFrames": 3100
}
]
},
{
"and": [
"canPreciseGrapple",
{
"heatFrames": 3200
}
]
},
{
"heatFrames": 4500
}
]
}Clears obstacles: f_DefeatedGoldenTorizo Sets flags: f_DefeatedGoldenTorizo Dev note: Listed Heat frames have been reduced by accounting for health drops. |
|
Stand in the safe spot and fire Charge shots into GT. Requires: {
"or": [
{
"notable": "Safe Spot Kill"
},
{
"and": [
{
"notable": "Safe Spot Kill (Lenient)"
},
{
"resourceAtMost": [
{
"type": "Missile",
"count": 31
}
]
},
{
"enemyDamage": {
"enemy": "Golden Torizo",
"type": "contact",
"hits": 1
}
}
]
}
]
}
"Charge"
{
"heatFrames": 6500
}
{
"or": [
{
"and": [
"Ice",
"Wave"
]
},
{
"and": [
"Ice",
"Spazer"
]
},
{
"and": [
"Wave",
"Spazer"
]
}
]
}Clears obstacles: f_DefeatedGoldenTorizo Sets flags: f_DefeatedGoldenTorizo |
From: 2
Right Door
To: 7
G-Mode Junction (Bottom of Room)
Start the fight with 31 Missiles or fewer in order to prevent GT from using its laser attack, which will enable Samus to stand next to it. Having GT start with his Chozo Ball attack also will make it so there are drops which can be collected at the end of the fight, otherwise they will have been overloaded. With more than 31 Missiles, Samus will have a 2 pixel window in which she must quickly get into to prevent touching GT or his lasers. If GT starts with his laser attack, be sure to carefully jump over them before doing something else in the room. Entrance condition: {
"comeInWithGMode": {
"mode": "any",
"morphed": false
}
}Requires: {
"notable": "Safe Spot Kill"
}
{
"or": [
{
"resourceAtMost": [
{
"type": "Missile",
"count": 31
}
]
},
"canComplexGMode"
]
}
{
"or": [
{
"ammo": {
"type": "Super",
"count": 30
}
},
{
"and": [
"Charge",
{
"or": [
"canBeVeryPatient",
{
"and": [
"canBePatient",
"Wave"
]
},
{
"and": [
"canBePatient",
"Spazer"
]
},
"Plasma",
{
"and": [
"canBePatient",
{
"ammo": {
"type": "Super",
"count": 15
}
}
]
}
]
}
]
}
]
}
{
"heatFrames": 0
}Clears obstacles: f_DefeatedGoldenTorizo, door_2 Sets flags: f_DefeatedGoldenTorizo Dev note: This exists because Samus can kill GT and stay in G-mode to then do something else in the room. |