Golden Torizo's Room: Right Item Double Shinespark (Very Hard)


One vertical spark is needed to open up the breakable blocks on the right ceiling. Then, a second horizontal spark is performed where those blocks were cleared to reveal the item.
Strats ()
From: 2
Right Door
To: 4
Hidden Right Item
One vertical spark is needed to open up the area directly above. A running jump is used to jump high enough into the revealed hole for a horizontal spark. Requires: {
"notable": "Right Item Double Shinespark"
}
{
"or": [
"f_DefeatedGoldenTorizo",
{
"obstaclesCleared": [
"f_DefeatedGoldenTorizo"
]
}
]
}
"canShinechargeMovementComplex"
"HiJump"
"canSpeedyJump"
{
"canShineCharge": {
"usedTiles": 28,
"openEnd": 0
}
}
{
"heatFrames": 900
}
{
"shinespark": {
"frames": 11,
"excessFrames": 3
}
} |
From: 2
Right Door
To: 4
Hidden Right Item
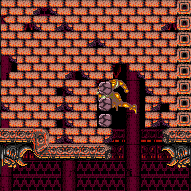
One vertical spark is needed to open up the area directly above. Then, a second horizontal spark is performed where those blocks were cleared. Try to aim for the seam between tiles to break more blocks. And the left side of the opening may be slightly easier. Requires: {
"notable": "Right Item Double Shinespark"
}
{
"or": [
"f_DefeatedGoldenTorizo",
{
"obstaclesCleared": [
"f_DefeatedGoldenTorizo"
]
}
]
}
"canShinechargeMovementComplex"
"canPreciseWallJump"
"canConsecutiveWallJump"
{
"canShineCharge": {
"usedTiles": 28,
"openEnd": 0
}
}
{
"heatFrames": 900
}
{
"shinespark": {
"frames": 12,
"excessFrames": 2
}
} |