Ice Beam Tutorial Room: Impressive Damage Boost (Expert)
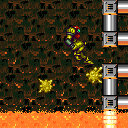
Unmorph with the right timing to damage boost using the Boyon who is closest to the Morph tunnel in order to avoid taking any lava damage.
Strats ()
From: 2
Right Door
To: 1
Left Door

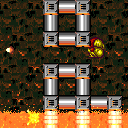
Enter the lava pool as the Ripper touches the left wall. Place a Power Bomb in the corner and boost up into the Ripper to escape. The Power Bomb timing is somewhat lenient, but incorrectly timing it will kill the Ripper and leave Samus in the lava pool. Entrance condition: {
"comeInWithGMode": {
"mode": "any",
"morphed": true
}
}Requires: "canComplexGMode"
"Gravity"
"h_artificialMorphPowerBomb"
"canNeutralDamageBoost"
{
"enemyDamage": {
"enemy": "Ripper 2 (red)",
"type": "contact",
"hits": 1
}
}
"canTrickyJump"
{
"lavaFrames": 140
}
"h_additionalBomb"
{
"or": [
{
"and": [
{
"notable": "Impressive Damage Boost"
},
"canHorizontalDamageBoost",
{
"enemyDamage": {
"enemy": "Boyon",
"type": "contact",
"hits": 1
}
}
]
},
{
"lavaFrames": 25
}
]
}
"h_heatedGModeOpenDifferentDoor" |
|
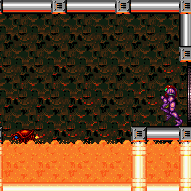
Spring Fling or IBJ across the right pit and damage boost or lava dive in the second; to Spring Fling, jump immediately before the pause triggers. Entrance condition: {
"comeInWithGMode": {
"mode": "any",
"morphed": true
}
}Requires: {
"or": [
"Morph",
{
"and": [
"h_artificialMorphSpringFling",
"canTrickyJump"
]
},
{
"and": [
"h_artificialMorphIBJ",
"h_artificialMorphBombHorizontally"
]
},
{
"and": [
"Gravity",
"h_artificialMorphSpringBall",
{
"lavaFrames": 20
}
]
},
{
"and": [
"h_artificialMorphSpringBall",
{
"lavaFrames": 50
}
]
}
]
}
{
"or": [
{
"and": [
{
"notable": "Impressive Damage Boost"
},
"canHorizontalDamageBoost",
"canTrickyJump",
{
"enemyDamage": {
"enemy": "Boyon",
"type": "contact",
"hits": 1
}
}
]
},
{
"lavaFrames": 90
},
{
"and": [
"Gravity",
{
"lavaFrames": 35
}
]
}
]
}
"h_heatedGModeOpenDifferentDoor" |
|
Unmorph with the right timing to damage boost using the Boyon who is closest to the Morph tunnel in order to avoid taking any lava damage. Requires: {
"notable": "Impressive Damage Boost"
}
"canHorizontalDamageBoost"
"canTrivialMidAirMorph"
"canTrickyJump"
{
"enemyDamage": {
"enemy": "Boyon",
"type": "contact",
"hits": 1
}
}
{
"heatFrames": 220
} |